
Installation Sheet


PAGE 2
4420BF_FTN_A LK4420BF_FTN_A
1000003685 (Rev. C - 03/20)
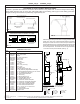
1. This fountain is to be mounted on a smooth, at, nished surface with adequate support structure. NOTE: Mounting structure
must be capable of supporting 300 lb. load on fountain.
2. Refer to rough-in for plumbing.
3. Install shut-o valve on water supply. (Valve not furnished)
4. Locate and install fountain using 3/8" minimum fasteners. (Fasteners not furnished)
5. Prior to installing the bottle ller to the center mounting position of fountain, install the drain pipe (Item #11) by positioning
the short end of drain pipe through mounting plate of bottle ller. Next, place the aesthetic collar (Item # 26) onto the center
mounting position of the fountain ensuring the vertical edge of the collar is upright and the curved edge sits below the mount
ing surface. Mount bottle ller to fountain with collar centered between the two pieces. Secure with supplied hardware.
6. Prior to installing the bottle ller to the arm mount of fountain, insert the drain pipe (Item #10) into the arm tunnel and adjust
drain to lean to the left side of arm when facing button. place the aesthetic collar (Item # 26) onto the arm mounting position
of the fountain ensuring the vertical edge of the collar is upright and the curved edge sits below the mounting surface.
Mount bottle ller to arm with collar centered between the two pieces Install bottle ller to arm being sure drain tube is
above mounting plate of ller. Install ller onto fountain and secure with supplied mounting hardware.
7. Connect water supply and fountain drain. Connect drain waste "Tee" to fountain drain tubes. Connect outlet of "Tee" to
drainage system. Connect Bottle Filler water line to regulator with the supplied 3/8" to 1/4" reducing tting. Water connection
and drain must comply with local codes.
8. Turn on water supply and check all connections for leaks.
9. Water supply 3/8" O.D. unplated copper tube. Waste 1-1/2" IPS. Contractor to supply waste trap and service stop
valve in accordance with local code.
10. Connecting lines to be made of unplated copper and should be thoroughly ushed to remove all foreign matter before
being connected to fountain. This fountain is manufactured in such a manner that it does not in any way cause taste,
odor, color, or sediment problems.
11. Connect fountain to supply line with a shut-o valve and install a 3/8" unplated copper water line between the valve
and the cooler. Remove any burrs from outside of water line. Push the tubes straight into the ttings until they reach a
positive stop, approximately 3/4" (See Fig. 2). DO NOT SOLDER TUBES INSERTED INTO PLASTIC FITTINGS AS
DAMAGE TO THE O-RINGS MAY RESULT.
INSTALLATION INSTRUCTIONS
IMPORTANT
ALL SERVICE TO BE PERFORMED BY AN AUTHORIZED SERVICE PERSON
IMPORTANT! INSTALLER PLEASE NOTE.
THE GROUNDING OF ELECTRICAL EQUIPMENT SUCH AS TELEPHONE, COMPUTERS, ETC. TO WATER LINES
IS A COMMON PROCEDURE. THIS GROUNDING MAY BE IN THE BUILDING OR MAY OCCUR AWAY FROM THE
BUILDING. THIS GROUNDING CAN CAUSE ELECTRICAL FEEDBACK INTO A FOUNTAIN, CREATING AN
ELECTROLYSIS WHICH CAUSES A METALLIC TASTE OR AN INCREASE IN THE METAL CONTENT OF THE
WATER. THIS CONDITION IS AVOIDABLE BY USING THE PROPER MATERIALS AS INDICATED. ANY DRAIN
FITTINGS PROVIDED BY THE INSTALLER SHOULD BE MADE OF PLASTIC TO ELECTRICALLY ISOLATE THE
FOUNTAIN FROM THE BUILDING PLUMBING SYSTEM.