
Installation Sheet


PAGE 4
4405BFFR_FTN_A LK4405BFFR_FTN_A
1000003941 (Rev. D - 03/20)
PUSH BUTTON CABLE
B
C
D
A
FINISHED FLOOR
7"
178mm
10"
254mm
O
3"
76mm
26 1/8"
664mm
6"
152mm
3 1/2"
89mm
1 3/4"
44mm
29 1/8"
740mm
30 9/16"
776mm
1/8"
3mm
19 1/8"
486mm
7 1/4"
184mm
12 1/8"
308mm
4 5/8"
117mm
27 1/8"
689mm
ADA
REQUIREMENT
37 3/16"
944mm
14 9/16"
371mm
57 3/16"
1452mm
8"
203mm
12"
305mm
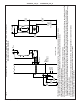
MAX. WALL
THICKNESS
2 5/8"
67mm
3 5/8"
92mm
13 11/16"
348mm
14 11/16"
373mm
18 3/16"
462mm
FINISHED FLOOR
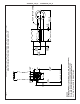
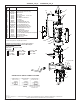
FIG. 2
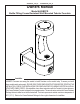
4405BFFR BOTTLE FILLING FREEZE RESISTANT FOUNTAIN
ROUGH-IN DRAWINGS
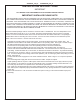
1. Wall should already be framed for the fountain using dimensions shown in Fig. 1. Shown dimensions pertain to installation location.
These dimensions are required for compliance with ANSI Standard A117.1. and ADA (Framing shown for reference only).
2. Remove bottom cover from fountain and save screws.
3. Install the fountain using 3/8" minimum fasteners and washers (not provided). Tighten securely.
4. Prior to installing the bottle ller to the fountain, insert the drain tube (item #4) into the arm tunnel and adjust drain to lean to the left side of the arm when facing the button. Place
the aesthetic collar (item #18) onto the mounting position of the fountain ensuring the vertical edge of the collar is upright and the curved edge sits below the mounting
surface. Mount bottle ller to arm with collar centered between the two pieces. Install bottle ller to arm being sure drain tube is above mounting plate of ller. Install mounting
hardware to secure ller to fountain.
5. Install bottle ller to fountain being sure drain tube is above mounting plate of ller. Install mounting hardware to secure ller to fountian.
6. Attach drain tube to fountain and cut to required length using the freeze resistant box as a guide.
7. Install freeze-resistant box - see box instructions.