
Installation Sheet


Page 3 of 4
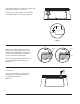
STEP 2: CLEANING AND CAULKING THE SINK
Clean the underside of the glass rim, sink
flange and sealing surface of countertop
opening with denatured alcohol (Figure 6).
Allow to air dry.
Apply a high quality 3/8" wide continuous bead
of black Kitchen & Bath Grade silicone to edge
of glass rim (not furnished) (Figure 7).
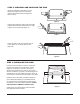
Add a 3/8" wide continuous bead of silicone
to the rabbet cut, as well as faucet holes
(Figure 8).
Figure 6
Figure 7
Figure 8
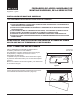
STEP 3: INSTALLING THE SINK
Insert the sink and rotate it so that it is positioned
properly with respect to the edge of the counter
(Figure 9). Press gently onto the countertop to
squeeze out excess silicone. Remove any excess
silicone and allow it to properly cure following silicone
manufacturer’s recommended instructions. Clean up
excess silicone. Remove protective plastic from glass.
Install faucet (not included), soap/lotion dispenser
(not included) and drain(s) (not included) that will
be connected to the sink following the appropriate
manufacturer’s recommended instructions. DO NOT
OVERTIGHTEN PLUMBING CONNECTIONS.
Install supply lines, drain fittings, and other items.
Run water and check for leaks.
Figure 9