
Installation Guide


INSTALLATION
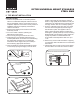
1. Position sink upside down on countertop surface.
Take into consideration adequate clearance for the
faucet, backsplash, and any accessories such as a
soap/lotion dispenser. Place sink in exact position for
installation and pencil completely around sink to
create a sink outline.
2. Scribe actual opening 5/16” inside the sink outline,
all the way around.
3. Cut out on inside of this line (following the
Manufacture’s instructions).
4. Test cutout by placing the sink into the cutout.
5. Install faucet(s) (not included) and drain(s) (not
included) that will be connected to the sink following
the appropriate manufacturer’s recommended
instructions. Attach supply lines (not included) to
faucet following appropriate instructions.
6. Clean underside of sink flange and sealing surface
of countertop opening thoroughly to remove dirt or
residue. Thoroughly dry and apply a continous
bead of a high quality silicone adhesive caulk (not
furnished) to the underside of the sink flange near
the edge. Position sink into countertop opening.
7. From the underside of the sink, place one clamp
near the center and tighten by hand enough to
hold the sink in place. This applies to all four
sides. Fasten remaining clamps in position and
hand tighten. (Usually 3 clamps on end, remaining
divided equally front and back). Space clamps as
equally as possible. Provided hardware will
accomodate countertops thicker than 3/4” up to
1-1/2”.
8. Remove any excess caulk and allow it to properly
cure following caulk manufacturer’s recommended
instructions.
9. Install supply lines to water sources, drain fittings,
and other items. Run water and check for leaks.
ECTSR UNIVERSAL MOUNT STAINLESS
STEEL SINK
II. TOP MOUNT INSTALLATION
7
5
SILICONE CAULK
SINK
COUNTERTOP
4 6
APPLY SILICONE
CAULK AROUND
CUTOUT.
2
3
SINK OUTLINE
5/16”
DRAW LINE 5/16” INSIDE SIK OUTLINE.
CUT ON INSIDE LINE
1
DRAW LINE AROUND SINK
POSITION SINK ON
COUNTERTOP UPSIDE DOWN
CLAMP DEVICE FOR RECTANGLE AND SQUARE STAINLESS STEEL SINKS