
Installation & Assembly


WARNING: please carefully read and properly follow the instructions for installation found in this manual.
STEPS:
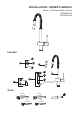
5
Tighten the shower (E) to the hose interposing
the gasket (D3) and confirm the hose can slide
smoothly through the passage hole.
CARTRIDGE REPLACEMENT
6
Connect the flexible hoses to the supply connections
with rubber gaskets.
Secure with wrench.
Turn on the water and check for leaks.
3/8”
[10 mm]
Hot
Cold
Red
Blue
D
3
E
321
Before inserting the single lever group in the hole of
the sink, make sure that the base gasket is properly
positioned in its seat and that the flexible hoses are
well tightened to the body of the tap.
Place the single lever group in the hole of the sink,
orienting the spout toward the sink tank.
For countertop thicknesses less than 1/16” thick
use the flange (B1), for all other installations use
the metal washer (B2).
Secure mounting
hardware in place by tightening
mounting nut (B3).
Install the check valve (C1) to the outlet hose with a
rubber washer (C2).
Secure with wrench.
Attach the pull-down hose to the bottom of the
check valve with a rubber washer (D1).
Secure with wrench.
13/16”
[20 mm]
1/2”
[13 mm]
4
Attach the counterweight (D2) to the flexible hose
approximately 15-3/4” [400mm] from the connection
to the outlet pipe.
B
3
B
2
B
1
A
C
2
D
1
C
1
13/16”
[21 mm]
D
2
321
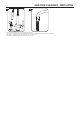
Before dissassembling the faucet be sure that the water supply is turned off.
Remove the finish cap (A), paying attention not to damage it. Remove the setscrew (B) with a 1/8” [2,5mm] hex wrench. Remove the handle (C). Lift the finishing ring nut (D)
using the reference notch. Unscrew the cartridge nut (E) then pull out the cartridge (F). Put the new cartridge into the body of the faucet, checking that the two centering pins
enter into the respective seats (X) a
nd that the gaskets on the cartridge are well positioned.
Reassmble the handle following the instructions in reverse order.
B
A
C
X
1/8”
[2,5 mm]
F
E
1-1/8”
[28 mm]
D