
Installation Guide


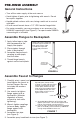


RISER
PIPE
COMPRESSION
NUT
SUPPORT
ROD
FERRULE
WALL BRACKET
BASE
ATTACH WITH SCREWS
(NOT INCLUDED)
WALL
SPRING
RETAINER
CAUTION! MANUFACTURER
RECOMMENDS THE USE OF
WALL BRACKET ASSEMBLY TO
SECURE RISER PIPE ON ALL
PRE-RINSE ASSEMBLIES
Determine correct length of
Support Rod from Wall to
Riser Pipe. Cut Rod to
approximate size. Affix
Wall Bracket Base securely
to Wall. Install Compression
Nut and Brass Ferrule and
tighten securely.
NOTE: Wall Bracket should
be located toward top of
Riser Pipe, as close as
possible to Spring Retainer.
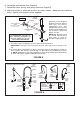
A. Assemble Large Coil Spring over Hose and onto Spring Retainer.
IMPORTANT: Spring must be assembled vertically with large curve of spring to the
top.
B. Assemble Spray Head Ring over Spray Head Grip and assemble Spray Assembly to
Hose. Tighten with wrench. Insure O-ring is in place prior to assembling (see Figure
9). NOTE: Additional O-rings are provided in a plastic bag. Realign Spray Head Hook
on Riser and tighten. Tighten all Wall Bracket Screws.
LARGE
COIL
SPRING
1
2
HOSE
SPRAY
HEAD
RING
SPRAY
HEAD
GRIP
HOSE
COUPLING
SPRING
RETAINER
STRAIN
RELIEF
SPRING
RISER
PIPE
POSITIVE SEAL O-RING CONSTRUCTION
ELIMINATES NEED FOR WASHERS
BE SURE
O-RING IS
INSTALLED
FOR PROPER
PERFORMANCE
(Extra O-Rings are provided)
GRIP
HOSE
COUPLING
SPRAY
HEAD
ASSEMBLY
SPRAY
HEAD
ASSEMBLY
RIGHT
DIRECTION
WRONG
DIRECTION
LARGE
COIL
SPRING
HOSE
SPRAY
HEAD
GRIP
FIGURE 8
FIGURE 9
6. Assemble wall bracket (see Figure 8).
7. Assemble hose, spring, and spray head (see Figure 9).
8. Make sure drain is attached and turn on water supply – being sure to check for
leaks. Tighten with wrench where needed.