
Installation Guide


PRE-RINSE ASSEMBLY
• Turn off the water supply at the main source.
• Hand tighten all parts prior to tightening with wrench. Do not
force parts together.
• Handle plated surfaces with care, being careful not to scratch
with tools.
• All wall mount faucets have a 1/2" I.P.S. female flanged inlet.
• For easier assembly, you may purchase as an accessory, the
LKMK462 mounting kit (see Figure 2). For spout model LK395A
a mounting kit is included.
General Instructions
1. Carefully orient, mount and
hand tighten the faucet to
the two flanges. Be sure
to include the washers
provided.
2. Use wrench to tighten
flange against wall or
backsplash. (Maintain
alignment of faucet
or spout to sink while
tightening.)
3. Wrench tighten couplings
to faucet body, tighten
flange against sink/
backsplash.
4. Assemble riser pipe
(see Figure 6).
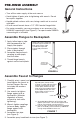
5. Assemble spray head hook to riser (see Figure 7).
RISER
PIPE
HOOK
CLAMP
Spread (open) clamp section
of Hook so it will slide over Riser
without marring finish of Riser.
Orient Spray Head Hook with
hook up and assemble to Riser.
Place approximately one-half
down length of Riser. Do not
tighten at this time.
Assemble Spring Retainer to Riser Pipe and
tighten with wrench. This will also tighten Riser
Pipe on Faucet Body (see Illustration D).
Insure O-ring is in place inside of Hose Coupling
prior to assembly (see Illustration E). Additional
O-rings are provided for future use.
A.
B.
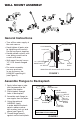
Assemble Faucet to Flanges
FIGURE 7
1. Apply teflon tape or pipe
joint compound to the
supply line nipples.
2. Place nipples through
holes in backsplash.
3. Assemble flange of each
coupling to one nipple,
then the other.
4. Thread flange loosely
against wall or backsplash.
RISER
PIPE
TEFLON TAPE
OR PIPE JOINT
COMPOUND
FAUCET
BODY
Apply Pipe Joint Compound
or Teflon Tape to threads on
both ends of Riser Pipe.
Thread Riser Pipe into
Faucet Body and hand
tighten.
Assemble Flanges to Backsplash
FIGURE 6