
Installation Sheet

A55483 (Rev. B - 9/10)
Page 3
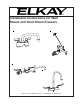
DECK MOUNT ASSEMBLY
Figure 3
Shank
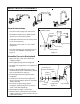
TO FIX SPOUT IN POSITION
1. Prior to spout installation, remove provided lock pin from sealed bag.
2. Place lock pin in the pierced hole at the base of the spout.
3. Align pin with slots in the ring found inside the throat of the spout connection on the faucet body.
4. Tighten spout nut to appropriate torque.
General Instructions
Turn off the water supply at the main source.
Hand tighten all parts prior to tightening with wrench. Do not force parts together.
Handle plated surfaces with care, being careful not to scratch with tools.
All deck mount faucets and spouts come complete with compression nut and one piece nutwasher
for ½” O.D. tube.
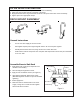
Assemble Base to Sink Deck
1. Apply Teflon tape or pipe joint compound to the
threads on the shank(s).
2. Place shank(s) through holes in deck.
3. Apply in order: nutwasher and nut (see Figure 3).
4. Hand tighten nutwasher against deck of sink.
(Maintain alignment of faucet or spout to sink while
tightening.
5. Attach supply lines.
6. Make sure drain is attached and turn on water
supply – being sure to check for leaks. Tighten
with wrench where needed.
Sink Deck
Nut
Nutwasher
Faucet Body
Gasket
Faucet Body