
Installation Manual

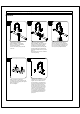


Secure the faucet assembly with the
washers (1&2) and nut (3). Hand tighten
the nut (3) onto the faucet assembly. Lock
the nut (3) into position by tightening the
screws (4) with a phillips screwdriver.
Optional Deck Plate Installation:
Before installation, align the hole in the
gasket (1) and deck plate (2) with the
mounting hole in the sink. Place the
faucet assembly through the deck plate
(2) and mounting hole in the sink until
the faucet assembly sets on top of deck
plate (2).
NOTE: If the sink is uneven, use silicone
under the gasket (1).
Optional Flange Installation:
Before installation, ensure that the
flange (1) is placed on the bottom of
the new faucet assembly.
Insert the faucet body through the hole
in the sink.
WARNING: Please carefully read and properly follow the instructions for installation found in this manual.
STEPS:
Important: after installation is
completed, turn on hot and cold water
supplies. Check for leaks. Remove
the spray head by unscrewing it from
the hose counterclockwise. Be sure to
hold the end of the hose down into
the sink and turn the faucet on to the
warm position where it mixes hot and
cold water. Flush water lines for one
minute. Check for leaks. Re-tighten
any connections if necessary, but do
not overtighten. Reinstall spray head
by hand tightening it back onto the
spray hose.
Make connections to water lines.
Thread the nut (1) on the supply line onto
the outlet of the water supply valve (2) and
tighten with a wrench.
Do not overtighten.
1
2
1
2
1
2
3
4
1