
Installation Guide


FOR CARE AND MAINTENANCE:
·The water in certain areas of the world can be very caustic -
standing water around the product can cause damage. Be
sure to remove standing water with a dry, soft cloth as soon
as possible.
·For polished brass finishes, as often as once a week, you
can apply a paste wax or special, non-abrasive, brass
coating (DO NOT APPLY POLISH).
·Before applying a protective coating, gently brush the entire
fixture using a soft tooth brush. This will remove any dirt or
deposit build-up.
·These simple steps will add temporary protective coating to
your faucet and extend the life of the finish.
Failure to follow care and cleaning will void your warranty.
For additional information, please visit elkayusa.com .
CARE AND CLEANING INSTRUCTIONS
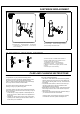
Loosen cartridge nut ① by turning it counter-clockwise and
lift out the cartridge ②.Remove old cartridge and replace
with new cartridge. Reinstall the handle.
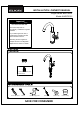
The faucet ships with a 1.5GPM aerator installed. An
optional 2.2 GPM aerator is also included in the box.
To switch the flow rate of the faucet:
1. Disassemble the quick connect assembly by
separating the connector ① and quick connect ②.
2. Replace 1.5 GPM connector(green) with the 2.2GPM
connector.
3. Reinstall quick connect assembly.
Congratulations on your purchase of an Elkay product.
Although your product is extremely durable, attention should
be given to the care, cleaning and maintenance of this
product. Cleaning agents and abrasives may cause damage,
which may result in oxidation and discoloration.
By following these simple guidelines for proper care and
cleaning, it will give you years of enjoyment:
TO CLEAN: Simply wipe gently with a damp cloth and blot dry
with a soft towel. A common rule of thumb is: when you dry off,
dry off your product.
· Avoid build-up of soap, toothpaste or mineral deposits, as
these tend to have an adverse effect on the appearance of
the product.
· NEVER use cleaning products of any kind on this product -
especially those containing ammonia, bleach or alcohol - or
those with any form of abrasive.
Shut off water supply! .With valves in "closed" position,
unscrew set screw ⑥ and remove handle ⑤ from valve stem
②. Loosen the screw ③ from valve stem ②. Loosen the cap
④ from the cartridge nut ①.
FLOW REGULATOR REPLACEMENT
2
1
1
2
1
6
CARTRIDGE REPLACEMENT
21 3
4
5
2
1