
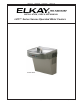
Installation Sheet


Page 5
LZO8*1G LZO8*2G LZO8*3G LZOD*1D
1000003094 (Rev. B - 11/16)
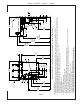
Lower and Upper Shroud
To access the refrigeration system and plumbing connections, remove four screws from bottom
of cooler to remove the lower shroud. To remove the upper shroud for access to the pushbars,
regulator, solenoid valve or other components located in the top of the unit, remove lower shroud,
disconnect drain, remove four screws from tabs along lower edge of upper shroud, unplug two wires
and water tube.
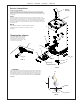
Bubbler
To remove the bubbler, rst disconnect the power supply. The underside of the bubbler can be
reached through the access panel (Item 13) on the underside of the upper shroud (Item 2). Remove
the access panel by removing the retaining screw. To remove the bubbler, loosen locknut from the
underside of the bubbler and remove the tubing from the quick connect tting per the Operation Of
Quick Connect Fittings section in the General Instructions. After servicing, replace the access panel
and retaining screw.
Service Instructions
NOTE:
When installing replacement bubbler and pedestal, tighten
nut (Item 11) only to hold parts snug in position. Do Not
Overtighten.
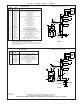
FIG. 4
11
10
3
11 - Bubbler
Assembly
25
25
6
25
14
Sensor Eye
Adjustment Screw
FIG. 5
13
8
11
Cleaning the strainer
To clean the strainer, unscrew the cap of the
solenoid valve. Remove screen and rinse
thoroughly with water. Insert screen back
into solenoid valve and screw cap on. Make
sure the o-ring is placed properly.
Warm, soapy water or mild household cleaning products can be used to clean the
exterior panels of the EZ coolers. Extra caution should be used to clean the mirror
nished stainless steel panels. They can be easily scratched and should only be
cleaned with mild soap and water or Windex glass cleaner and a clean, soft cloth
Use of harsh chemicals or petroleum based or abrasive cleaners will void the
warranty.
CLEANING
16
18
19
FIG. 3
2
8
Basin
Locknut
BUBBLER DETAIL