
Use and Care Manual


EZSTLDWS*1D EZSTLRDWS*1D EZSTL8WS*1D, 2D, 3D EZSTLR8WS*1D
LZSTLDWS*1D LZSTLRDWS*1D LZSTL8WS*1D, 2D, 3D LZSTLR8WS*1D
Page 121000001733 (Rev. K - 06/17)
INSTRUCTIONS CONTINUED.....
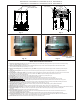
Swap drain parts in shroud:
Loosen each hose clamp retaining
the drain pieces.
Remove each drain piece and swap
to other basin.
Tighten each hose clamp.
Refrigerated Cooler side:
Carefully tip the shroud/basin assembly
toward the cooler frame.
Connect one of the black wires to the
solenoid valve and one wire to the cold
control.
Re-connect the water line at the solenoid
valve. Reference (Fig. 17, p.12) for the
operation of the quick connect ttings.
Non-Refrigerated Cooler side:
Carefully tip the shroud/basin assembly
toward the cooler frame.
Connect one of the black wires to the
solenoid valve and one to the power
cord.
Re-connect the water line at the
solenoid. Reference (Fig. 17, p.12) for
the operation of the quick connect
ttings.
Using a #T20 (6 point star bit),
tighten the shroud screws.
Both sides, both coolers, being
careful not to overtighten.
.
SEE PAGE 14 FOR
PLUMBING DIAGRAMS
Precautions need to be taken when
replacing the Basin/shroud assembly:
1) Make sure all wires are inside
frames so as not to become pinched.
2) Water line coming from bottle llter
drain must be pulled down as not to
interfere with the fan operation. The
fan blade needs to spin freely.
.
INSTALL WRAPPERS &
TRIM STRIPS PER PAGE 13