
Installation Guide


STEP ONE
Place sink upside down on countertop sur-
f
ace. Place sink in exact position for instal-
lation and pencil completely around sink to
create a sink outline.
STEP TWO
S
cribe actual opening 5/16" inside the sink
outline, all the way around.
STEP THREE
Cut out on inside of this line (following the
manufacturer’s instructions). If sink comes
with a faucet deck, install faucet to sink and
tighten.
STEP FOUR
Apply a silicone sealer around entire perime-
ter of opening. Set bowl into opening.
STEP FIVE
From underside of sink, place one clamp
near center, tighten by hand enough to hold
sink in place. This applies to all four sides.
Fasten balance of clamps in position and
hand tighten. (Usually 3 clamps on end, bal-
ance divided equally front and back). Space
clamps as equally as possible.
STEP SIX
From the top side, check seal between rim
and countertop. Adjust clamps to high spot if
necessary.
STEP SEVEN
Tighten clamp evenly with screwdriver or
socket wrench in rotation until sink is seated
with countertop. Caution: Do not over-
tighten clamps.
PASO UNO
Lugar fregadero boca abajo sobre la super-
f
icie de la encimera. Fregadero Lugar en la
posición exacta para la instalación y el lápiz
completamente alrededor de fregadero para
crear un contorno del fregadero.
PASO DOS
Escriba la apertura real de 5 / 16 "dentro
d
e esquema fregadero, toda la manera
alrededor.
PASO TRES
Cortar en el interior de esta línea (siguiendo
las instrucciones del fabricante). Si el fre-
gadero viene con una cubierta grifo, llave
para instalar el fregadero y apriete.
PASO CUATRO
Aplique un sellador de silicona alrededor de
todo el perímetro de apertura. Juego de
fuentes en la apertura.
PASO CINCO
De la parte inferior de fregadero, coloque
una abrazadera cerca del centro, apriete
con la mano lo suficiente como para man-
tener hundirse en su lugar. Esto se aplica a
los cuatro lados. Sujete las abrazaderas de
equilibrio en la posición y apriete a mano.
(Normalmente 3 pinzas de punta, el equilib-
rio dividido en partes iguales anverso y
reverso). Abrazaderas espacio tan iguales
como sea posible.
PASO SEIS
Desde la parte superior, el sello de verifi-
cación entre la llanta y encimera. Ajuste las
abrazaderas para punto alto si es necesario.
PASO SIETE
Apriete la abrazadera uniformemente con un
destornillador hasta lavabo está sentado
con encimera. Precaución: No apriete las
abrazaderas.
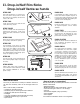
II
. Drop-in/Self Rim Sinks
Drop-in/self llanta se hunde
1
POSITION SINK ON
COUNTER UPSIDE DOWN.
4
DRAW LINE AROUND SINK.
DRAW LINE 5/16" INSIDE SINK OUTLINE.
CUT ON INSIDE LINE.
5/16"
SINK
S
INK OUTLINE
1-1/2" RADIUS
APPLY SILICONE
SEALER AROUND
CUTOUT.
2
3
Wh at Yo u W ill N ee d
The tools you will need to install your stainless steel sink
are few and commonly found in the average home tool
box.
Here is a list of what you will need:
Caulking for mounting sink rim
3lumbers putty for mounting faucet and strainers
<ardstick or Rule (at least 3-feet long).
)lashlight
Long, thin screwdriver (shank at least six inches).
Adjustable wrenches (2), or open ends.
3ipe wrench.
¿Que es lo que va a necesitar?
Las herramientas que necesita para instalarlo son las más
usadas comunmente.
Empaques/Silicón
Masilla de plomero para instalar llaves y céspol
&inta de medir (por lo menos 1 mt. de largo)
/interna
Desarmador delgado y largo (15.24cm.)
/lave ajustable
/lave Inglesa
Los tornillos de instalación vienen con el fregadero.
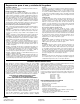
I
agua.
2
S
COUNTERTOP
SINK
SEALER
COUNTERTOP
CLAMP DEVICE FOR RECTANGLE AND SQUARE
STAINLESS STEEL SINKS
SINK
7
5
6
SILICONE
SEALER