
Installation Guide
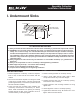

STEP ONE
Place sink upside down on countertop surface.
Place sink in exact position for installation
and pencil completely around sink to create a sink
outline.
STEP TWO
Scribe actual opening 5/16 ” inside the sink outline,
all the way around.
STEP THREE
Cut out on inside of this line (following the manu -
facturer’s instructions). If sink comes with a faucet
deck, install faucet to sink and tighten.
STEP FOUR
Apply a silicone sealer around entire perimeter of
opening. Set bowl into opening.
STEP FIVE
From underside of sink, place one clamp near
center, tighten by hand enough to hold sink in
place. This applies to all four sides. Fasten balance
of clamps in position and hand tighten. (Usually 3
clamps on end, balance divided equally front and
back). Space clamps as equally as possible.
STEP SIX
From the top side, check seal between rim and
countertop. Adjust clamps to high spot if necessary.
STEP SEVEN
Tighten clamp evenly with scr ewdriver or socket
wrench in rotation until sink is seated with counter-
top. Caution: Do not overtighten clamps.
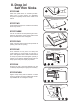
II. Drop in/
Self Rim Sinks
COUNTERTOP
SINK
CLAMP
PLASTIC
PAD
SEALER
1
7
POSITION SINK ON
COUNTER UPSIDE DOWN.
4
DRAW LINE AROUND SINK.
DRAW LINE 5/16" INSIDE SINK OUTLINE.
CUT ON INSIDE LINE.
5/16"
SINK
SINK OUTLINE
1-1/2" RADIUS
5
APPLY SILICONE
SEALER AROUND
CUTOUT.
6
2
3
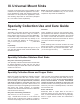
CLAMP DEVICE FOR RECTANGLE AND SQUARE
COPPER AND BRASS SINKS
CLAMP DEVICE FOR OVAL AND ROUND COPPER,
BRASS AND STAINLESS STEEL SINKS
SINK
CLAMP
THREADED STUD
ATTACHED TO THE SINK
COUNTERTOP
COUNTERTOP
SINK
SEALER
COUNTERTOP
CLAMP DEVICE FOR RECTANGLE AND SQUARE
STAINLESS STEEL SINKS
SINK
SILICONE
SEALER
7
5 6
7
5
6
NUT
SILICONE
SEALER
COUNTERTOP
SINK
SILICONE
SEALER
CLAMP
PLASTIC
PAD