
Installation Sheet

PAGE 8
1000003951 (Rev. A - 06/17)
4400FR_FTN_A LK4400FR_FTN_A
Insufcient Bubbler Flow: Check that the shut-off valve is wide open. Verify minimum 20 PSI supply pressure. Clean inlet strainer screen located in the valve body.
Cleanrubberoriceinowcontrollocatedbelowfrostlineinbushingbetweenbarbttingandvalve.
No Flow: Check for leaks in the air tubing going from the push button to the valve. Make sure the air tubing compression nut is hand tight. Disconnect air tube from
pushbutton.Placengeroverairoutlet.Pushbuttontotestdiaphragm.Tightendiaphragmcapscrews.Replacediaphragmifnecessary.
Continued Insufcient or Varied Height of Bubbler Flow:
•Replaceowcontrol.
• Check for kinks in the tubing.
• Remove the cleanout plug from the PVC column. Remove the valve assembly from the PVC column by carefully pulling up on the strap and connecting tubing at the
same time. Pressure test the valve assembly for leaks. Check stream height from the bubbler. Stream height is factory set at 35 PSI. If supply pressure varies greatly
from this, adjust the screw on the regulator (Item 11, Page 6, Fig. 4). Clockwise adjustment will raise stream and counter-clockwise adjustment will lower stream. For best
adjustment stream height should be approx. 1-1/2" (38mm) above the bubbler guard. Replace the valve into the PVC column. Make sure the supply hose coils into the
bottom of the PVC column without any kinks and double check that the valve is positioned fully at the bottom of the PVC column. Cap the PVC column.
Continuous Bubbler Flow: Insure that push button is not obstructed and springs back to normal position. Remove four screws which secure plastic diaphragm block
to valve body. Pull plastic and rubber diaphragm assembly out of valve body. Locate tiny hole in rubber diaphragm just under lip of plastic part. Clean debris from this
hole.Inspectvalveseatforgrooves.IfvalveseatwasOKanddiaphragmholewasfreefromdebris,inspectrubberbuttonlocatedatcenterofoatingsteeldiscinvalve
diaphragm block assembly. If button is worn, turn disc over or replace it. If diaphragm and seats are in good condition, stretch spring slightly. Spring is located behind
oatingstainlesssteelplate.Insurethatairbleedportonvalveplasticblockassemblyisnotplugged.
TROUBLESHOOTING AND MAINTENANCE
17
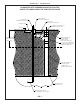
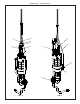
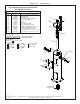
Vandal-Resistant
Bubbler Detail
FIG. 8
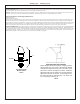
BASIN
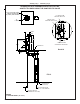
FIG. 9
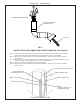
STREAM HEIGHT ADJUSTMENT:
Stream height is factory set at 35 psi. If supply pressure
varies greatly from this, insert a small straight bladed
screwdriver through the access hole in the center of the
push button and turn the adjustment screw. Clockwise
adjustment will raise the stream and counterclockwise
adjustment will lower the stream. For best adjustment,
the stream should be approximately 1 1/2" above the
top of the bubbler. (See Fig. 9)