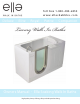
Toll Free 1-800-480-6850 w w w. e l l a s b u b b l e s . c o m Deluxe - Elite - Royal - Petite - Companion Luxury Walk In Baths Owners Manual - Ella Soaking Walk In Baths High quality luxury offering safety and independent living.
Table of Contents Unpacking and Carrying your Walk in Bath...............................................1-2 IMPORTANT Safety Instructions...............................................................3 Installing Extension Kits.......................................................................4 Installation of Deck Mount Grab Bar..........................................................5 Service Access and Door Seal Information...................................................6 Finishing Installation.
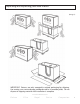
Unpacking and Inspecting your Walk in Bath (Image 1) IMPORTANT: Returns are only accepted in original packaging for shipping. Use caution so as not to damage cardbord crate or its wooden pallet. Do not dispose of shipping material until installation is complete. www.ellasbubbles.com Deluxe . Elite . Royal . Petite .
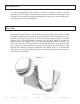
Unpacking and Carrying your Ella Walk in Bath (Image 2) (Image 3) www.ellasbubbles.com 2 Deluxe . Elite . Royal . Petite .
Important Safety Instructions WARNING: ***Read through the entire manual completely before begining installation.*** Use only licenced plumbers for installation. Be sure you and your contractor are aware of and follow all local plumbing codes. Your Ella Walk in Bath is not intended for outdoor use. Install the tub in accordance with the instructions in the manual. Use ONLY the parts and accessories provided or as recomended by the manufacturer.
Installing Extension Kits (Image 4) www.ellasbubbles.com 4 Deluxe . Elite . Royal . Petite .
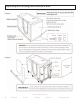
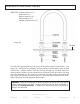
Installation of Deck Mount Grab Bar PARTS LIST: Chrome grab bar x (1) Escutcheon x (2) Rubber washers x (4) Metal washers x (2) Machine thread bolts x (2) (Image 10) Tub Shell * To install the supplied grab bar first locate all the parts needed for instalation. (see image 10). Ready the bolt assembly by first placing a metal washer onto the bolt followed by a rubber washer. Feed the bolt up through the tub shell and place another rubber washer over the extruded bolt followed by the escutcheon.
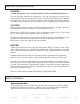
Service Access It is the responsibility of the installer or owner to provide access for service required, per code. Ella is not responsible for any costs related to obtaining access for repair. The owner shall assume responsibility for such costs, and if appropriate, must seek recovery from the installer. Door Seal Please keep in mind that the door has been closed for an extended period of time throughout shipping and the bathtub has been stored in various temperatures.
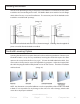
Finishing Installation After all of the plumbling testing is completed, and all fixtures are checked, the tub can be installed to the surrounding wall or walls. Ella Walk in Baths come with low rise tile flange which allows for two or one wall installations. The extension panel of the bathtub can be installed as needed for 60” openings. (Image 17) The tub can be finished and tiled over as shown in images. Caulking must be applied to joints as needed after the bathtub is installed.
Operating Instructions 1. Draining the Walk in Bath To drain your Ella Walk in Bath. Open each of the drains by turning both drain openers clockwise from a down position, upward one half turn until fully open. Remain in the tub until the water has dropped below the door sill. 2. Exiting the Bath Getting out of your Ella Walk in Bath is as easy as getting in to it. Wait for the water to drain below the door sill. Unlock the door by using the door handle.
Cleaning and Maintenance Usually, a mild detergent will remove construction debris. More stubborn debris may be removed with denatured alcohol or Clorox Soft Scrub cleaner. Light scratches and dulled areas may be restored to its original luster by polishing the surface with a fine grade automotive type cleaning and polishing compound. To clean your Ella Walk in Bath, use a mild non-abrasive liquid detergent solution. It is recomended that once a month the tub is flushed.
Warrenty Activation Form 1 of 2 Model: _______________________ Serial Number: ____________________ Purchase Date:_______________ Purchase price:____________________ Place of Purchase:_____________________________________________________________ Contact Name:______________________ Phone Number:_____________________ Upon completing the installation of an Ella Walk In Bath, the following Warranty Activation Form must be completed, signed by both the customer and installer, and returned to Ella’s Bubble
Warrenty Activation Form 2 of 2 OWNER’S INFORMATION: _____________________________________________________________________________ Name _____________________________________________________________________________ Address City State ZIP ____________________________ Telephone _________________________________________ E-mail ___________________________ Date _________________________________________ Signature INSTALLER’S INFORMATION: _______________________________________________________________________