OWNER’S MANUAL Low Threshold Gelcoat Shower with Molded Seat 6032 SH 1S 3P 6032 SH 1S 3P
Low Threshold Shower with Molded Seat Gelcoat & Solid Surface Bathware Tools/ materials you might need for proper installation • 6D galvanized screws • 100% clear silicone caulking • caulking gun • color match surface caulk • shims • tape measure • 1/8” countersunk drill bit • power drill • cardboard • china marker or grease pencil • furring strips • construction adhesive • long spirit level • mortar mix • 2’-3’ sections of 1/2” PVC pipe • plumb bob tool DO’S & DON’TS See framing diagram in Figure 1 for
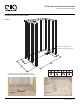
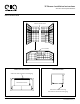
P Shower Installation Instructions Gelcoat & Solid Surface Bathware FRAMING DIAGRAM FOR 3 PIECE SHOWER FIGURE 1 Box out for sub floor 6” x 6” core minimum size required * Framing pocket required to provide 60” mimimum and 60 1/4” maximum width x 33 1/4” deep FIGURE 2 Wood Shims FIGURE 3 ellasbubbles.
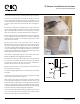
3P Shower Installation Instructions Gelcoat & Solid Surface Bathware INSTALLATION INSTRUCTIONS 1. Carefully remove the three parts from the packaging and inspect the shower closely for any shipping damage. It is very important to dry assemble the shower in an open space for the purpose of inspecting the shower for fit, finish and defects before moving the shower into the construction area. Check to ensure that the gaps are consistent.
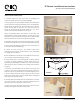
3P Shower Installation Instructions Gelcoat & Solid Surface Bathware Do not slide shower base on protruding drain fitting. See Figure 3 7. Once unit is perfectly level, use marker or grease pen to mark studs at top and bottom edge of flanges as a visual guide. Use 1/8” countersinking bit to drill pilot holes. Recheck Level as you fasten to studs to ensure base has not shifted off level. See Figures 4 and 5 8.
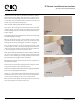
3P Shower Installation Instructions Gelcoat & Solid Surface Bathware Prepare the seat side wall for permanent installation. Apply a bead of caulk on the shower base from the front corner to the center line of back wall using 100% clear silicone adhesive caulk. This procedure will prominently adhere the wall to the base and seal off any moisture from the wall cavity. NOTE: Cosmetic caulking will be required in a later step. Place wall on base and align into permanent position.
3P Shower Installation Instructions Gelcoat & Solid Surface Bathware 16. Measure, and mark locations for mounting holes on the flanges of the wall panels. Mark horizontal so each hole matches up with a stud, (16” on center). Mark every 8” on center for the vertical flanges at the front of the unit. Drill a 1/8” diameter screw hole at each mark. Use 6D fastener screws to draw nailing flange to wood studs. Shim where necessary.
3P Shower Installation Instructions Gelcoat & Solid Surface Bathware INSTALLATION DIAGRAM 3 Pins at center seam 1 Pin on base UNDER SIDE VIEW OF BASE SIDE VIEW OF BASE Add form shim to bottom of leveling leg Wood bottom boards Trim Foam 1” wide x 38” long Glue foam to bottom of leveling leg ellasbubbles.
Low Threshold Shower with Molded Seat Gelcoat & Solid Surface Bathware LIMITED WARRANTY Ella’s Bubbles, LLC.
Warranty Activation Form INSTALLER’S INFORMATION Name Address City Telephone Email Date Signature State Zip Upon completing the installation of an Ella Walk In Bath, the following Warranty Activation Form must be completed, signed by both the customer and installer, and returned to Ella’s Bubbles, LLC. In order for the Warranty to be activated (faxed, scanned, or emailed, or hard copy mailed).
Warranty Activation Form OWNER’S INFORMATION Name Address City Telephone Email Date Signature State Model Serial Number Purchase Date Purchase Price Zip Place of Purchase Contact Name Telephone ** Copy of sales receipt must be included with warranty activation forms. To activate manufacturer’s warranty, please complete both pages and use one of the following options below to submit. Mail: Ella’s Bubbles, LLC. Warranty Department 2101 S.