ELLA LOW THRESHOLD APPLIED ACRYLIC SHOWERS OWNER'S MANUAL REPRESENTING THESE MODEL NUMBERS: 3648 SH 1S 3P 4.0 Right Seat/Left Seat 4836 SH 4P 3.0 Center Drain 6033 SH 3PS Right Seat/Left Seat 6033 SH 5P 4.0 Center Drain 6030 SH 5P 4.
Contents Getting Started.................................................................................................................................... 1 Installation Procedure...................................................................................................................... 2-4 Limited Warranty................................................................................................................................. 5 Framing Dimensions..........................................
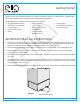
Getting Started Thank you for purchasing an Ella Low Threshold Shower System. For best results, please read and follow all directions carefully before beginning installation.
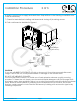
Installation Procedure 1 of 3 1. Remove wall section(s) from the base unit. Carefully move all parts into the installation area. Apply a bead of silicone to all joints. Reinstall wall sections. Align all parts, and connect using the alignment pins. Wipe away any excess caulk that squeezes out. The unit will be installed in the framed alcove as a one-piece unit. The unit must be installed completely level.
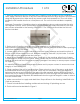
Installation Procedure 2 of 3 8. Finish wall board as detailed in Figure 2. Sectional bathing units are shipped from the factory with screws or nuts and bolts connecting the parts together. If installing the unit fastened together in one piece, follow instructions on Page 1 of this manual. The alignment pins should allow you to more easily install the unit in the framing alcove. Read and understand the instructions on this page since the alignment pins must be inserted in a specific direction. 1.
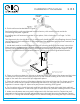
Place a continuous bead of silicone on 6. base between the edge of the base and the holes (As shown in Figure 4B). For three and four piece units,apply silicone up the veritical seam(s) between the holes for the fasteners and the front or inside edge of the wall. Installation Procedure of blocks. 3 One the walls on top of the3 wooden 7. Place by one remove the blocks taking care to align the 6. Make connections to Figure 3 Caulk as necessary.
Limited Warranty LIMITED WARRANTY Ella's Bubbles, LLC warrants to the owner of its Tub/Shower units as follows: Units manufactured of fiberglass reinforced polyester resin, that it will, free of charge, repair or exchange as its option, any Ella's Bubbles unit found to be defective in materials or workmanship upon inspection by an authorized representative of Ella's Bubbles for a period of three (3) years from date of purchase.
Caulk Gap Mounting Flange Phone: (800) 443-7269 Fax: (731) 925-7656 Framing Dimensions FRAMING DIMENSIONS Model No. G 3838 NA 2P Old No. G 3838.51 G 6032 TS 2P G 6030.74 G 3232 SH 2P G 3232.50 G 3635 SH 2P G 3635.53 G 4836 SH 2P 1S G 4835.
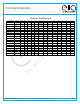
Shower Diagrams Sectional Gelcoat Showers Sectional Gelcoat Tub/Showers Required for G 6036.
Ella Accessible Shower In A Box Warranty Information For all customers of private labels who complete the Ella’s Bubbles Product Registration Form and return the same to the Ella’s Bubbles Corporate Office, Ella’s Bubbles will use its best efforts to facilitate any customer warranty claim.
Warranty Activation Form 1 of 2 INSTALLER'S INFORMATION ________________________________________________________________________________________ Name ________________________________________________________________________________________ Address City State Zip __________________________________ Telephone __________________________________________________ Email __________________________________ Date __________________________________________________ Signature Upon completing the installation of an
Warranty Activation Form 2 of 2 OWNER'S INFORMATION ________________________________________________________________________________________ Name ________________________________________________________________________________________ Address City State Zip __________________________________ Telephone __________________________________________________ Email __________________________________ Date __________________________________________________ Signature Model: ____________________________________