
Installation Guide


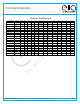

Framing Dimensions
9.
10.
11.
12.
G 3838.51
Model No.
6824/25
6839
Fig 5
Fig 7
Fig 6
A
B
C
D
E
F
G
H
I
J
N/A
N/A
27”
79”
73”
74”
74”
74”
73”
73”
73”
39-1/2”
60-1/4”
32-1/4”
36-1/4”
48-1/4”
36-1/4”
48-1/4”
60-1/4”
39-1/2”
31-7/8”
33-1/2”
36-1/2”
37-5/8”
35-5/8”
31-1/4”
17-3/4”
14-3/4”
16-1/2”
18”
18”
16-1/8”
16-3/8”
14-1/2”
17-3/4”
17-3/4”
2-5/8”
16”
18”
24”
18”
24”
1-3/8”
14-3/4”
16-1/2”
18”
18”
16-1/8”
16-3/8”
14-1/2”
75”
76”
76”
76”
83-3/4”
83-3/4”
83-1/8”
83-1/8”
83-3/4”
83-3/4”
82”
82”
82”
81”
48”
19”
48”
48”
48”
48”
48”
17-1/2”
42-1/4”
22”
22”
22”
22”
22”
43”
X
X
X
X
X
X
X
X
36-1/2”
Old No.
G 3838 NA 2P
G 6032 TS 2P
G 3232 SH 2P
G 3635 SH 2P
G 4836 SH 2P 1S
G 3636.53
G 6030.75
G 6036.71
6976/77
X
76”
60-1/4”
35-3/4”
15”
2”
15”
79”
82”
25-1/4”
38-1/4”
G 6036.72
6880/81
X
81”
60-1/4”
37”
17-1/2”
1-5/8”
17-1/2”
81-1/4” 81-1/4”
22”
42-1/2”
G 6030.74
G 3232.50
G 3635.53
G 4835.54
G 4834.50
G 4834 3P 2S
G 3260 TS 3P N/A
G 5494 TS 2P N/A
G 4887 SH 3P 1S
N/A
X
X
X
60-1/4”
74”
32-3/4”
16”
N/A
16”
N/A N/A N/A
N/A N/A N/A
N/AN/AN/A
74”
54-1/4”
27-1/2”
12-1/4”
N/A
12-1/4”
N/A
N/A
N/A
78”
48-1/4”
35-3/4”
18-1/4”
24”
18-1/4”
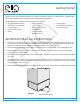
FRAMING DIMENSIONS
Do not use abrasive cleaners
If you use a RUBBER FLOOR MAT in this
tub or shower unit it must be removed after each
usage. If left in the unit, it may cause blisters or
damage to the surface finish.
G 6017 TS 2P
N/A
X
81”
60-1/4”
37-3/4”
16”
N/A
16”
N/A
N/A
N/A N/A
G 4887 SH 2P 1S
N/A
X
78”
48-1/4”
35-3/4”
18-1/4”18-1/4”
24”
18-1/4”
N/A
N/A
N/A
N/A
G 3679 SH 3P
N/A
X
78”
36-1/4”
37”
19”
18”
19”
N/A
N/A
N/A
N/A
G 3687 SH 2P
X
N/A
79”
36-1/4”
36-1/4”
17-1/2”
18”
17-1/2”
N/A
N/A
N/A
N/A
G 3275 SH 2P
X
N/A
77”
32”
34”
19-1/2”
16”
19-1/2”
N/A
N/A
N/A
N/A
X
G 4080 NA 2P
N/A
81” 41-1/4” 41-1/4”
19” 19” 19”
N/A
N/A
N/A
N/A
Praxis Companies LLC.
435 Industrial Road
Savannah, TN. 38372
Phone: (800) 443-7269
Fax: (731) 925-7656
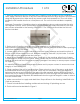
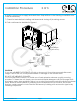
Make sure all seams are even and in alignment
with the base section. Fasten the wall assembly
to the framing using 6D galvanized screws through the
mounting flanges. Fasten every 8” O.C. along the vertical
flanges and to each framing stud along the top, horizontally.
3
The most important caution is to avoid use of harsh
abrasive cleaners or gritty scouring powders. To clean
the unit, simply use a household liquid detergent with
soft sponge cloth and warm water. More persistent
stains, tar, or paint can be removed with naptha or
mineral spirits.
Remove excess plaster by scraping with a sharpened
soft wood stick. Avoid wire brushes, metal scrapers
or tools. Restore dull areas by rubbing with automotive
type body cleaning compound.
CAUTION:
Make connections to supply and drain
lines. Strap all lines to the framing. Install finish
trim. Caulk as necessary.
Check for leaks before installing wall-board and
closing off plumbing access.
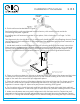
Finish wall
board as
detailed in
the diagram.
Shim Along
Framing
Wall
Board
Mou nting
Flange
Caulk
Gap
Framing
Figure 6
www.ellasbubbles.com Page 6 10/17