
Installation Guide


Thank you for purchasing an Ella Low Threshold Shower System. For best results, please read
and follow all directions carefully before beginning installation.
Tools/Materials you might need for proper installation:
IMPORTANT! READ ALL INSTRUCTIONS
1. The back of a berglass unit is not waterproof. Unit must be stored so water will drain off
and not acumulate in one spot. Water can penetrate the back laminates and soak the
glassed in reinforcement supports causing bulges in the gelcoat unit.
2. Most handling damage is the result of impact blows to the back of hte berglass units.
3. Never drag a berglass unit on any surface. Always transport the unit y hand using (2)
people or two wheel dolly.
4. Never let a berglass unit drop from any height, not even an inch or stress cracks are likely
to occur.
5. Placing objects inside the unit can cause scratches or nicks to the surface. Do not use the
shower as a trash receptacle! Always place a drop cloth or cardboard on the oor when
working inside the shower.
6. Never clean berglass gelcoat surface with metal tools of any kind, including razor blades.
Getting Started
INSTALLATION
INSTRUCTIONS
Pre-Installation Planning
1.
2.
3.
Do Not store units out of doors.- Keep
out of sunlight and exposure to weather.
Review Figures 7, 8, and 9 to make
sure alcove is of proper size. If a fire rated
alcove is required, approved finish material must
be installed prior to unit installation. Access to
drain and supply connections should be provided
so that these connections may be made after the
unit has been installed. Framing alcove must
reflect interior dimensions on diagram to permit
installation of unit. Note in diagram the required
opening in the floor to provide clearance for the
drain fitting and connection.
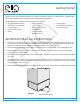
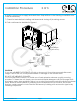
Placement of the two wood shims (provided)
is MANDATORY to provide bottom structural
support of the base unit. See Figure 1.
3.
Installation Procedure
Remove wall section(s) from the base
unit. Carefully move all parts into the installation
area. Apply a bead of silicone to all joints. Reinstall
wall sections. Align all parts, and connect with
the metal fasteners. Wipe away any excess caulk
that squeezes out. The unit will be installed in
the framed alcove as a one-piece unit.
If installing piece-by-piece into the alcove,
Alternate Connection: Plastic Fasteners:
use the plastic fasteners. These fasteners
Drain and/or Overflow assembly should
be installed on unit according
to the
manu
facturers instructions. Apply a bead of 100%
silicone caulk around the drain opening in unit
before installing the fitting.
Locate supply lines for control valves
and shower head. Measure and mark locations
of fittings on the finished side of the unit. Recheck
locations, and drill 1/4’’ pilot holes. Cut holes to
final size using the appropriate size hole saw.
4.
1.
2.
5 .
6.
7.
8.
Plumb and level the unit in two directions:
Place a level on top of the apron, and along the
finished flat area at the top of the wall. Once the unit
is leveled, if any gap appears between the apron and
sub floor fill the gap with solid material. When satisfied
with the fit, attach the unit to framing with 6d galvanized
nails or screws through the predrilled holes in the
mounting flanges. If required, drill additional holes
through the flanges in order to attach the unit to each
stud.
Make connections to supply and drain
lines. Strap all lines to the framing. Inst
all finish
trim. Caulk as necessary.
Check for leaks before installing wall-board and
closing off plumbing access.
Finish wall
board as
detailed in
the diagram.
Shim Along
Framing
Wall
Board
Mou nting
Flange
Caulk
Gap
Framing
SECTIONAL GELCOAT BATHING SYSTEMS
Wood Support Shims
Two wood shims are provided in the installation
packet attached to the unit. Additonal shims may be
added by the installer.
READ INSTRUCTIONS COMPLETELY
BEFORE BEGINNING INSTALLATION.
permit a “blind” installation so shower parts may
connected together in the installation location.
The unit parts are held in alignment with the plastic
fastener pins. When the caulking cures, the parts
are solidly held together similar to a one
piece unit when attached to the framing.
Follow the instructions on Pages 2 and 3
if using the plastic fasteners in place of
the metal fasteners.
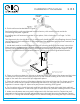
Apply wood wedges to the alcove floor.
Carry unit to the opening. Align front of apron
to final location and tilt unit into place. Make certain
that the wood shims contact both the bathing unit
and sub floor. Remove and adjust wedges if
necessary to assure proper contact for support.
It is MANDATORY that these wedges are in place
and in proper contact to assure structural integrity
of the bathing unit.
Figure 2
1
Figure 1
• 6D Galvanized Screws
• 100% silicone caulking
• Caulking gun
• Acrylic latex caulk
• Shims
• Tape measure
• 1/8" drill bit
• Phillips screw driver
• Cardboard
• China marker /
grease pencil
• Furring strips
• Construction adhesive
• Long spirit level
www.ellasbubbles.com Page 1 10/17