
Installation Guide


1. Remove wall section(s) from the base unit. Carefully move all parts into the installation
area. Apply a bead of silicone to all joints. Reinstall wall sections. Align all parts, and connect
using the alignment pins. Wipe away any excess caulk that squeezes out. The unit will be
installed in the framed alcove as a one-piece unit. The unit must be installed completely
level.
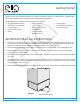
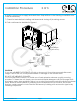
Alternate Connection: If installing piece by piece into the alcove, make sure that the pins
are aligned correctly. When the caulking cures the parts are solidly held similar to the one
piece when attached to the framing. See Photo1. The valve wall should be the rst wall
sections installed.
2. Drain and/or Overow assembly should be installed on unit according to the
manufacturer’s instructions. Apply a bead of 100% silicone caulk around the drain opening in
unit before installing the tting.
3. Locate supply lines for control valves and shower head. Measure and mark locations of
ttings on the nished side of the unit. Recheck locations, and drill 1/4" pilot holes. Cut holes
to nal size using the appropriate size hole saw.
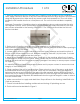
4. Apply wood wedges to the alcove oor. Carry unit to the opening. Align front of apron
to nal location and tilt unit into place. Make certain that the wood shims contact both the
bathing unit and sub oor. Remove and adjust wedges if necessary to assure proper contact
for support.
It is MANDATORY that these wedges are in place and in proper contact to assure structural
integrity of the bathing unit.
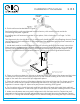
5. Plumb and level the unit in two directions: Place a level on top of the apron, and along
the nished at area at the top of the wall. Once the unit is leveled, if any gap appears
between the apron and sub oor ll the gap with solid material. When satised with the t,
attach the unit to framing with 6d galvanized nails or screws through the pre-drilled holes in
the mounting anges. If required, drill additional holes through the anges in order to attach
the unit to each stud.
6. Make connections to supply and drain lines. Strap all lines to the framing. Install nish trim.
Caulk as necessary.
7. Check for leaks before installing wall-board and closing off plumbing access.
8. Finish wall board as detailed in Figure 2.
Installation Procedure 1 of 3
Photo 1
www.ellasbubbles.com Page 2 10/17