
Installation Guide


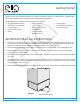

8. Finish wall board as detailed in Figure 2.
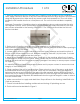
Sectional bathing units are shipped from the factory with screws or nuts and bolts
connecting the parts together.
If installing the unit fastened together in one piece, follow instructions on Page 1 of this
manual.
The alignment pins should allow you to more easily install the unit in the framing alcove. Read
and understand the instructions on this page since the alignment pins must be inserted in a
specic direction.
1. Install drain and/or overow assembly on unit following drain manufacturers instructions.
Place support wedges under the back edge and secure Place the base unit in the install
location. Level the unit. A minimum of two shims should be used for proper support. (See
Figure 5). Re-check level and attach base to framing studs with 6D galvanized screws.
2. Place a continuous bead of silicone on base between the edge of the base and the holes.
For three and four piece units, apply silicone up the vertical seam(s) at the front or inside
edge of the wall. Also around the pin alignment piece.
3. Place the walls on the top of the base aligning the holes with the pins. For three and four
piece units, install the left wall rst. Repeating the same for the right wall. Press all seams
together to assure a tight t. Wipe away any excess caulking. See Figure 5
4. For four piece units, install the back wall rst. Install the left and right walls (Wet wall last).
Press the seams together, to assure a tight t. Wipe away any excess caulking before it cures.
5. Make sure all seams are even and in alignment with the base section. Fasten the wall
assembly to the framing using 6D galvanized screws through the mounting anges. Fasten
every 8" O.C. along the vertical anges and to each framing stud along the top, horizontally.
Installation Procedure 2 of 3
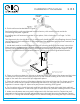
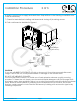
SIDE VIEW
INTEGRAL SELF-LOCATING
METAL GUIDE PIN DETAIL
INTEGRAL SELF-LOCATING
METAL GUIDE PINS PAN
BASE DETAIL
www.ellasbubbles.com Page 3 10/17