
Installation Guide


6. Make connections to supply and drain lines. Strap all lines to the framing. Install nish trim.
Caulk as necessary.
7. Check for leaks before installing wall-board and closing off plumbing access.
8. Finish wall board as detailed in Figure 6.
CAUTION
If you use a RUBBER FLOOR MAT in this tub or shower unit it must be removed after each
usage. If left in the unit, it may cause blisters or damage to the surface nish.
DO NOT USE ABRASIVE CLEANERS
The most important caution is to avoid use of harsh abrasive cleaners or gritty scouring
powders. To clean the unit, simply use a household liquid detergent with soft sponge cloth
and warm water. More persistent stains, tar, or paint can be removed with naptha or mineral
spirits. Remove excess plaster by scraping with a sharpened soft wood stick. Avoid wire
brushes, metal scrapers or tools. Restore dull areas by rubbing with automotive type body
cleaning compound.
1.
4.
Remove the nuts and bolts to disassemble the wall
section(s) from the base unit. Carefully move all
parts into the installation area.
Install drain and/or overflow assembly on unit
following drain manufacturers instructions.
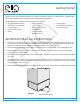
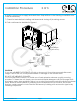
Place support wedges under the back edge and secure
Place the base unit in the install location. Level the unit.
with adhesive. A minimum of two shims should be used
for proper support. (See Figure 5). Re-check level and
attach base to framing studs with 6D galvanized screws.
6.
2.
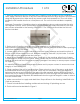
USING PLASTIC FASTENERS TO STABILIZE
THE WALLS ON SECTIONAL BATHING UNITS
Fiberglass Unit
Apply a bead of silicone to the inside head of the
plastic fasteners. Insert the plastic fasteners in the
holes on the base ledge coming in from the bottom
(outside) and pushing them upward so they point toward
the ceiling. See Figure 3.
The head of the fastener and silicone should make
contact with bottom ledge of the base.
Silicone Bead
Plastic Fastener
3.
For three piece units, after applying the
silicone to the head of the plastic fasteners for the
wall, insert them from the backside through the holes
in the vertical seam on the left wall (the wall to the left
as you face the unit) so they are facing the right and
the heads of them are pressed firmly to the backside
of the flanges.
For four piece units, after applying the silicone to the
head of the plastic fasteners for the walls, insert them
on the two front vertical flanges of the back wall. These
fasteners will be inserted from the backside and pressed
through until the head of the fasteners fully contact the
flanges. These fasteners will be pointing out towards
the front of the bathing unit.
5.
The silicone on the plastic fasteners should be
allowed time to dry. Use four wooden blocks on
the top ledge. Space evenly along the ledge. Tape them
in place. They will be used to temporarily space the wal
l
above the base while it is being placed. See Figure 4A.
7.
Sectional bathing units are shipped from the factory
with screws or nuts and bolts connecting the parts
together.
If installing the unit fastened together in one piece,
follow instructions on Page 1 of this manual.
If you will be installing the base first then the separate
wall sections, it is recommended you use the plastic
fasteners. The plastic fasteners are especially usefull
when installing a three or four piece bathing unit.
Using the plastic fasteners should allow you to more
easily install the unit in the framing alcove. Read and
understand the instructions on this page since the
plastic fasteners must be inserted in a specific direction.
Support Wedges
(Secure with adhesive)
Wood Blocks
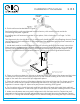
1/4” Bead of
Silicone Caulk
Place a continuous bead of silicone on
base between the edge of the base and the holes
(As shown in Figure 4B). For three and four piece
units,apply silicone up the veritical seam(s) between
the holes for the fasteners and the front or inside edge
of the wall.
Figure 3
Figure 4B
Place the walls on top of the wooden blocks. One
by one remove the blocks taking care to align the
plastic fasteners into the holes in the underside of the
walls. For three piece units, install the left wall first.
Repeat for the right wall. Press all seams together to
8.
For four piece units, install the back wall first. Install
the left and right walls, (Wet wall last.) Take care to
align the plastic fasteners into the holes in the walls.
Press the seams together, to assure a tight fit.
Wipe away any excess caulking before it cures.
assure a tight fit. wipe away any excess caulking.
See Figure 5.
2
Figure 5
Figure 4A
Installation Procedure 3 of 3
www.ellasbubbles.com Page 4 10/17