
Installation Instructions
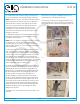


4. Determine the position you want the to install the bar. Place the bar against the wall.
Using a pencil, mark the location of each mounting hole at both ends of the bar.
5. Using a power drill with a 1/4" diameter carbide tipped drill bit, drill, each mounting hole.
6. Apply silicone caulking around and inside each drilled hole before installing the grab bar.
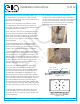
7. Take two (2) of the #10 x 2" Stainless Steel screws. By hand, start one mounting screw in
each end of the bar into the wall.
8. Use a power drill with a Phillips drill bit to fully install these mounting screws.
9. Take the remaining #10 x 2" screws and place them into the remaining open holes. Use
care to snug up the screws, but to not over-torque that the screws strip out the factory
installed backer board.
10. If installing a bar with snap-on covers, move the covers into place at each ange. Twist
the covers clockwise or counter clockwise to tighten the covers onto the anges.
THIS COMPLETES THE INSTALLATION OF THE GRAB BAR
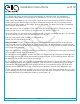
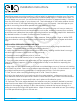
INSTALLATION INSTRUCTIONS FOR COLLAPSIBLE WATER RETAINERS
Important considerations before you begin: Most manufactured units are designed with a
radius where the oor transitions or meets the wall. This is to ensure proper structural strength
where the wall meets the oor. The installation of end caps is highly recommended on
radius models for proper t and nish. The caps will also help to keep your curtain inside
the water barrier. A properly sized curtain with heavy tape weights combined with a water
retainer is the most complete and effective system available today.
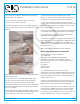
Installation of radius models: (For Finished End Cap Installation) Make sure you have ordered
the correct length. See chart below. The water retainer strip is designed to travel along the
oor to the wall radius until vertical, then capped. (Less Cap Installation) Cut the retainer
strip to the shape of the radius where the wall and the oor meet, then caulk. Caps are not
required in applications where a 90-degree corner is standard.
Size Verication Chart for all Factory Manufactured Shower Units
For most Acrylic Showers:
• 36" ADA barrier free (36"I.D. opening) 42CWR-White
• 48" barrier free (45-46" I.D opening) 52CWR-White
• 60" ADA barrier free shower (60" I.D. opening) 66CWR-White
• Finished End Cap CWRCAP-White
NOTE: 1 ½" wide at mounting surface required.
Installation Instructions 10 of 12
www.ellasbubbles.com Page 14 06/15