
Installation Guide
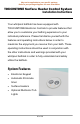
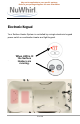

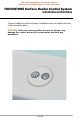


Table Of Contents

TOUCHSTONE
Air-Activated Controller
Owners Manual
Product Illustration:
1. Plug the Blower into the NEMA Socket on the front of the Control Box.
2. Plug the air tubing from the air button on the bathtub onto the Air Tube Nipple on the front of the
Control Box.
3. Plug the Control Box into the standard wall outlet under the tub.
4. The Control Box must be installed with the nipple located in the lower right hand corner.
5. The Control Box must be installed on a vertical surface with a 6” clearance around all ventilation
openings.
6. The underside tub temperature must not exceed 122°F (50°C).
7. Hydromassage bathtubs utilizing this direct plug-in type controller shall be provided with a "drip
loop" in the cable or air line to the tub side actuator.
8. Hydromassage bathtubs utilizing this direct plug-in type controller shall be constructed so that the
load cord and attachment plug will be kept off the bathtub-mounting surface a minimum of 1-
1/2 in. (38.1 mm).
Installation Instructions
Operating Instructions:
Rear
View
Front
View
Air Tube
Nipple
NEMA
Socket
NEMA
Plug
The first press of the air button will start the Blower at high speed. This will also start a 20-minute
countdown timer which will automatically turn off the Blower when time expires. If more time is desired
after the Blower turns off automatically, press the air button again to start a new 20-minute session.
The second press of the air button will change the speed of the Blower to medium speed.
The third press of the air button will change the speed of the Blower to low speed.
The fourth press of the air button will cause the Blower to change speeds from low to high in an oscil-
lating manner (“Massage Mode”).
The fifth press of the air button will turn the blower off.
20 minutes after the Blower has been turned off (either manually or automatically) the Blower will turn
on again automatically for one minute. This cycle will purge out any residual moisture that is in the air
system making the system fresh and ready for the next bath.
WARNING: Use and follow these instructions along with all instructions that have been provid-
ed with your whirlpool bathtub in order to fully enjoy the bathtub safely.
WARNING: Failure to install in strict accordance with each and every instruction above may
cause the Control Box to fail, which may cause injury to persons and/or property.
WARNING: Keep dry. Replace control if
subjected to contamination or flooding.
May not be applicable to your specific package
Refer to your package diagrams for more information
35 of 38