
Installation Guide


Finishing Installation
www.ellasbubbles.com Page 19 09/17
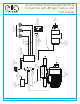
After all of the water and electrical testing is completed and all xtures are checked, the
tub can be installed to the surrounding wall or walls. Ella Walk in Baths come with low
rise tile ange which allows for two or one wall installations. The extension panel of the
bathtub can be installed as needed for 60" openings.
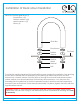
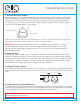
The tub can be nished and tiled over as shown in images. Caulking must be applied to
joints as needed after the bathtub is installed.
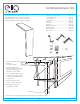
Threshold Lowering Option
Lowering the threshold is an option that can be chosen during installation. Because your
Ella Walk in Bath is set up for easy installation, lowering the threshold requires the drain
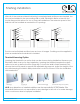
option to be set up below the oor (Page #6). To lower the Walk in Bath threshold; First,
remove the toe kick panel to expose the adjustable leg supports. Adjust the height of the
tub while keeping the Walk in Bath plumb level on all four corners. Finish the installation
with baseboard.
NOTE: Any alterations or installed additions are the responsibility of the installer. Ella
Accessible Bathrooms is not responsible for any damage to the unit or for water damage,
which could occur due to improper installation.
Drywall
Glue
Tile
Caulking
5/8”Tub Lip
Stud
Stud
Stud
Drywall
Drywall
Glue
Glue
Tile
Tile
5/8”Tub Lip
5/8”Tub Lip
Caulking
Caulking
Panel On Panel Off Lowered Threshold Baseboard On (not supplied)