Acrylic Wall Liner Installation Manual Complete / Complete Freedom www.ellasbubbles.
Jigsaw Prep................................................................................6 Shower Bases.............................................................................8 Wall Surrounds......................................................................... 14 Wainscoting.............................................................................30 Accessories..............................................................................34 Final Silicone Adhesive Seal..........................
INSTALLATION / TOOLS & SuPPLIeS LIST Suggested Tool List o Bathtub Liner Template o Expandable Spud Wrench with 1” Combination Wrench o Drain Extractor o Drain Identification Kit o 1- 1 / 2 ” dia. Tub Drain Shoes (Brass and PVC) o 1- 1 / 2 ” dia. Die Cast & Plastic Slip-Joint Nuts & Washers o Tub Drain Shoe Gaskets o Tub Overflow Gaskets (beveled and flat) o 1- 1 / 2 ” dia.
Installation - Orbital Jigsaw Prep www.ellasbubbles.
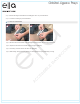
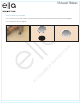
Orbital Jigsaw Prep INSTALLATION / ORBITAL JIGSAW PReP ® Step 1: Measure the length of the bottom of the orbital jigsaw. Add 1” to your measurement. Step 2: Cut Velcro® according to your measurements. Tip: Velcro is recommended. A B Step 3: Place the Velcro® on the bottom of the orbital jigsaw, leaving excess Velcro® hanging off each end. Step 4: Wrap the excess Velcro® around both edges of the jigsaw. (Image A) Step 5: Press firmly, and do the same to the other side.
Installation - Shower Bases www.ellasbubbles.
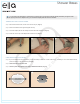
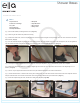
Shower Bases INSTALLATION / SHOWeRLINeRS & SHOWeR BASeS ® Tip: If you intend to use turnbuckle or crossbar drain on a flat pan liner, you will need to install the adapter plate before you begin to install the liner. If your pan liner has a dimpled recess, you can install the adapter plate after the liner is installed. TuRNBuCkLe dRAIN INSTALLATION Step 1: Dremmel out the drain hole, be sure not to touch the acrylic. (Image J) Step 2: Insert the turnbuckle into the pipe and tighten securely.
Shower Bases INSTALLATION / SHOWeRLINeRS & SHOWeR BASeS ® SNAP-IN dRAIN INSTALLATION Step 1: Place the cover on the drain and trace the perimeter. Use a dremmel to cut out the hole, then remove the rag from the drain. (Image P) Step 2: Snap the drain into place. (Image Q) O www.bciacrylic.com www.ellasbubbles.
Shower Bases INSTALLATION / SHOWeRLINeRS & SHOWeR BASeS ® SHOWER INSTALLATION PAN LINeR PAN INSTALLATION TOOLS Pipe Wrench o Hammer or Sledge o Pry Bar o Spud Wrench o Sharpie® Marker o Notepad o Tape Measure o Drop Cloths o Utility Knife o Step 1: Remove all hardware, including the drain cover. (Image HH) Step 2: Stuff a rag into the drain to keep debris from entering.
Shower Bases INSTALLATION / SHOWeRLINeRS & SHOWeR BASeS ® PAN LINeRLINER INSTALLATION (CONTINued) SHOWER INSTALLATION (CONTINUED) Step 10: Measure and mark the length of the liner, using the width line as a starting point. Use a straight edge to extend the line. Step 11: Measure and mark the height of the threshold in 3 or 4 different locations. Connect the markings with a straight edge.
Installation - Wall Surrounds www.ellasbubbles.
Wall Surrounds INSTALLATION / WALL SuRROuNdS ® TOOLS o Orbital Jigsaw with Bosch T101 Blade or 10 to 12 Tooth-per-inch Wood Blade o Level o Screwdriver o Suction Cup o Large and Small Wall Templates o Utility Knife o Sharpie® Marker Notepad Tape Measure o Hammer o Chisel o Pipe Wrench o Handle Puller o Work Table o Extension Cords Vacuum Broom and Dust Pan o Garbage Bags o Drywall and Screws o Pliers o Tub Template o Drop Cloths o o o o Tip: It is recommended to install the wall surrounds first and
Wall Surrounds INSTALLATION / WALL SuRROuNdS ® CeILING PANeL INSTALLATION Step 1: Measure the depth from the soap dish wall to where the new ceiling panel will end in three separate locations. (Image D) Step 2: Measure the width from the back wall to the plumbing wall in three separate locations. (Image E) Step 3: Place the small wall template flush against the ceiling, with the long edge against the soap dish wall. This will measure the angles.
Wall Surrounds INSTALLATION / WALL SuRROuNdS ® CeILING PANeL INSTALLATION (CONTINued) Step 9: Mark the bullnose edge using the bullnose line guide. The bullnose line guide is pre-marked with holes at 1/8” increments for ease of measuring. Locate the appropriate measurement for your bullnose edge. For example, if you are cutting your bullnose edge at 1/4”, then locate the 1/4” hole. Step 10: Place the Sharpie® marker into the appropriate hole and slide the bullnose line guide along the bullnose edge.
Wall Surrounds INSTALLATION / WALL SuRROuNdS INSTALLATION / WALL SuRROuNdS ® ® SOAP dISH WALL INSTALLATION SOAP dISH WALL INSTALLATION (CONTINued) Step 1: Install corner reinforcements. Corner reinforcements are part of the triple gasketing system and are used to square up the walls and provide a more permanent seal. Start by measuring from the top of the tub or shower base to the ceiling and record the measurement. (Image M) Step 5: Connect markings with a straight edge.
Wall Surrounds INSTALLATION / WALL SuRROuNdS ® SOAP dISH WALL INSTALLATION (CONTINued) Step 5: Connect markings with a straight edge. Step 6: Measure from the plumbing wall to back wall and record the measurements. (Image S) Transfer these measurements by making three width marks on the panel, using the plumbing wall line as the starting point. Step 7: Connect the lines with a straight edge. (Image T) This will be the back wall.
Wall Surrounds INSTALLATION / WALL SuRROuNdS ® SOAP dISH WALL INSTALLATION (CONTINued) SOAP dISH WALL — LeVeL MeASuRe OPTION (CONTINued) Step 4: Measure from the plumbing wall to the back wall in the same 3 or 4 different locations you used to check if the wall was plumb. (Image X) Tip: Try to measure the walls using the same increments on both sides. Step 5: Write all of your measurements on your notepad.
Wall Surrounds INSTALLATION / WALL SuRROuNdS ® SOAP dISH WALL INSTALLATION (CONTINued) Step 10: Make sure the primer is dry to the touch and apply the butyl tape on top of the primed areas. Press firmly when installing so the butyl tape does not pull up when you remove the release paper. (Image CC) Step 11: Remove the release paper. Apply the silicone in between the butyl tape in a “Z” pattern, keeping the bead about ¼” thick.
Wall Surrounds INSTALLATION / WALL SuRROuNdS ® PLuMBING WALL INSTALLATION (CONTINued) BuLLNOSe edGe FINISHeS (CONTINued) OPTION 2 – Tri-Guard under Wall Panel (Image II) The tri-guard will need to be installed before the wall panel. Step 1: Measure from the floor to the ceiling. Step 2: Mark the measurement on the tri-guard and cut it with tin snips. Step 3: Place a thick bead of silicone on the inside of the tri-guard and push firmly into place.
Wall Surrounds INSTALLATION / WALL SuRROuNdS ® PLuMBING WALL INSTALLATION (CONTINued) PLuMBING WALL — TeMPLATe MeASuRe OPTION There are two measuring options: the template method and the level method. The following is the template method. Please refer to page 42 for level method. Step 1: Using the large wall template, place the template on the plumbing wall, with the long edge against the soap dish wall and the short sides tight against the ceiling and top of tub or shower base.
Wall Surrounds INSTALLATION / WALL SuRROuNdS ® PLuMBING WALL INSTALLATION (CONTINued) PLuMBING WALL — LeVeL MeASuRe OPTION There are two measuring options: the template method and the level method. The following is the level method. Please refer to page 41 for template method. Step 1: Draw a level horizontal line across the plumbing wall, from soap dish wall to outside edge of plumbing wall.
Wall Surrounds INSTALLATION / WALL SuRROuNdS ® PLuMBING WALL INSTALLATION (CONTINued) Step 1: Measure from the ceiling to the center of the shower arm hole. Measure from the soap dish wall to the center of the shower arm hole. Write down your measurements. (Image A) Step 2: Measure from the ceiling and from the soap dish wall to the center of the mixer valve. Record your measurements. (Image B) Step 3: Measure down from the ceiling and from the soap dish wall to the center of the tub spout.
Wall Surrounds INSTALLATION / WALL SuRROuNdS ® PLuMBING WALL INSTALLATION (CONTINued) Step 10: Remove the release paper. Apply the silicone in between the butyl tape in a “Z” pattern, keeping the bead about ¼” thick. (Image G) Step 11: Clean the back of the new panel with denatured alcohol or damp cloth. Press the panel firmly into place. Remove the slip sheeting and wipe down the panel to ensure it’s secured. Step 12: Attach the plumbing fixtures with Teflon® tape.
Wall Surrounds INSTALLATION / WALL SuRROuNdS ® BACk WALL INSTALLATION (CONTINued) BACk WALL —TeMPLATe MeASuRe (CONTINued) Step 5: Mark these measurements on your wall panel and connect the marks using a straight edge. (Image M) Step 6: Place the wall template onto the new wall panel, flush with the top ceiling edge. Hold the template up to this depth line to mark the top and bottom angles of the back wall. Remove the template and connect the marks using a straight edge.
Wall Surrounds INSTALLATION / WALL SuRROuNdS ® BACk WALL INSTALLATION (CONTINued) BACk WALL —TeMPLATe MeASuRe (CONTINued) Step 4: Measure from the top of the tub or shower base down to the floor for the leg measurement. Record your measurement. (Image S) Step 5: Measure from the edge of the back wall to the outside of the tub to get the width of the leg. Make sure to account for the radius of the tub. Record these measurements on the existing wall.
Wall Surrounds INSTALLATION / WALL SuRROuNdS ® BACk WALL INSTALLATION (CONTINued) Step 1: Transfer your measurements onto the new sheet of acrylic. (Image AA) Use a straight edge to connect the measurements. Tip: If you are using simulated tile, double check that the grout lines will match up. Step 2: Cut the panel slowly, carefully supporting your panel with your other hand and keeping your fingers clear from the blade. (Image BB) Step 3: Test fit your panel and trim as needed.
Installation - Wainscoting www.ellasbubbles.
Wainscoting INSTALLATION / WAINSCOTING ® TOOLS Tin Snips Tape Measure o Straight Edge o Orbital Jigsaw o Sharpie® Marker o o WAINSCOTING INSTALLATION Step 1: Ask the customer how high up the wall they want the wainscoting to end. (Image A) Tip: Height cannot pass 59”. Step 2: Draw a level horizontal line across the wall 1” below the desired location. (Image B) Tip: If there is existing tile on the wall, and the top of the existing tile is level, you can use that as your horizontal line.
Wainscoting INSTALLATION / WAINSCOTING ® WAINSCOTING INSTALLATION (CONTINued) Step 9: Wipe down the back of your wainscoting with a clean rag and denatured alcohol. Place one end of the panel against the wall first and press the rest into place. Step 10: Remove the slip sheet and wipe down the panel. OuTSIde CORNeR TRIM INSTALLATION Step 1: Measure the height first, from top of wainscoting to the floor at each corner. Add 1/8” to account for extra material at the top. Record the measurement.
Wainscoting INSTALLATION / WAINSCOTING ® WAINSCOTING INSTALLATION (CONTINued) SeAM TRIM INSTALLATION Tip: Seam trim covers the seam of two pieces of wainscoting that meet in the middle of a wall. Step 1: Measure the height, from top of wainscoting to floor, and add 1/8” for material. (Image M) Measure the depth, adding 1/8” for material. Record the measurements. Step 2: Transfer measurements to the seam trim. Cut the seam trim, then test fit and trim accordingly.
Installation - Accessories www.ellasbubbles.
Accessories INSTALLATION / ACCeSSORIeS ® CORNeR CAddY TOOLS o White Butyl Tape INSTALLATION Step 1: Apply white butyl tape along the back perimeter of the caddy, making sure to stay about ½” away from the edge. Step 2: Place a ball of butyl tape inside the caddy to add extra support. (Image A) Step 3: Remove the release paper. Step 4: Ask the homeowner where they want the caddy installed. (Image B) Step 5: Push the caddy into place. (Image C) Tip: There is a top and bottom side to the caddy.
Accessories INSTALLATION / ACCeSSORIeS ® ReCeSSed SOAP dISH TOOLS Tape Measure o Sharpie® Marker o o o Hole Saw Jigsaw Butyl Tape o Level o INSTALLATION Note: Installing a recessed soap dish is done during the soap dish wall installation. Step 1: If there is an existing soap dish opening, measure from the plumbing wall to the beginning of the soap dish opening and from the top of the tub up to the bottom of the soap dish opening.
Accessories INSTALLATION / ACCeSSORIeS ® SHAVING STANd TOOLS White Butyl Tape o Sharpie® Marker o Level o INSTALLATION Step 1: Ask the homeowner where they would like the shaving stand to be installed, and mark the location. (Image M) Step 2: Apply butyl tape to the back of the shaving stand. Step 3: Remove release paper and continue to add layers of butyl tape as needed to ensure proper contact with wall. (Image N) Step 4: Use the marks to align the shaving stand and push into place.
Installation - Final Silicone Adhesive Seal www.ellasbubbles.
Final Silicone Adhesive Seal INSTALLATION / FINAL SILICONe AdHeSIVe SeAL ® TOOLS o o o o Color-matching Silicone Rag / Paper Towels Silicone Primer Caulk Finishing Tool Step 1: Wipe down all the walls and the liner as well as any accessories. Step 2: Make sure the bathroom is dust free. Step 3: Use silicone primer on all seams before applying silicone. (Image A) Step 4: Check that wall panels and accessories are pressed firmly into place and have not moved or lifted.
Product Information PRODUCT INFORMATION BCI® ACRYLIC DEALER TIPS & TECHNIQUES RECOMMENDED ACRYLIC CLEANERS Use only cleaning products whose labels state that they are SAFE FOR ACRYLIC. Always test products on a small area of skirt before applying to complete bath area.
Installation Tools & Supplies Checklist Installation Below is a list of suggested tools and supplies for installing BCI Acrylic products.
Installation INSTALLATION BCI ACRYLIC DEALER TIPS & TECHNIQUES Installation Tools & Supplies Checklist Installation Tools (cont.
Installation INSTALLATION BCI ACRYLIC DEALER TIPS & TECHNIQUES CORNER SHOWER SEAT INSTALLATION Follow the steps below when installing a BCI® Acrylic Corner Shower Seat. NOTE: The Shower Base is installed before the Corner Shower Seat. The Wall Surrounds are installed after the Corner Shower Seat. 1. Shower Base installed 2. Corner Shower Seat installed 3.
Installation INSTALLATION BCI ACRYLIC DEALER TIPS & TECHNIQUES CORNER SHOWER SEAT INSTALLATION 17” 17” Fig. 2 Set Frame for Corner Shower Seat 1. Measure roughly 17” out from inside corner for outside edges of Corner Seat. (Fig. 2) a. This measurement may be different depending on the studs already in place. 2. At the appropriate measurement, add additional frame/studs to inside wall area for seat as needed. (Fig. 2) 3. Add 2” x 4” as needed for cross beams.
Installation INSTALLATION BCI ACRYLIC DEALER TIPS & TECHNIQUES CORNER SHOWER SEAT INSTALLATION Trim & Test Fit Corner Seat 1. Place Corner Seat into shower area to assess placement. 2. Check to see if the Seat is level. (Fig. 4) Fig. 4 3. View bottom Corner Seat and how it aligns with shower base. For Corner Seat to sit flush against the shower base, the bottom corners and bottom edge will need to be trimmed. Fig. 5 Fig. 6 4. Measure the width of shower base flange.
Installation INSTALLATION BCI ACRYLIC DEALER TIPS & TECHNIQUES CORNER SHOWER SEAT INSTALLATION Fig. 7 6. Connect measurement lines with straight edge on bottom of Corner Seat. (Fig. 7) Fig. 8 Fig. 9 7. Trim bottom of Corner Seat with jigsaw. (Fig. 8) Cut sprayfoam backing as needed when trimming. 8. Notice the bottom corners and how they are notched (circled) to fit on top of the shower base. (Fig. 9, Fig. 10) Fig. 9 shows the Corner Seat upside down. Fig.
Installation INSTALLATION BCI ACRYLIC DEALER TIPS & TECHNIQUES CORNER SHOWER SEAT INSTALLATION Fig. 11 Fig. 12 9. Test fit Corner Seat. View how the bottom of the Corner Seat fits on top of the Shower Base. Check to make sure the Corner Seat is level. (Fig. 11) 10. Mark the bottom where the Seat needs to be trimmed. (Fig. 12) Fig. 13 11. 12. 13. 14. 15. Trim bottom of Corner Seat as needed. (Fig. 13) Test fit Corner Seat again. Trim and test fit as needed.
Installation INSTALLATION BCI ACRYLIC DEALER TIPS & TECHNIQUES CORNER SHOWER SEAT INSTALLATION Installing Corner Seat Once the Corner Seat is properly placed (with shims as needed) and level, begin the final installation. Fig. 14 1. Pre‐drill holes through Corner Seat flanges, into the frame previously built. 2. Attached Corner Seat to studs through pre‐drilled holes with screws. (Fig. 14) Fig. 15 3. Measure, cut and attach drywall to wall frames. (Fig. 15) www.ellasbubbles.
Installation INSTALLATION BCI ACRYLIC DEALER TIPS & TECHNIQUES CORNER SHOWER SEAT INSTALLATION Add Acrylic Wall Surround Install acrylic walls around the Corner Seat. Refer to BCI® Installation Manual for more information. Fig. 16 1. Cut walls to fit around the Corner Seat. (Fig. 16) 2. Install walls following steps in Installation Manual. 3. Apply final silicone seal around all seams. Contact BCI Acrylic Technical Support for questions or further assistance. 1‐800‐963‐8827 www.ellasbubbles.
Ella’s Bubbles, LLC. warrants to the owner of its ACRYLIC WALL LINERS as follows: Ella’s Bubbles LLC. warrants acrylic showerliners, acrylic wall surrounds and acrylic accessories sold to residential buyers to be free from chipping, peeling, cracking, or fading for as long as the buyer owns the residence. These guidelines expressly prohibit the use of any abrasive cleansers, and damage resulting from their use that would not be covered under the terms of this warranty.
Warranty Activation Form 1 of 2 INSTALLER'S INFORMATION ________________________________________________________________________________________ Name ________________________________________________________________________________________ Address City State Zip __________________________________ Telephone __________________________________________________ Email __________________________________ Date __________________________________________________ Signature Upon completing the installation of an
Warranty Activation Form 2 of 2 OWNER'S INFORMATION ________________________________________________________________________________________ Name ________________________________________________________________________________________ Address City State Zip __________________________________ Telephone __________________________________________________ Email __________________________________ Date __________________________________________________ Signature Model: ____________________________________