Ella Multi-Piece Cultured Marble Shower Wall Surround Installations Manual ellasbubbles.
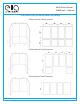
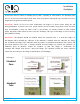
Multi-Piece Shower Wall Panel - 3 Options Please refer to your purchased shower wall package. 8 Piece Shower Panel Surround 6 Piece Shower Panel Surround 4 Piece Shower Panel Surround ellasbubbles.
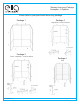
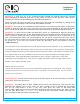
Shower Accessory Package Examples - 4 Options Please refer to your purchased accessory package. Package 1 Package 2 Soap dish + 2 corner shelves Package 3 Trim + soap dish + 2 corner shelves Package 4 Trim ellasbubbles.
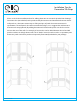
Installation Tips for Decorative Tile Strips Please see the below installation ideas for adding decorative or mosaic tile (marked A in drawings). Decorative tiles (not included) can be purchased by the customer and installed in between shower wall panels as a decorative accent strip or if the joint lines of panels do not meet customer’s expectations. The wall panels do not have rounded off edges, so it is suggested to add mosaic or decorative tile strip (optional).
Installation Guidelines Special care must be taken in handling these panels, especially in cold weather. The indented grout lines are of necessity a little thinner than other areas of the panels causing this type of panel to be more fragile than our typical cast marble panels. IMPORTANT: Panels are to be at room temperature (65 degrees or above) when being cut and during installation. If panels have been stored outside in cold weather, bring them inside 24 hours prior to installation so they can warm.
Installation Guidelines IMPORTANT: If grab bars are to be installed, blocking should be installed behind the substrate before attempting to install the grab bars on the panels. The holes for the grab bars should be predrilled in the same area of the blocking prior to installing the grab bars. Failure to do this will cause the grab bars to come loose and could cause breakage or cracking of the panels. This type of breakage is not covered by Ella's Bubbles warranty.
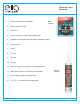
Materials/Tools Required Blade example 1. Circular Saw with a masonry blade 2. Drill for using hole saws 3. Saw horses 4. 2x4s for saw horses to help support the panels 5. Sandpaper (recommend using 80 grit) for sanding cut edges 6. Tape measure 7. Pencil 8. 24" level 9. Acetone 10. Dry rag 11. Hole saw or jig saw to cut holes for plumbing fixtures 12. 100% Silicone must be used for panel installation 13. Latex caulk for marble to drywall seams 14.
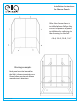
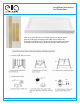
Installation Instructions for Shower Panels After the shower base is installed please follow the correct sequence of panel installation by referring to the drawing on the left. 4 & 6, 3 & 5, 2 & 8, 1 & 7 Bracing example: Each panel must be braced for the 100% silicone to entirely cure. Please follow purchased silicone manufacturers directions. ellasbubbles.
Installation Instructions for Shower Panels 1. Check to see that the tub/pan is level from front to back and left to right. The maximum tolerance for level is +/- ¼”. Also note that a gap of 1/8” is the maximum tolerance on marble seams. 2. Accurately measure tub spout and handle(s} hole location on alcove side wall from the front edge of the bathtub and transfer dimensions to one of the side panels.
Installation Instructions for Shower Base Note: If you have purchased reversible shower base please attach/ glue the 4" fiberglass tile flanges with 100% silicone before the shower base installation. The shower panels will be installed over the tile flanges and siliconed to protect from leakages behind the base. ellasbubbles.
Installation Instructions for Trim Strips Important: Read these instruction before starting installation Trim strips, as a rule, are manufactured at 36" and 60". The installer should plan to trim each piece to fit the area in which it will be installed. If the shower panels do not extend to the ceiling, the trim should be cut so that the top of the trim is the same height as the panels it will be installed next to.
Installation Instructions for Corner Shelves Important: Read these instruction before starting installation • These installation instructions have been written for Shower Walls Corner Mount Soap dish cast marble, corner mount soap dish. • In preparation, before installing the soap dish, you will need to have completed the installation of the panel system and sealed the seams of the shower panels behind where the soap dish is to be installed with 100% silicone.
Cleaning Guidelines • For regular cleaning use only mild detergents or warm soapy water applied with a soft cloth • Always rinse surface after cleaning and dry by blotting with a damp cloth or chamois • Do not use scouring pads, gritty cloths or cleaners that are not recommended. Cleaners not listed are either not approved or are untested. Please choose and approved cleaner from the list • If you have any questions, please call Ella's Bubbles customer service at (800) 480-6850 ellasbubbles.
Cultured Marble Shower Wall Surround & Base Limited Lifetime Warranty Ella’s Bubbles (EB) warranty to the original purchaser or primary owner of it’s products are as follows: This limited lifetime warranty is extended to the first purchaser to be free from defects in workmanship and material under normal use and conditions from the date of the original purchase. This warranty is nontransferable and applies only to the original owner and to the original installation place/address.