
Installation Guide


ellasbubbles.com
Installation Instructions
for Corner Shelves
Important: Read these instruction before starting installation
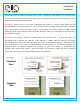
• These installation instructions have been written for Shower Walls Corner Mount Soap dish
cast marble, corner mount soap dish.
• In preparation, before installing the soap dish, you will need to have completed the
installation of the panel system and sealed the seams of the shower panels behind where
the soap dish is to be installed with 100% silicone.
• Two types of adhesive are needed to install the soap dish because they serve different
purposes. The hot melt glue bonds immediately, but will not hold the soap
dish for more
than a few days. The silicone takes a few hours to cure, but after curing, they will secure the
soap dish indefinitely.
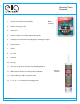
Tools and Materials Required:
• Torpedo Level
• Silicone 100% and caulk gun
• Hot melt glue and hot melt
glue gun.
• Acetone
• Pencil
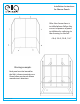
Installing the cast marble corner mount soap dish:
1. First you will need to determine the location
of the shampoo shelf. Once determined make
a mark with your pencil on the panel. This will
be the height to the top of the shampoo shelf.
2. After de
termining the correct height for the shelf,
use the acetone to thoroughly clean the back of the
shampoo shelf and the wall where it is to be installed.
3. Using the torpedo level, lightly make a level line to the corner, going onto the adjacent wall
with the mark.
4. Apply silicone to the cleaned back of the soap dish. Only a small "dab" of silicone is
necessary. Place the silicone toward the outer edges. Apply a small amount of hot melt glue in
the middle of the back of the soap
dish. It is important that the two different adhesives do not
mix, because they do not work well together when mixed .Once the hot melt glue has been
applied, the soap dish needs to be installed immediately. Otherwise, the hot melt glue will cool.
If that happens, scrape the hot melt glue off and reapply.
5. Any excess silicone and hot melt glue can be cleaned up after installation. The earlier it is
cleaned, the easier it is to remove. Also, using a clean cloth rag and acetone, clean the pencil
lines from the panel.
Please use acetone only. Denatured alcohol or other water-based cleaners are not acceptable.
If you do not have acetone, wiping with a clean, dry rag is an acceptable alternative.