
Installation guide


Solo Whistle Installation Guide Installation
MAN-SOLWHIIG (Ver. 1.4)
3-33
3.10 Powering Up
After the Solo Whistle is connected to its device, it is ready to be powered up.
Caution:
Before applying power, ensure that the DC supply is within the specified range
and that the proper plus-minus connections are in order.
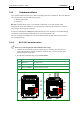
3.11 Initializing the System
After the Solo Whistle has been connected and mounted, the system must be set up and
initialized. This is accomplished using the Composer, Elmo’s Windows-based software
application. Install the application and then perform setup and initialization according to
the directions in the Composer Software Manual.
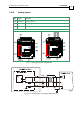
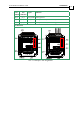
3.12 Heat Dissipation
The best way to dissipate heat from the Solo Whistle is to mount it so that its heat sink
faces up. For best results leave approximately 10 mm of space between the Solo Whistle's
heat sink and any other assembly.
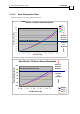
3.12.1 Solo Whistle Thermal Data
• Heat dissipation capability (θ): Approximately 10 °C/W.
• Thermal time constant: Approximately 240 seconds (thermal time constant means
that the Solo Whistle will reach 2/3 of its final temperature after 4 minutes).
• Shut-off temperature: 86 °C – 88 °C (measured on the heat sink)