
Ceiling Presenter Instruction Manual


32
1
2
3
4
5
6
7
8
9
10
11
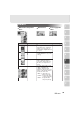
8 RS-232C SPECIFICATIONS
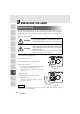
This product can be controlled by a PC connected through the RS-232C terminal [RS-232C].
Setting Up
(1) Connect this product to a PC with an RS-232C connection cable.
When using an RS-232C cable available in the market, select a cable with the connection
shown below.
To protect this product and the PC, be sure to turn OFF all the power supply of all equipment
before connecting.
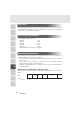
(2) Start the PC, and set the communication mode of the RS-232C to the communication
mode of this product.
For the information how to set the communication mode of the RS-232C, refer to the
instruction manual of the PC.
(3) Start the PC program to operate this product.
(4) Control through the RS-232C will start.
For communication control, be sure to take the above steps for setting.
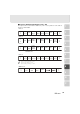
Cable Connection
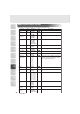
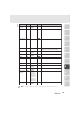
54321
9876
1
2
3
4
5
6
7
8
9
CD
RXD
TXD
DTR
SG
DSR
RTS
CTS
RI
CD
RXD
TXD
DTR
SG
DSR
RTS
CTS
RI (CI)
1
2
3
4
5
6
7
8
9
DSUB-9P (Female)
54321
9876
PC side :
DSUB-9P (Female)
Ceiling Presenter side
(DSUB-9P)
PC side
(DSUB-9P)