
Installation Guide User Manual


Bell Installation Guide Installation
MAN-BELIG (Ver. 1.302
|www.elmomc.com
42
Table of Contents
3.13. Powering Up
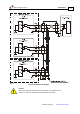
After the Bell is connected to its devices, it is ready to be powered up.
Before applying power, ensure that the DC supply is within the specified range
and that the proper plus-minus connections are in order.
3.14. Initializing the System
After the Bell has been connected and mounted, the system must be set up and initialized. This is
accomplished using the Composer, Elmo’s Windows-based software application, as well as the
Tuner program developed by Digital Feedback Technologies. Install the application and then
perform setup and initialization according to the directions in the Composer Software Manual.
3.15. Heat Dissipation
The best way to dissipate heat from the Bell is to mount it so that its heatsink faces up. For best
results leave approximately 10 mm of space between the Bell’s heatsink and any other assembly.
3.15.1. Bell Thermal Data
• Heat dissipation capability (θ): Approximately 10 °C/W.
• Thermal time constant: Approximately 240 seconds (thermal time constant means that the
Bell will reach two-thirds of its final temperature after 4 minutes.)
• Shut-off temperature: 86 °C – 88 °C (measured on the heatsink).
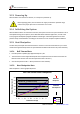
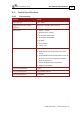
3.15.2. Heat Dissipation Data
Heat dissipation is shown graphically below:
Whistle
100 Series Power Dissipation
0.0
1.0
2.0
3.0
4.0
5.0
6.0
0
0.5
1
1.5
2
2.5
3
3.5
4
4.5
5
Peak Current (A)
Power Dissipation (W)
85VDC
70VDC
50VDC
Standard 40 °C Ambient Temp.
Heatsink
Required
Heatsink
not Required
Bell