Copyright © 2001 Elo TouchSystems Inc. All Rights Reserved. No part of this publication may be reproduced, transmitted, transcribed, stored in a retrieval system, or translated into any language or computer language, in any form or by any means, including, but not limited to, electronic, magnetic, optical, chemical, manual, or otherwise without prior written permission of Elo TouchSystems. Disclaimer The information in this document is subject to change without notice.
2 Table of Contents Usage Notice Precautions ................................................................................. 3 Introduction About the Product ....................................................................... 4 Package Overview ...................................................................... 5 Installation Product Overview ........................................................................ 6 Start Your Installation ........................................................
3 Usage Notice Warning- To prevent the risk of fire or shock hazards, do not expose this product to rain or moisture. Warning- Do not open or disassemble the product as this may cause electric shock. Precautions Follow all warnings, precautions and maintenance as recommended in this user’s manual to maximize the life of your unit. Do: q q q q q Turn off the product before cleaning. Use only a dry soft cloth or clean wipe when cleaning the LCD panel surface.
4 Introduction About the Product This product is a 12.1” SVGA TFT color LCD touchmonitor with the following features: q Direct analog RGB input q Active matrix TFT LCD technology q 12.1” diagonal screen size q 16.
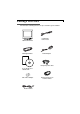
Package Overview 5 Check that the following 10 items are present and in good condition: LCD Touchmonitor VGA Signal Cable US/Canada Power Cord Power Adapter Manual CD Software European power cable User’s Guide and software CD Mac Video Adapter Audio-In Cable RS-232 Touchscreen Interface Cable
6 Installation Product Overview u Main Unit LCD Touchmonitor User Controls Stand MENU SELECT u Rear View Power Switch Audio In Ear Phone Power DC-In Display Input RS-232 Touch Interface
7 Start Your Installation u Connecting the Touchmonitor (Figure 7.1) To setup this touchmonitor, please refer to the following figure and procedures. 1. Be sure all equipment is off. 2. Connect the VGA signal cable from display input connector to the 15-pin connector of your host computer and tighten the screws. 3. Connect the female end of the touchscreen cable to the serial port on the back of your PC, and the male end of the cable to your touchmonitor. 4.
8 Power Adapter Power Cord RS-232 Touch Cable Mac Adapter VGA Signal Cable Audio-In Cable (Figure 7.1) Notice: To ensure the LCD display works well with your computer, please configure the display mode of your graphic card to less than or equal to 800 x 600 resolution. Make sure the timing of the display mode is compatible with the LCD display. We have listed the Compatibility Modes of this LCD display in the appendices for your reference.
User Controls 9 Front Panel Controls MENU SELECT No. / Icon Control Function MENU Menu button Displays the OSD menus SELECT Select Selects the adjustment items from OSD menus. 3 Decrease / Select Decreases value of the adjustment items or selects the functions. 4 Increase / Select Increases value of the adjustment items or selects the functions. Power LED 1. Green indicates the display is turned on. 2. Amber indicates the display in power-saving mode.
10 How to Use the OSD Menus 1. Press the “MENU” button to pop up the on-screen menu and to toggle between Main Menu Page 1 to Page 3. 2. Choose the adjustment items by pressing the “ SELECT” button. 3. Adjust the value of adjustment items by pressing the “ 3 ” & “ 4 ” buttons. 4. Press the “ MENU” button again to turn off the OSD menu. If you don’t operate the OSD menu in a pre-set time, the OSD will automatically disappear.
11 On-Screen Display Menus First OSD Menu: Main Menu Page 1 Brightness Contrast Horizontal Position Vertical Position Frequency Tracking -3 4+ 4 Brightness Adjusts the brightness of the image. 4 Contrast Adjusts the contrast of the display image. 4 Horizontal Position Adjusts the horizontal position of the image. 4 Vertical Position Adjusts the vertical position of the image. 4 Tracking Synchronizes the signal timing of the display to that of the graphic card.
12 Second OSD Menu: Main Menu Page 2 Auto-Adjustment Re-Scaling Display Mode OSD Off-Time Language Text-Graphic NO Yes 4Auto-Adjustment Choose this function to obtain an optimum image. 4Re-Scaling If the input resolution is less than 800 x 600, you can select this function to obtain the full screen image. 4Display Mode Select this function to demonstrate the display resolution, vertical refresh, and horizontal scan of the current mode.
13 Third OSD Menu: Main Menu Page 3 Volume Mute Reset -3 4+ 4 Volume Allows you to control the volume of sound, 4 Mute Allows you to disable the sound immediately. 4 Reset Returns the display parameters of the current mode to the factory defaults.
14 Appendices Troubleshooting If you are experiencing trouble with the LCD display, refer to the following. If the problem persists, please contact your local dealer or our service center. Please refer to the back cover of this manual for the phone number of the Elo TouchSystems office nearest you. Problem: No image appears on screen. 4 Check that all the I/O and power connectors are correctly and well connected as described in the “ Installation ” section.
15 Warning Signal Sometimes you will see warning messages from the LCD screen. This means that the LCD display cannot receive the signal from the computer graphic card. There are three situations where this may happen. Please check the connected cables or contact your local dealer for more information. 4No Signal This message means that the LCD display has been powered on but it cannot receive any signal from the computer graphic card. Check all the power switches, power cables, and VGA signal cable.
16 Product Dimensions 340mm/13.4” 286.7mm/11.3” Front View Side View 170mm/6.
Touchmonitor Specifications 17 12” LCD Touchmonitor (ET12-XXWC-1) Specifications Display Type Active matrix, thin film transistor (TFT), liquid crystal display Size 12- inch diagonal 246 x 185 mm useful screen area N ative Resolution 800 x 600 Touchscreen AccuTouch, anti- glare Colors 16 million with dithering Display Brightness AccuTouch: 188 cd/m† typical Back- light Lamp Life 30,000 hours at full brightness typical Viewing Angle H or izont a l Ve r t ica l Contrast Ratio 100:1 typical
18 AccuTouch Touchmonitor Specifications M e cha nica l Construction Top: Polyester with outside hard- surface coating with clear or antiglare finish. Inside: Transparent conductive coating. Bottom: Glass substrate with uniform resistive coating. Top and bottom layers separated by Elo- patented separator dots. Positional Accuracy Standard deviation of error is less than 0.080 in. (2.03 mm). This equates to less than – 1%. Touchpoint Density More than 100,000 touchpoints/in† (15,500 touchpoints/cm†).
19 Compatibility Modes Mode Resolution V. Frequency (Hz) H. Frequency (kHz) IBM VGA 640 x 350 70 31.5 IBM VGA 640 x 400 70 31.5 IBM VGA 640 x 480 60 31.5 IBM VGA 720 x 400 70 31.5 VESA VGA 640 x 480 72 37.9 VESA VGA 640 x 480 75 37.5 VESA VGA 640 x 480 85 43.3 VESA SVGA 800 x 600 56 35.2 VESA SVGA 800 x 600 60 37.9 VESA SVGA 800 x 600 72 48.1 VESA SVGA 800 x 600 75 46.9 VESA SVGA 800 x 600 85 53.7 Apple Mac LC 640 x 480 67 34.
20 Installing the Driver Software Elo TouchSystems provides driver software that allows your touchmonitor to work with your computer. Drivers are located on the enclosed CD-ROM for the following operating systems: Windows 2000 Windows Me Windows 98 Windows 95 Windows NT 4.0 Additional drivers and driver information for other operating systems (including MS DOS, Windows 3.x, OS/2, Macintosh and Linux) are available on the Elo TouchSystems web site at www.elotouch.com.
2. Follow the directions on the screen to complete the driver setup for your version of Windows. If the AutoStart feature is not active: 1. Click Start > Run. 2. Click the Browse button to locate the touch.exe program on the CD-ROM. 3. Click Open, then OK to run touch.exe. 4. Follow the directions on the screen to complete the driver setup for your version of Windows. Installing the Touch Driver for MS-DOS and Windows 3.1 You must have a DOS mouse driver (MOUSE.
22 To run the INSTALL program: 1. Type INSTALL at the DOS prompt in the directory containing the driver install files. 2. INSTALL asks you to select the software to install. Then choose d:\EloDW from the displayed list. 3. INSTALL also asks you for the paths to use during installation, or you may use its defaults. INSTALL creates directories as necessary, and warns you if they exist.
Regulatory Information I. Electrical Safety Information: A) Compliance is required with respect to the voltage, frequency, and current requirements indicated on the manufacturer’s label. Connection to a different power source than those specified herein will likely result in improper operation, damage to the equipment or pose a fire hazard if the limitations are not followed. B) There are no operator serviceable parts inside this equipment.
24 1) In order to meet emission and immunity requirements, the user must observe the following: a) Use only the provided I/O cables to connect this digital device with any computer. b) To ensure compliance, use only the provided manufacturer’s approved line cord. c) The user is cautioned that changes or modifications to the equipment not expressly approved by the party responsible for compliance could void the user’s authority to operate the equipment.
Warranty Except as otherwise stated herein or in an order acknowledgment delivered to Buyer, Seller warrants to Buyer that the Product shall be free of defects in materials and workmanship. The warranty for the touchmonitors and components of the product are: 3 years monitor, 10 years IntelliTouch screen, 5 years AccuTouch screen, 5 years Controller. Seller makes no warranty regarding the model life of components.
26 SELLER’S LIABILITY UNDER THE WARRANTY SHALL BE LIMITED TO A REFUND OF THE PURCHASE PRICE OF THE PRODUCT. IN NO EVENT SHALL SELLER BE LIABLE FOR THE COST OF PROCUREMENT OR INSTALLATION OF SUBSTITUTE GOODS BY BUYER OR FOR ANY SPECIAL, CONSEQUENTIAL, INDIRECT, OR INCIDENTAL DAMAGES.