Elo Entuitive Touchmonitor User Guide For 18” LCD Touchmonitor Version 1.0 P/N 80-8025-01-A 1800L Series Models ET1825L-8SWA-1 ET1825L-7SWA-1 ET1866L-8SNA-1 ET1866L-7SNA-1 ET1886L-8SNA-1 ET1886L-7SNA-1 Elo TouchSystems, Inc. 1-800-ELOTOUCH www.elotouch.
Copyright © 2000 Elo TouchSystems Inc. All Rights Reserved. No part of this publication may be reproduced, transmitted, transcribed, stored in a retrieval system, or translated into any language or computer language, in any form or by any means, including, but not limited to, electronic, magnetic, optical, chemical, manual, or otherwise without prior written permission of Elo TouchSystems. Disclaimer The information in this document is subject to change without notice.
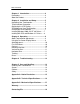
Table of Contents Chapter 1. Introduction........................................4 Precautions ................................................................4 About the Product......................................................4 Chapter 2. Installation and Setup......................5 Unpacking Your Touchmonitor.................................5 Touch Interface Connection......................................6 Optimizing the LCD Display.....................................
Chapter 1 – Introduction Congratulations on your purchase of an Elo TouchSystems Entuitive LCD touchmonitor. Your new high-resolution touchmonitor combines the reliable performance of Elo’s touch technology with the latest advances in LCD display design. This combination of features creates a natural flow of information between a user and your touchmonitor. Precautions Follow all warnings, precautions and maintenance as recommended in this user’s manual to maximize the life of your unit.
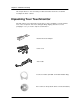
Chapter 2 – Installation and Setup This chapter discusses how to install your LCD touchmonitor and how to install Elo TouchSystems driver software. Unpacking Your Touchmonitor Carefully unpack your touchmonitor. Check that you have everything you need and that none of the components have been damaged during shipping. Save the box and packaging in case you need to ship the touchmonitor..
Chapter 2 – Installation and Setup (Continued) Touch Interface Connection Note: Your interface cables may have been pre-connected to your monitor at the factory. 1. Before connecting the cables to your touchmonitor and PC, be sure that the computer and the touchmonitor are turned off. 2. Connect the ferrite end of the video cable to the video connector on your PC. Connect the other end of the video cable to the touchmonitor.
Chapter 2 – Installation and Setup (Continued) Installing the Driver Software Elo TouchSystems provides driver software that allows your touchmonitor to work with your computer. Drivers are located on the enclosed CD-ROM for the following operating systems: Windows 2000 Windows 98 Windows 95 Windows NT 4.0 Windows 3.x MS-DOS 2.x or later Additional drivers and driver information for other operating systems (including OS/2, Macintosh and Linux) are available on the Elo TouchSystems web site at www.elotouch.
Chapter 2 – Installation and Setup (Continued) Installing the Serial Touch Driver for MS-DOS and Windows 3.1 1. Insert the Elo CD-ROM in your computer’s CD-ROM drive. 2. From DOS, type d:\EloDW to change to the correct directory on the CDROM (your CD-ROM drive may be mapped to a different drive letter). 3. Type install and press Enter to start the installation. 4. Align the touchscreen. You must have already completed Steps 1 and 2 before proceeding.
Chapter 3 – Operation About Touchmonitor Adjustments Your touchmonitor will likely require adjustment. Variations in video output and application will require you to adjust your touchmonitor to optimize the quality of the display. For best performance, your monitor should be operating in native resolution, that is 1280 x 1024 @ 60 Hz. Use the Display control panel in Windows to choose 1280 x 1024 resolution. Operating in other resolutions will degrade video performance.
Chapter 3 – Operation (Continued) User Controls (The following is an excerpt taken from pages 10 – 12 of the NEC user manual) BNC/D-SUB: Allows you to change between the BNC and D-SUB signal inputs. OSM™ (On-Screen Manager) control buttons on the front of the monitor function as follows: To access OSM menu, press any of the control buttons ( , , , ) or the PROCEED or EXIT button. To rotate OSM between Landscape and Portrait modes, press the RESET button. NOTE: OSM menu must be closed in order to rotate.
Chapter 3 – Operation (Continued) User Controls (Continued) • To deactivate the LOCK OUT mode, simultaneously press the PROCEED and button. AUTO Auto Adjust Automatically adjusts the Image Position, H. Size and Fine settings. Position Controls H. POSITION Controls Horizontal Image Position within the display area of the LCD. V. POSITION Controls Vertical Image Position within the display area of the LCD.
Chapter 4 – Troubleshooting If you are experiencing trouble with the video of your touchmonitor, refer to the following excerpt from page 17 of the original NEC users manual. If the problem persists, please contact your local dealer or our service center. Troubleshooting No picture • • • • The signal cable should be completely connected to the display card/computer. The display card should be completely seated in its slot. Power Button and computer power switch should be in the ON position.
Chapter 5 – Care and Handling of your Touchmonitor Care and Handling Of Your Touchmonitor The following tips will help you keep your Touchmonitor functioning at the optimal level: Protect your touchmonitor from extremely low or high temperatures (see Appendix C, Technical Specifications). Keep your touchmonitor dry. Do not wash it with a wet cloth or pour fluid into it. Check your touchmonitor for condensation.
Chapter 5 – Care and Handling of your Touchmonitor (Continued) Cleaning Your LCD Touchmonitor Prevent damage to your touchmonitor (and PC) by powering off the computer system and disconnecting the touchmonitor from the AC out-let before you clean it. After you finish cleaning, make sure the touch-monitor is completely dry before you reconnect the cables and power it on. Do not apply liquid or aerosol spray cleaners directly on the screen or cabinet.
Appendix A – Native Resolution The native resolution of a monitor is the resolution level at which the LCD panel is designed to perform best. For the Elo LCD touchmonitor, the native resolution is 1280 x 1024 @ 60Hz for the 18.1” inch size. In almost all cases, screen images look best when viewed at their native resolution. You can lower the resolution setting of a monitor but not increase it.
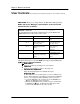
Appendix B – Technical Specifications Model Technical Specifications Display Size & Type Useable Screen Area Optimal (Native) Resolution Other Supported Resolutions Colors Viewing Angle Contrast Ratio Brightness Input Video Signal Input Power Source Scanning Frequency Horizontal Vertical Environmental Operating Temperature Storage Temperature Humidity Altitude Touchscreen Connector ET1825L-8SWA-1 ET1825L-7SWA-1 ET1866L-8SNA-1 ET1866L-7SNA-1 ET1886L-8SNA-1 ET1886L-7SNA-1 18.1” (46.
Appendix C – Mechanical Specifications ET1825LModels ET1866LModels ET1886LModels Elo LCD Touchmonitor User Guide- 17
Warranty Except as otherwise stated herein or in an order acknowledgment delivered to Buyer, Seller warrants to Buyer that the Product shall be free of defects in materials and workmanship. The warranty for the touchmonitors and components of the product are: 3 years monitor, 10 years IntelliTouch screen, 5 years Accu- Touch screen, 5 years Controller. Seller makes no warranty regarding the model life of components.
Contacting Elo Contacting Elo Elo TouchSystems, Inc. 6500 Kaiser Drive Fremont, CA 94555 USA Elo TouchSystems GmbH & Co. KG. Dr.- von Daller-Str. 35 D-85356 Freising Germany www.elotouch.