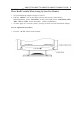
AMM170TK/AMM17TK/AMM18TK/AMM19TK/AMM19TK(HB) 1 back of the monitor WARN IN G The title "WARN IN G" is used to inform the users of possible causes that could inflict the injury, death, or property damage to the patients. C AUTIO N The title "C AUTIO N " is used to inform the users of possible causes that could inflict the patients although it might not severe enough to cause deaths.
Users Guide TABLE OF CONTENTS Quick Setup................................................................................... 3~5 Product Features ... 6 Unpacking .... 7 Symbol Explanations . 8 Regulatory Compliance . 8 EU Declaration of Conformity for Medical Applications ......... 9 Screen Position Adjustment ... 10 Cleaning lnstructions . . 11 Supported Modes ..... 12 Power Management Function 13 Power Management System .. 13 Connecting the Power Cord .. 14 DDC . 14 Installation .
AMM170TK/AMM17TK/AMM18TK/AMM19TK/AMM19TK(HB) 3 Quick Setup (IBM/IBM Compatible under Windows 95/98/ME/2000) Please Read Carefully When Setting Up Your New Monitor Monitor Screen Adjustment and Resolution Setting Procedure for IBM/IBM Compatible Computers with Windows based OS system. Before adjusting the monitor, all the necessary drivers should be installed to your System and resolution has to be set to manufacturers recommended preset of 1280 x 1024 @ 60Hz, 70Hz, 72Hz or 75 Hz.
Users Guide Quick Setup (IBM/IBM Compatible under Windows NT 4.0) Please Read Carefully When Setting Up Your New Monitor Monitor Screen Adjustment and Resolution Setting Procedure for IBM/IBM Compatible Computers with Windows based OS system. Before adjusting the monitor, all the necessary drivers should be installed to your System and resolution has to be set to manufactures recommended preset of 1280 x 1024 @ 60Hz, 70Hz, 72Hz or 75Hz.
AMM170TK/AMM17TK/AMM18TK/AMM19TK/AMM19TK(HB) 5 Quick Setup (Macintosh) Please Read Carefully When Setting Up Your New Monitor 1. Set your Macintosh Adapter on pages 23 and 24. 2. Push the APPLE icon on the upper left corn and execute Control Panel-> Monitors&Sound. Select Thousands for the Color Depth, Select 1280X1024, 60Hz, 70Hz, 72Hz or 75Hz for the Resolution. (60Hz recommended) * On some Apple G3 or newer systems, you may not need to use the Macintosh Adapter. Screen Adjustment Procedure 1.
Users Guide INTRODUCTION Congratulations on your purchasing of the AMM17TK/AMM18TK/AMM19TK high performance TFT LCD monitor. FEATURES The FPD is a TFT-LCD monitor that is intelligent, microprocessor-based and ergonomically designed display, compatible with most analog RGB (Red, Green, Blue) display standards, including PS/V, PS/2, Apple Macintosh Centris, Quadra, and Macintosh II family signals.
AMM170TK/AMM17TK/AMM18TK/AMM19TK/AMM19TK(HB) 7 UNPACKING Please check the following items are present when you unpack the box, and save the packing materials in case you will need to ship or transport the monitor in future.
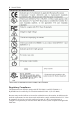
Users Guide Symbol Explanations This monitor is intended for use in Health Care Facilities. Regulatory Compliance This monitor has been tested to comply with IEC/EN 60601-1 and IEC/EN60601-1-2 By NEMKO and is certified by UL to medical standard UL2601-1(UL/cUL Mark).
AMM170TK/AMM17TK/AMM18TK/AMM19TK/AMM19TK(HB) 9 EU Declaration of Conformity for Medical Applications A Declaration of Conformity has been filed for this product. A sample of this document may be found in the addendum which accompanied this manual. For a copy of the Declaration of Conformity document, please contact ADVAN Intl Corp. and request for AMM17TK, AGMM18TK, AMM19TK and AMM19TK/HB DOC. Installation Before you unpack your monitor, prepare a suitable workspace.
Users Guide Equipment is not suitable for use in the presence of a flammable anesthetic mixture with air or with oxygen or nitrous oxide. No user serviceable parts inside, ask qualified personnel when accessing inside For disposal of waste product, you must follow the requirement of local code. Electrical input rating : 12V d.c. 6.
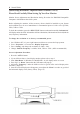
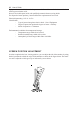
AMM170TK/AMM17TK/AMM18TK/AMM19TK/AMM19TK(HB) 11 SAFETY PRECAUTION • • • • • • Avoid placing the monitor, or any other heavy object, on the power cord to prevent fire or electrical shock from damage to the power cord. Do not expose the monitor to rain, excessive moisture, or dust to avoid fire or shock hazard. Do not cover the slots or openings of the monitor for proper heat dissipation. Always put the monitor in a place where there is adequate ventilation.
Users Guide PRESET MODES To reduce the need for adjustment for different modes, the monitor has default setting modes that are most commonly used as given in the table below. If any of these display modes are detected, the monitor automatically adjusts the picture size and centering. When none of the mode is matched, the user can store their preferred modes in the user modes. The monitor is capable of storing up to 7 user modes.
AMM170TK/AMM17TK/AMM18TK/AMM19TK/AMM19TK(HB) 13 POWER MANAGEMENT FUNCTION The monitor is equipped with the power management function which automatically reduce the power consumption when not in use in three power level modes. • Stand-by Mode The monitor goes into stand-by mode when the horizontal sync signal is off for about 10 seconds. In this mode, the screen goes off and the power LED blinks for 3 seconds On and 1 second Off. The screen is displayed after the horizontal sync signal is restored.
Users Guide DDC To make your installation easier, the monitor is able to Plug and Play with your system if your system also supports DDC protocol. The DDC (Display Data Channel) is a communication protocol through which the monitor automatically informs the host system about its capabilities, for example, supported resolutions and corresponding timing. The monitor supports DDC1 and DDC2B standard.
AMM170TK/AMM17TK/AMM18TK/AMM19TK/AMM19TK(HB) 15 Display for Video and Image Playback Explains how to use our AMM17TK, AMM18TK, AMM19TK and AMM19TK/HB to play VCR, view television, video game, or digital camera images. It also show you how to connect video and other types of video equipment to the display. Connecting with Video Equipment You can connect many types of video equipment to the display. The equipment must have either Super video (S-video) ports or Composite video ports.
Users Guide USER CONTROLS Front Panel Controls 1. Power LED: Lights up to indicate the power is turned ON. 2. Power Switch: To turn ON or OFF the power. 3. +: To increase the value of the parameter in the OSD you have selected for adjustment. To increase the brightness directly when OSD menu is not activated. 4. -: To decrease the value of the parameter in the OSD you have selected for adjustment. To increase the brightness directly when OSD menu is not activated. 5.
AMM170TK/AMM17TK/AMM18TK/AMM19TK/AMM19TK(HB) 17 OSD Scren Basic Section (VGA) For OSD display, push Menu.
Users Guide OSD Scren Basic Section (VGA) For OSD display, push Menu.
AMM170TK/AMM17TK/AMM18TK/AMM19TK/AMM19TK(HB) 19 OSD Scren Basic Section (DVI) For OSD display, push Menu. For selecting Icon, push Up or Down Push Up or Down button to select between Brightness or Contrast then push Select Use Left or Right button to adjust Push Up or Down button to select between OSD Hor. Pos., OSD Ver. Pos.
Users Guide OSD Scren Basic Section (DVI) For OSD display, push Menu.
AMM170TK/AMM17TK/AMM18TK/AMM19TK/AMM19TK(HB) 21 OSD Scren Basic Section (C-Video or S-Video) For OSD display, push Menu.
Users Guide OSD Scren Basic Section (C-Video or S-Video) For OSD display, push Menu.
AMM170TK/AMM17TK/AMM18TK/AMM19TK/AMM19TK(HB) 23 OSD Function Description (Under Analog Display) Ite m F u n c t io n D e s c r ip t io n Br ightne s s To inc r e a s e o r d e c r e a s e the b r ightne s s . C o ntr a s t To inc r e a s e o r d e c r e a s e the c o ntr a s t. F r e q ue nc y To a d jus t fr e q ue nc y ( d o t c lo c k ) . P ha s e To a d jus t p ha s e ( c lo c k - p ha s e ) . Ho r izo nta l To mo ve the s c r e e n le ft o r r ight.
Users Guide OSD Function Description (Under Digital Display) Ite m Function D e s cription Brightness To increase or decrease the brightness. C ontrast To increase or decrease the contrast. Horizontal To move the screen left or right. Vertical To move the screen upward or d ownward. O S D Hor P os To move O S D menu left or right. O S D Ver P os To move O S D menu upward o r downward. O S D Background C hoose between O paq ue or Translucent.
AMM170TK/AMM17TK/AMM18TK/AMM19TK/AMM19TK(HB) 25 OSD Function Description (Under C-Video or S-Video Display) Ite m Func tio n D e s c riptio n H ue To inc re a se o r d e c re a se the hue le ve l. S a tura tio n To inc re a se o r d e c re a se the sa tura tio n le ve l. B rightne ss To inc re a se o r d e c re a se the b rightne ss. C o ntra st To inc re a se o r d e c re a se the c o ntra st. H o rizo nta l To mo ve the sc re e n le ft o r right.
Users Guide TROUBLESHOOTING Before sending your LCD monitor for servicing, please check the troubleshooting list below to see if you can self-diagnose the problem. P r oble ms C ur r e nt St a t us R e me dy LED ON • Using OSD, adjust brightness and contrast to maximum or reset to their default settings. LED OFF • Check the pow er sw itch. • Check if AC pow er cord is properly connected to the AC adapter. • Check if video signal cable is properly connected at the back of monitor.
AMM170TK/AMM17TK/AMM18TK/AMM19TK/AMM19TK(HB) 27 SPECIFICATION AM M 170TK LC D Panel 43.2cm/17- inch C olor TFT Panel Type Active Matrix Resolution 1280 dots x 1024 lines (Recommended) Pixel Pitch 0.264mm Display C olor 16 million colors Response Time 25ms C olor Tone Up to 256 tone C olor Filter RGB vertical stripe type Face Finishing Anti- Glare Hard C oated Viewing Angle 170°H 170°V (C R> =10) Video 0.7Vp- p analog RGB & TMDS (PanelLink ) Digital 165 MHz x 1 Input S igna l S ync 2.
Users Guide SPECIFICATION AM M 17TK LC D Panel 44.2cm/17.4- inch C olor TFT Panel Type Active Matrix Resolution 1280 dots x 1024 lines (Recommended) Pixel Pitch 0.27mm Display C olor 16 million colors Response Time 25ms C olor Tone Up to 256 tone C olor Filter RGB vertical stripe type Face Finishing Anti- Glare Hard C oated Viewing Angle 160°H 160°V (C R> =10) Video 0.7Vp- p analog RGB & TMDS (PanelLink ) Digital 165 MHz x 1 Input S igna l S ync 2.5~ 5.
AMM170TK/AMM17TK/AMM18TK/AMM19TK/AMM19TK(HB) 29 SPECIFICATION AM M 18TK LC D Panel 46cm/18.1- inch C olor TFT Pane Type Active Matrix Resolution 1280 dots x 1024 lines (Recommended) Pixel Pitch 0.28mm Display C olor 16 million colors Response Time 40ms C olor Tone Up to 256 tone C olor Filter RGB vertical stripe type Face Finishing Anti- Glare Hard C oated Viewing Angle 160°H 160°V (C R> =10) Video 0.7Vp- p analog RGB & TMDS (PanelLink ) Digital 165 MHz x 1 Input S igna l S ync 2.
Users Guide SPECIFICATION AM M 19TK LC D Panel 48cm/19- inch C olor TFT Pane Type Active Matrix Resolution 1280 dots x 1024 lines (Recommended) Pixel Pitch 0.294mm Display C olor 16 million colors Response Time 25ms C olor Tone Up to 256 tone C olor Filter RGB vertical stripe type Face Finishing Anti- Glare Hard C oated Viewing Angle 170°H 170°V (C R> =10) Video 0.7Vp- p analog RGB & TMDS (PanelLink ) Digital 165 MHz x 1 Input S igna l S ync 2.5~ 5.
AMM170TK/AMM17TK/AMM18TK/AMM19TK/AMM19TK(HB) 31 SPECIFICATION AM M 19TK/HB LC D Panel 48cm/19- inch C olor TFT Pane Type Active Matrix Resolution 1280 dots x 1024 lines (Recommended) Pixel Pitch 0.294mm Display C olor 16 million colors Response Time 25ms C olor Tone Up to 256 tone C olor Filter RGB vertical stripe type Face Finishing Anti- Glare Hard C oated Viewing Angle 170°H 170°V (C R> =10) Video 0.7Vp- p analog RGB & TMDS (PanelLink ) Digital 165 MHz x 1 Input S igna l S ync 2.
Users Guide Connectors DC Input Connector Jack Power Input The SCD-014-1-A (SHIUA CHYUAN) or equivalent. Pin Description 1 +12V DC 2 GND Video Input 15 pin D-subminiature connector. The vedor P/N is DHSB-15 FRF7(LEOCO) or equivalent.
AMM170TK/AMM17TK/AMM18TK/AMM19TK/AMM19TK(HB) 33 Description of Warranty Advan warrants that the goods the goods sold hereunder will be free of defects in materials and workmanship, and such goods will substantially conform to the specifications furnished by Advan, and to any drawings or specifications furnished to Advan by the Buyer if approved by Advan. This warranty shall be effective only if Advan receives notice of such defect or nonconformance during the period of the warranty.
Users Guide ADVAN DISCLAIMS ALL OTHER WARRANTIES EXPRESS OR IMPLIED INCLUDING, WITHOUT LIMITATION, ANY IMPLIED WARRANTIES OF MERCHANTABILITY OR FITNESS FOR PARTICULAR PURPOSE, EXCEPT TO THE EXTENT THAT ANY WARRANTIES IMPLIED BY LAW CANNOT BE VALIDLY WAIVED. No oral or written information or advice given by ADVAN, its authorized service center, distributors, dealers, agents or employees, shall create another warranty or modify this warranty.
AMM170TK/AMM17TK/AMM18TK/AMM19TK/AMM19TK(HB) 35 Tounchscreen User's Manual (AMM17TK-TE/AMM18TK-TE/ AMM19TE or AMM17TK-TEW/AMM18TK-TEW/AMM19TK-TEW) Quick Start 1.Connect Power Code and VGA Cable of LCD Monitor. 2.Connect Touchscreen DB9 male RS-232 cable. 3.Turn the LCD display Power ON. 4.Adjust the tilt of LCD Monitor. 5.Adjust the Picture of LCD Monitor. 6.Install driver software of Touchscreen (See "Driver software" for details). 7.
Users Guide Touchmonitor installation Cable Connection 1. Connect and test LCD as a video display only. 2. Plug the DB9 male into the DB9 female connector labled "TOUCHSCREEN" on the back of the LCD Monitor. Driver software ELO provide driver programs for the DOS, Windows 3.1, Windows 95/98, Windows NT, Windows 2000, Windows XP, OS/2, and Macintosh systems. Additional drivers may be available for other system. Contact ELO for details. Installing Driver software for Windows / Windows NT 1.
AMM170TK/AMM17TK/AMM18TK/AMM19TK/AMM19TK(HB) 37