Elo Entuitive触摸显示器 用户指南 18” LCD触摸显示器 版本 1.0 P/N 80-8025-01-A 1800L系列 ET1825L-8SWA-1 ET1825L-7SWA-1 ET1866L-8SNA-1 ET1866L-7SNA-1 ET1886L-8SNA-1 ET1886L-7SNA-1 Elo触摸系统有限公司 1-800-ELOTOUCH www.elotouch.
版权®2000 Elo触摸系统有限公司 版权所有 未经Elo触摸系统公司书面认可 任何人不得以任何方式或方法如电子方法 磁方法 光学方法 化学方法 手册形 式或其他方式方法对本出版物的任何部分进行复制 传播 转录 存于检索系统内或译成其他语言或计算机语言 否认的声明 本文所含信息可能会在没有通知的情况下发生变更 Elo触摸系统公司对此处所含内容不作任何陈述或保证 对用于 特殊目的商销性或适合性尤其不存在任何暗示引申保证 Elo触摸系统公司对本出版物保留修改权 随时会对此处出 版物的内容作出修改 Elo触摸系统公司并无义务将这些修改或变更通知任何人 商标声明 IntelliTouch SecureTouch AccuTouch Entuitive和MonitorMouse为Elo触摸系统有限公司的商标 此处提及的其他产品名称为相应公司的商标或注册商标 除本公司的商标外 Elo触摸系统公司并无意于其他公司 的商标 Elo LCD触摸显示器用户指南 - 2
目 录 第 一 章 介 绍 ........................................4 提示 ....................................... ........................4 关于本产品 .....................................................4 第 二 章 安 装 及 设 置 . . . . . . . . . . . . . . . . . . . . . . 5 触 摸 显 示 器 拆 箱 . . . . . . . . . . . . . . . . . . . . . . . . . . . . . . . . . 5 触摸接口连接 . . . . . . . . . . . . . . . . . . . . . . . . . . . . . . . . . . . . . . 6 优化 LCD显示 . . . . . . . . . . . . . . . . . . . . . . . . . . . . . . . . . . . . .
第一章 - 介绍 祝贺您购买了一台Elo触摸系统公司生产的Entuitive LCD触摸显示器 这台高分辨率的触摸显示器 结合了Elo触摸技术的可靠运行性与LCD显示器最先进的设计 这一完美组合使用户与触摸显示器 实现自然的信息交互 提示 谨遵本用户手册中的所有警告 提示和保养要求 以便最大程度的延长机器寿命 参见第五章 触摸显 示器保养及处理 相关触摸显示器安全信息 关于本产品 本LCD触摸显示器是一台18.1”模拟TFT/有效矩阵LCD彩色显示器 具有以下特征 双路输入(BNC/D-Sub) 18.1” 屏幕尺寸 无限色彩 1280 x 1024 分辨率 XGA/ SVGA/ VGA/ VESA/ Mac/ NEC PC-98 兼容 24~80kHz 水平扫描 56~76z 高刷新率 自动调整功能 高质全屏比例重调 VESA DPMS节能 VESA平板显示器物理安装接口(100mm) 技术规范完全内容参见附录B. 机械规范完全内容参见附录C.
第二章 - 安装及设置 本章论述了LCD触摸显示器和Elo触摸系统驱动程序的安装方法 触摸显示器拆箱 触摸显示器拆箱务必小心谨慎 检查所有组件是否齐备 是否有组件在运输过程中损坏 妥善保 存原包装箱壳 以备将来搬运触摸显示器之用 外置AC电源适配器 电源线 视频电缆 触摸屏电缆 (仅限ET1866L & ET1886L型号) Elo触摸工具CD (含驱动程序及文件) Elo LCD触摸显示器用户指南 - 5
第二章 - 安装和设置(接上页 ) 触摸接口连接 备注: 接口电缆一般工厂已预接 1. 在连接触摸显示器及计算机电缆前 务必确保触摸显示器已关闭 2. 将视频电缆的铁氧体端与计算机相连 将视频电缆的另一端口与触摸显示器相连 妥善固定电缆 拧紧接口上的螺丝 3. 将串行电缆 RS-232 的插口端与计算机背后的串口相连 将电缆的插头端与显示 器的触摸屏接口相连 4. 打开计算机然后打开触摸显示器 在一简短的停顿后 将出现画面 5.
第二章 – 安装及设置(接上页 ) 安装驱动程序 Elo触摸 系统公司提供驱动程序使本触摸显示器与计算机兼容 驱动程序存在随附CD-ROM上 含 以下操作系统的驱动程序 Windows 2000 Windows 98 Windows 95 Windows NT 4.0 Windows 3.x MS-DOS 2.x 或以上 其他操作系统 包括OS/2, Macintosh和Linux www.elotouch.com获得 的驱动程序和相关信息亦可在Elo触摸系统网站 本Elo触摸显示器为即插即用适配件 本触摸显示器的视频功能相关信息在启动Windows便被发送 至视频显示适配器中 Windows监测到触摸显示器后 根据屏幕提示安装普通即插即用显示器 h 安装Windows 2000 95/98及 NT 4.0串行触摸驱动程序 注意: 在Windows2000及NT4.0操作平台上安装驱动程序 用户必须拥有管理员登录权 1. 将Elo CD-ROM插入计算机光驱中. 2.
第二章 – 安装及设置 (接上页 ) 安装MS-DOS及 Windows 3.1串行触摸驱动程序 1. 2. 将Elo CD-ROM插入计算机光驱. 在DOS下输入d:\EloDW进入CD-ROM上的相关目录 被映射不同的驱动盘符 3. 输入 install 4. 调整触摸屏 不同光驱可能会 安装 然后按回车开始安装 在继续安装前必须完成第一和第二步骤 参见Elo提供的DOS及Windows驱动指南第二章 查阅相关附加安装信息 1. 在DOS提示符下在驱动安装文件所在目录中输入INSTALL 安装 命令 2. INSTALL 安装 命令会要求安装者选择所需安装的软件 接着 从所显示的 清单中选择 d:\EloDW 3. INSTALL 安装 命令还会要求安装者指定安装过程中所使用的路径 或可使 用默认路径 必要时INSTALL 安装 命令创建目录 如果目录已存在的话 会 给出警告提示 4.
第三章 – 操作 关于触摸显示器调整 触摸显示器通常要求进行调整 当视频输出和应用发生变更时 就需要对触摸显示器进行调整 优化 显示质量 为达到最佳效果 显示器应按其规定分辨率1280*1024 @ 60 Hz.
第三章 – 操作 (接上页 ) 用户控制 (以下内容为NEC用户手册 10-12页内容摘录) BNC/D-SUB: 可进行BNC与D-SUB信号输入方式切换.
第三章 – 操作(接上页 ) 用户控制(接上页) 欲退出锁定模式 同时按 • AUTO 继续 和上箭头 自动调整 自动调整图像位置 横向大小和微调 位置控制 水平位置 在LCD显示区内控制图像水平位置 V. POSITION 在LCD显示区内控制图像垂直位置 AUTO 自动 在LCD显示区域内自动设置图像水平和垂直位置 . 图像调整控制 横向尺寸 通过增大或减小本设置选项来调整横向大小 微调 通过增大或减小本设置选项来改善焦距 清晰度和图像稳定性 自动调整横向大小设置 AccuColor 控制系统 五色预设选择所需色彩设置 每种颜色设置均为工厂设置 R,G,B: 根据颜色选择 分别增强或降低红 绿或兰色 屏幕色彩将发生变化 而且其变化 降低或增强 程度通过小横道的多 少表现出来 工具 OSM H POS. OSM V POS.
第四章 –故障发现及修理 如果您碰到触摸显示器视频故障 请参见以下除第17页外的NEC用户手册原文 如果问题仍然存在 请与当地经销商或我们的服务中心联系 故障发现及修理 无图像 • • • • 信号电缆应与显卡/计算机完全接好 显卡应完全位于插槽内 电源按钮及计算机电源开关应处于打开位置 确保显卡选择了支持模式或支持系统 请参考显卡或系统手册改变图像模式 • 检查显示器和显卡看是否兼容并采用建议设置 . • • 检查信号电缆接头是否有弯曲或断针.
第五章 – 触摸显示器保养及维护 触摸显示器保养及维护 遵守下列提示可令触摸控制器保持最佳性能 谨防过高温或过低温 参见附录C:技术规范 保持干燥 切勿用湿布清洗或倾倒液体 检查触摸显示器是否发生冷凝现象 直至冷凝蒸发 一旦发生 关闭触摸显示器电源 切勿碰撞. 谨防灰 砂 尘. 谨防潮湿.
第五章 – 触摸显示器保养及维护 接上页 LCD触摸显示器清洁 在对触摸显示器进行清洁前先关闭计算机系统并断开电源以便保护触摸显示器 和计算机 清洁完成后 在重新连接电缆和电源前应确保触摸屏完全干透 不要直接用液体或气雾剂直 接喷射触摸屏或机箱 切勿使用研磨纸 碱性清洁剂 洗涤粉或溶剂 如酒精或汽油 来清 洁触摸显示器 避免水进入触摸显示器内部 如果水真的进了触摸显示器 在再次通电前请 专业服务人员检查 屏幕 用不起毛的洁净软布揩拭触摸屏清除灰尘 用软布沾氨基玻璃清洁剂擦去手指印和 污迹 机箱 用微湿软布沾温和清洁剂对机箱进行清洁 用洁净水漂洗抹布 拧干后揩拭机箱清除余留清 洁剂 安全 本手册包含了设置和维修触摸显示器相关的重要信息 在安装和对新触摸显示器通电前 应 通篇阅读本手册 尤其是第二章 安装 和第三章 操作 内容 为减少触电危险 请遵守所有安全警告 切勿打开触摸显示器箱盖 进行产品清洁前先断电 .
附录A – 最佳/规定分辨率 显示器的规定分辨率是指LCD显示屏设计的最佳分辨率 Elo LCD18.
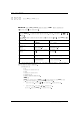
附录B – 技术规范 ET1825L-8SWA-1 ET1825L-7SWA-1 显示尺寸及类型 有效显示区 最佳 规定 分辨率 其他支持分辨率 色彩 视角 对比度 亮度 输入视频信号 输入电源 水平 垂直 ET1866L-8SNA-1 ET1866L-7SNA-1 ET1886L-8SNA-1 ET1886L-7SNA-1 18.1” (46.3 cm) 对角有效矩阵彩色 TFT LCD 14.4” (359 mm) x 11.3” (287mm) 1280 x 1024 @ 60Hz 720 x 400*: VGA 文本 640 x 480 @ 60Hz-76Hz 800 x 600* @ 56Hz- 76Hz 832 x 624* @ 75Hz 1024 x 768* @ 60Hz-76Hz 1152 x 900* @ 66Hz (SUN) 1280 x 960 @ 60Hz-76Hz 无限 (取决于显卡) + 85 ° 或 170° 150: 1 AccuTouch 150 cd/m2: Intellitouch 185 cd/m2 模拟 0.7 Vp-p/75 Ohms 独立同步.
附录C- 机械规范 ET1825L型号 ET1866L型号 ET1886L型号 Elo LCD 触摸显示器用户指南 - 17
保证 除非本文或发送给买方的订购确认书中另有规定外 卖方应向买方保证所售产品无 材质和工艺缺陷 触摸显示器和组件的保证期为 触摸计算机 3年 IntelliTouch 触摸屏 10年 触摸控制器 5年 卖方对组件的模型寿命不作任何保证 卖方的供货商有可能随时或时不时的对作为 产品或组件出售的组件进行修改 买方在发现任何符合以上保证要求的产品有缺陷时应立即书面通知卖方 从发现日期起 不得超过30天 通知上应合理详细描述此类缺陷症状 同时 在可能的情况下应给卖 方提供机会检查已安装好的产品 通知应在保证期内送交至卖方 除非卖方另外直接书 面指示外 在提交通知30天内 买方必须将其认为有缺陷的产品用原箱或同等功效包 装并自费且自担风险运送至卖方 卖方在收到买方认定为缺陷的产品并确认其不能满足上述质量保证后 应根据其意愿 在适当的时间内 或者 I 修补产品 或 II 调换产品 此类整改 修补或调换费 用及返程运输及买方最小险费用应由卖方承担 买方应承担产品在运输中的丢失及损坏 风险并可对产品进行保险 如果卖方发现退回的产品并非缺陷产品的话 买方须将运输 费用补贴给卖方 产品的整改或修补可根据卖方意愿在卖方工厂进行
Elo联系方式 Elo联系方式 Elo TouchSystems, Inc. 6500 Kaiser Drive Fremont, CA 94555 USA Elo TouchSystems GmbH & Co. KG. Dr.- von Daller-Str. 35 D-85356 Freising Germany www.elotouch.
Elo Entuitive Touchmonitor User Guide For 18” LCD Touchmonitor Version 1.0 P/N 80-8025-01-A 1800L Series Models ET1825L-8SWA-1 ET1825L-7SWA-1 ET1866L-8SNA-1 ET1866L-7SNA-1 ET1886L-8SNA-1 ET1886L-7SNA-1 Elo TouchSystems, Inc. 1-800-ELOTOUCH www.elotouch.
Copyright © 2000 Elo TouchSystems Inc. All Rights Reserved. No part of this publication may be reproduced, transmitted, transcribed, stored in a retrieval system, or translated into any language or computer language, in any form or by any means, including, but not limited to, electronic, magnetic, optical, chemical, manual, or otherwise without prior written permission of Elo TouchSystems. Disclaimer The information in this document is subject to change without notice.
Table of Contents Chapter 1. Introduction........................................4 Precautions ................................................................4 About the Product......................................................4 Chapter 2. Installation and Setup......................5 Unpacking Your Touchmonitor.................................5 Touch Interface Connection......................................6 Optimizing the LCD Display.....................................
Chapter 1 – Introduction Congratulations on your purchase of an Elo TouchSystems Entuitive LCD touchmonitor. Your new high-resolution touchmonitor combines the reliable performance of Elo’s touch technology with the latest advances in LCD display design. This combination of features creates a natural flow of information between a user and your touchmonitor. Precautions Follow all warnings, precautions and maintenance as recommended in this user’s manual to maximize the life of your unit.
Chapter 2 – Installation and Setup This chapter discusses how to install your LCD touchmonitor and how to install Elo TouchSystems driver software. Unpacking Your Touchmonitor Carefully unpack your touchmonitor. Check that you have everything you need and that none of the components have been damaged during shipping. Save the box and packaging in case you need to ship the touchmonitor..
Chapter 2 – Installation and Setup (Continued) Touch Interface Connection Note: Your interface cables may have been pre-connected to your monitor at the factory. 1. Before connecting the cables to your touchmonitor and PC, be sure that the computer and the touchmonitor are turned off. 2. Connect the ferrite end of the video cable to the video connector on your PC. Connect the other end of the video cable to the touchmonitor.
Chapter 2 – Installation and Setup (Continued) Installing the Driver Software Elo TouchSystems provides driver software that allows your touchmonitor to work with your computer. Drivers are located on the enclosed CD-ROM for the following operating systems: Windows 2000 Windows 98 Windows 95 Windows NT 4.0 Windows 3.x MS-DOS 2.x or later Additional drivers and driver information for other operating systems (including OS/2, Macintosh and Linux) are available on the Elo TouchSystems web site at www.elotouch.
Chapter 2 – Installation and Setup (Continued) Installing the Serial Touch Driver for MS-DOS and Windows 3.1 1. Insert the Elo CD-ROM in your computer’s CD-ROM drive. 2. From DOS, type d:\EloDW to change to the correct directory on the CDROM (your CD-ROM drive may be mapped to a different drive letter). 3. Type install and press Enter to start the installation. 4. Align the touchscreen. You must have already completed Steps 1 and 2 before proceeding.
Chapter 3 – Operation About Touchmonitor Adjustments Your touchmonitor will likely require adjustment. Variations in video output and application will require you to adjust your touchmonitor to optimize the quality of the display. For best performance, your monitor should be operating in native resolution, that is 1280 x 1024 @ 60 Hz. Use the Display control panel in Windows to choose 1280 x 1024 resolution. Operating in other resolutions will degrade video performance.
Chapter 3 – Operation (Continued) User Controls (The following is an excerpt taken from pages 10 – 12 of the NEC user manual) BNC/D-SUB: Allows you to change between the BNC and D-SUB signal inputs. OSM™ (On-Screen Manager) control buttons on the front of the monitor function as follows: To access OSM menu, press any of the control buttons ( , , , ) or the PROCEED or EXIT button. To rotate OSM between Landscape and Portrait modes, press the RESET button. NOTE: OSM menu must be closed in order to rotate.
Chapter 3 – Operation (Continued) User Controls (Continued) • To deactivate the LOCK OUT mode, simultaneously press the PROCEED and button. AUTO Auto Adjust Automatically adjusts the Image Position, H. Size and Fine settings. Position Controls H. POSITION Controls Horizontal Image Position within the display area of the LCD. V. POSITION Controls Vertical Image Position within the display area of the LCD.
Chapter 4 – Troubleshooting If you are experiencing trouble with the video of your touchmonitor, refer to the following excerpt from page 17 of the original NEC users manual. If the problem persists, please contact your local dealer or our service center. Troubleshooting No picture • • • • The signal cable should be completely connected to the display card/computer. The display card should be completely seated in its slot. Power Button and computer power switch should be in the ON position.
Chapter 5 – Care and Handling of your Touchmonitor Care and Handling Of Your Touchmonitor The following tips will help you keep your Touchmonitor functioning at the optimal level: Protect your touchmonitor from extremely low or high temperatures (see Appendix C, Technical Specifications). Keep your touchmonitor dry. Do not wash it with a wet cloth or pour fluid into it. Check your touchmonitor for condensation.
Chapter 5 – Care and Handling of your Touchmonitor (Continued) Cleaning Your LCD Touchmonitor Prevent damage to your touchmonitor (and PC) by powering off the computer system and disconnecting the touchmonitor from the AC out-let before you clean it. After you finish cleaning, make sure the touch-monitor is completely dry before you reconnect the cables and power it on. Do not apply liquid or aerosol spray cleaners directly on the screen or cabinet.
Appendix A – Native Resolution The native resolution of a monitor is the resolution level at which the LCD panel is designed to perform best. For the Elo LCD touchmonitor, the native resolution is 1280 x 1024 @ 60Hz for the 18.1” inch size. In almost all cases, screen images look best when viewed at their native resolution. You can lower the resolution setting of a monitor but not increase it.
Appendix B – Technical Specifications Model Technical Specifications Display Size & Type Useable Screen Area Optimal (Native) Resolution Other Supported Resolutions Colors Viewing Angle Contrast Ratio Brightness Input Video Signal Input Power Source Scanning Frequency Horizontal Vertical Environmental Operating Temperature Storage Temperature Humidity Altitude Touchscreen Connector ET1825L-8SWA-1 ET1825L-7SWA-1 ET1866L-8SNA-1 ET1866L-7SNA-1 ET1886L-8SNA-1 ET1886L-7SNA-1 18.1” (46.
Appendix C – Mechanical Specifications ET1825LModels ET1866LModels ET1886LModels Elo LCD Touchmonitor User Guide- 17
Warranty Except as otherwise stated herein or in an order acknowledgment delivered to Buyer, Seller warrants to Buyer that the Product shall be free of defects in materials and workmanship. The warranty for the touchmonitors and components of the product are: 3 years monitor, 10 years IntelliTouch screen, 5 years Accu- Touch screen, 5 years Controller. Seller makes no warranty regarding the model life of components.
Contacting Elo Contacting Elo Elo TouchSystems, Inc. 6500 Kaiser Drive Fremont, CA 94555 USA Elo TouchSystems GmbH & Co. KG. Dr.- von Daller-Str. 35 D-85356 Freising Germany www.elotouch.