
User guide


14
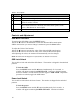
Table 1 - User controls
#
Control Function
1 MENU Menu monitor and menu exit.
2
▲
Adjusts the increasing value of the selected OSD control option.
3
▼
Adjusts the decreasing value of the selected OSD control option. (Hot-
Button for Audio Volume)
4 SELECT Monitors the OSD menus on the screen and used to select (“Clockwise”
and “Counter-clockwise” direction) the OSD control options on the
screen. (Hot-Button for Auto-Adjust)
5 POWER Turns the monitor system power on or off.
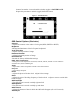
Controls and Adjustment
OSD Menu Functions
To monitor the OSD Menu, press the MENU button.
1 Press the ▲ button or the ▼ button to select the different OSD control option.
2 When the function you want to change is monitored, press the Select button.
To adjust the Value of the function:
1 Press the ▲ button to increase the value of the selected OSD control option.
2 Press the ▼ button to decrease the value of the selected OSD control option.
After adjusting the values, the monitor will automatically save the changes.
NOTE: The OSD screen will disappear if no input activities are detected for 45 seconds.
OSD Lock/Unlock
You are able to lock and unlock the OSD feature. The monitor is shipped in the unlocked
position.
To lock the OSD:
Press the MENU button and the ▲button simultaneously for 2 seconds. A
window will appear monitoring OSD UNLOCK. Continue to hold the buttons
down for another 2 seconds and the window toggles to OSD LOCK. Repeat this
procedure to unlock (toggle) the OSD feature.
Power Lock/Unlock
You are able to lock/unlock the Power feature. The monitor is shipped in the unlocked
position.
To lock the power:
Press the MENU button and the ▼ button simultaneously for 2 seconds. A
window will appear monitoring POWER UNLOCK. Continue to hold the