USER MANUAL Elo Touch Solutions PayPoint Android Rev.
Copyright © 2017 Elo Touch Solutions, Inc. All Rights Reserved. No part of this publication may be reproduced, transmitted, transcribed, stored in a retrieval system, or translated into any language or computer language, in any form or by any means, including, but not limited to, electronic, magnetic, optical, chemical, manual, or otherwise without prior written permission of Elo Touch Solutions, Inc. Disclaimer The information in this document is subject to change without notice.
Table of Contents Section 1: Introduction ....................................................................................................................................................................................................................................... 4 Section 2: Unpacking and Operation ........................................................................................................................................................................................................
Section 1: Introduction Product Description The Elo PayPoint register is an all-in-one Android based cash register that comes equipped with built-in receipt printer, magnetic stripe reader, barcode reader, cash drawer, and customer facing display. In addition to its built-in peripherals, the system has a USB port that allows for connectivity of external USB devices.
Section 2: PayPoint Unpacking and Operation Box Contents Verify that the box contains: • PayPoint Android Unit • Quick Install Guide • PayPoint Power Cable (color should match PayPoint unit) • 2 receipt paper rolls • 2 cash drawer keys User Manual – PayPoint Android Rev B UM600184 Rev A, page 5 of 26
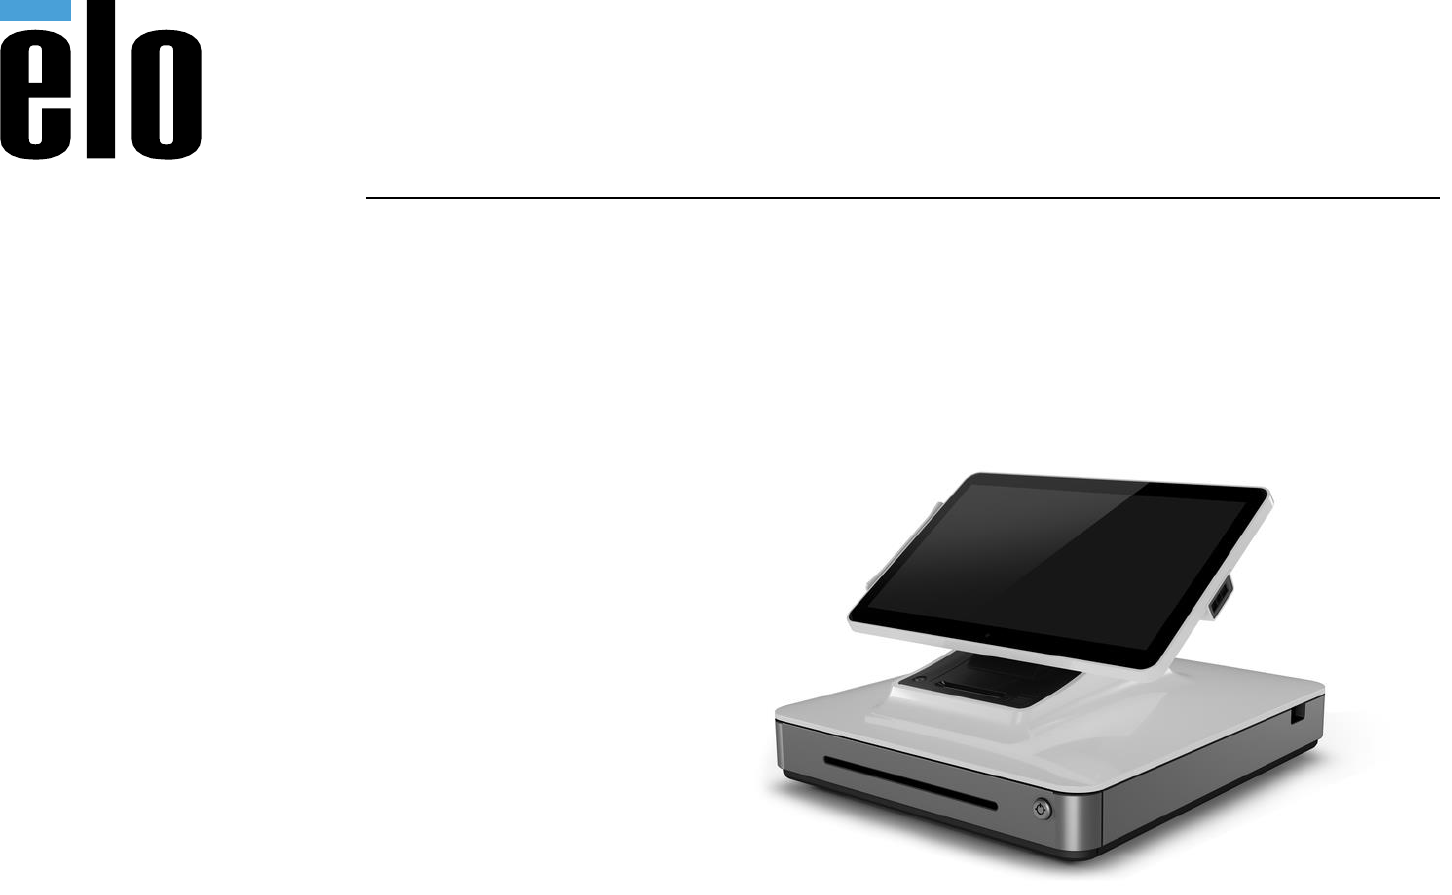
Elo PayPoint Register Layout User Manual – PayPoint Android Rev B UM600184 Rev A, page 6 of 26
6 A. Register Display Head MSR 2 Barcode Scanner B. Register Base Customer Facing 5 Display Receipt Printer 7 8 Cash Drawer Lock 10 Check/Media Slot 12 Speaker 14 Ethernet Port 16 Power Port 1 3 4 9 11 13 15 - Main Display USB 2.0 Port Cash Drawer Printer door release button Receipt Printer Cash Drawer Release Mini USB 2.
Figure 3. Elo PayPoint display head can be flipped and supports two configurations: Elo PayPoint Register cashier-facing view (top) and customer-facing view (bottom) 1. Magnetic Stripe Reader (MSR) The register has a built in encryptable magnetic stripe reader. Application provider is responsible for correctly encrypting the reader. When the register is in clerk view, the MSR will be on the left of the register display head.
5. Customer-facing display The register base is equipped with a customer-facing display. As a cashier rings up customer orders, the customer facing display will display each order. 6. USB port (USB 2.0) This USB port can be used to charge your mobile device. Note: In order to comply with PCI compliance and to prevent security breaches, this USB port will not be accessible for connecting the register with other USB devices (e.g. mouse, keyboard, storage device) 7.
The register is equipped with a built-in speaker. 14. Cash drawer manual release latch A latch located on the bottom of the register base can be used to manually open the cash drawer. 15. USB port This USB port can be used to charge your mobile device. Note: In order to comply with PCI compliance and to prevent security breaches, this USB port will not be accessible for connecting the register with other USB devices. 16.
Power Press the register power button to turn the Elo PayPoint Register on. Press and hold power button when the register is on to bring up the Shut Down option screen. In the event that the register freezes and does not respond, press and hold the power button until the register turns off. If the register does not turn off via the power button, the register will need to be powered down by unplugging the power cord from the wall.
Section 3: Technical Support and Maintenance Information and guidance on how to use and operate your Elo PayPoint Register are available in this User Manual. Solutions to Common Problems Problem Suggested Troubleshooting Check that the power cable is properly connected to both the register and the wall. Power button LED will be red when register is properly connected to the wall. OR The Elo PayPoint Register does not respond when turning on the system.
Ensure that the thermal receipt paper is installed in the printer in the proper orientation. Note: Only one side of the thermal paper is coated with the dye that changes color when heated. This is the side that will need to contact the printer thermal head. Receipt printer does not print text on the receipt paper Refer to Chapter 8 for more information on how to properly install the thermal receipt paper in the receipt printer. OR Try and restart the register.
Technical Assistance Technical Specifications Online Self-Help Technical Support visit www.elotouch.com/products for technical specifications for this device visit www.elotouch.com/go/websupport for online self-help visit www.elotouch.com/go/contactsupport for technical support See this user manual’s last page for worldwide technical support phone numbers. User Manual – PayPoint Android Rev.
Elo PayPoint Register Care and Handling The following tips will help maintain optimal performance of your Elo PayPoint Register: Disconnect the power cable before cleaning. To clean the unit (except for touch screen), use a soft cotton or microfiber cloth lightly dampened with a mild detergent. It is important that your unit remains dry. Do not get liquids on or inside the unit.
Printing width: 48mm To change the paper for the Elo PayPoint Register receipt printer: 1. Ensure that the register display head is flipped away from the receipt printer (in customer-facing view). 2. Push the receipt printer head release button to release the printer head cover. 3. Lift printer head cover. 4. Take out the roll of used printer paper, and replace with new roll of printer paper. Make sure that the paper is placed and positions in the correct orientation, as shown below.
Cleaning and Care of Printer The following tips will help maintain optimal performance of your Elo PayPoint Register receipt printer: Do not pull any paper that is ejected from the printer. Do not touch the printer roller or thermal head surface with bare hands. In the case of contact between printer roller or thermal head and hands, clean the roller and/or thermal head surface with alcohol, as specified in the latter parts of this section herein.
1. Roller It is recommendable to clean the printer roller once a month. To do so: a. Apply isopropyl alcohol onto a cloth. b. Wipe off any stain from the printer roller with the alcohol dampened cloth. c. Use a dry soft cloth to wipe the roller. d. Wait to allow the roller to dry off, and then shut the printer head cover. 2. Photo-sensor: It is recommendable to clean the printer photo-sensor once a month. To do so: a.
Section 4: Safety Waste Electrical & Electronic Equipment Directive (WEEE) This product should not be disposed of with household waste. It should be deposited at a facility that enables recovery and recycling. Elo has put in place recycling arrangements in certain parts of the world. For information on how you can access these arrangements, please visit www.elotouch.com/e-waste-recyclingprogram/. User Manual – PayPoint Android Rev.
Section 7: Regulatory Information Electrical Safety Information Compliance is required with respect to the voltage, frequency, and current requirements indicated on the manufacturer’s label. Connection to a different power source than those specified herein will likely result in improper operation, damage to the equipment or pose a fire hazard if the limitations are not followed. There are no operator serviceable parts inside this equipment.
equipment has been tested to the requirements for the CE Mark as required by EMC Directive 2014/30/ EU as indicated in European Standard EN 55032 Class A and the Low Voltage Directive 2014/35/EU as indicated in European Standard EN 60950-1. General Information to all Users: This equipment generates, uses and can radiate radio frequency energy. If not installed and used according to this manual the equipment may cause interference with radio and television communications.
Agency Certifications The following certifications and marks have been issued or declared for this peripheral: • FCC/IC • CE • UL/cUL/CB • China CCC • China SRRC - 5150-5350MHz for indoor use - 5470-5725 for indoor/outdoor use RED: - Hereby, Elo declares that the radio equipment type, PayPoint, is in compliance with Directive 2014/53/EU. - The full text of the EU declaration of conformity is available at the following internet address: www.elotouch.
User Manual – PayPoint Android Rev.
Power Specifications Electrical Ratings Input 120VAC Operating Conditions Temperature 0°C - 40°C Humidity 20% to 80% (non-condensing) Storage Conditions Temperature -20°C - 50°C Humidity 10% to 95% (non-condensing) User Manual – PayPoint Android Rev.
Section 5: Warranty Information For warranty information, go to http://support.elotouch.
Notes www.elotouch.com Visit our website for the latest • Product Information • Specifications • Upcoming Events • Press Releases • Software Drivers To find out more about our extensive range of Elo touch solutions, go to www.elotouch.com, or call the office nearest you. North America Tel +1 408 597 8000 Fax +1 408 597 8001 customerservice@elotouch.com User Manual – PayPoint Android Rev. B Europe Tel +32 (0)16 70 45 00 Fax +32 (0)16 70 45 49 elosales@elotouch.