
User manual


A7+InternetTablet–UserManualv1.5 Page27
6. Enter the information for your outgoing mail server – server name,
port # (if applicable), security type (if applicable), username, and
password. Make sure you check/uncheck the box depending on
whether or not your outgoing server requires sign-in.
7. After you enter all the required information, tap the Next button at the
bottom right. As it did with the Incoming Server, the Tablet will
automatically test a connection to the Outgoing Mail server and
Check outgoing server settings.
If you have entered any wrong information, or if the Tablet is unable to
reach the mail server, an error message will appear and you will be
asked to Edit details.
8. If the outgoing server check is good, you will be asked how often the
Tablet should check for mail, whether this account should be the
default account, and whether you want notifications when new mail
arrives. Make your selections, then tap Next at the bottom.
9. Give your mail account a name (i.e. Bob Work) and enter the sender
name as you want it listed for your outgoing mail. Tap Done at the
bottom. That’s it. You’ll be taken to your Inbox.
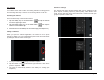
10. By tapping the Menu Smart Key on the black bezel, you can call up
the popup menu with choices for composing and navigation. Tap the
Accounts button to go from the Inbox up one level to Accounts.