
User's Manual


Low Frequency Exciters - Installation Guide _________________________________________________________________________________________
Page 4 of 8
DTA03N01_V13
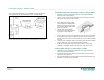
4. Insert base of the exciter into
the surface mounting ring.
Orient the mounting ring so it is
facing the ceiling or the wall.
5. Pull the 6P6C power cable (for
master slave configurations the
additional 8P8C interface cable
as well) trough the cable entry
hole of the LF exciter base.
6. Screw the base to the wall or ceiling using the 2 supplied screws. Ensure that the screw
heads are recessed inside the screw holes. If not the LF Exciter will not close properly and
damage may occur.
7. Connect the power and interface cables to the LF Exciter; set the DIP switch and adjust the
units' output power. Then, insert the LF Exciter back into its base.
8. Finally walk test the LF Exciter using either an Elpas LF Meter or an active Elpas Tag/Badge
to verify that the placement and output power of the device is correct.
Remote Supervision Management
Elpas LF exciters (from hardware Version C) transmit RF messages (as if the devices were
badges) for the purpose of supervision.
Supervision alerts include: Operational RF Status & Output Power Trouble
Configuring an Operational RF Status Alert
EIRIS can be configured to generate an Operational RF Status alert whenever a LF Exciter has
not been seen by EIRIS for a specified period of time.
1. Ensure that the LF Exciter to be supervised is correctly defined and configured.
2. Define a new Badge Model as detailed in the following steps:
Right-click on the All Badge Models branch of the Component tree.
Select Add Badge Model.
The General tab of the corresponding Badge Model Configuration (with default name)
form also appears in the EV2 setup pane.
Update the Badge Model Name so that it denotes that it is defined for a LF exciter.
Update the Idle Lost and the Motionless Lost interval values to 35 seconds,
respectively.
Press Apply; the badge model parameters are saved.
3. Define a new Badge that will represent the LF Exciter to be supervised as detailed in
the following steps:
Right-click on the All Badges branch of the Component tree. Select Add By Type;
the Add Object box appears.
Select the Badge icon by clicking on it. Then press Add; a new Badge sub-branch
(with default name) appears in the Components tree.