More Security, More Convenience Wired/Wireless IP Camera Quick Installation Guide (IE Browser) Model 1 Model 2 Model 3
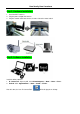
More Security, More Convenience Step 1: Hardware Installation. 1. Install the Wi-Fi antenna. 2. Plug the power adaptor into camera. 3. Plug the network cable into camera, the other side to the router/switch. Step 2: Software Installation. Install the follow software: 1. IP Camera Tool: Open the CD, click “IPCamSetup.exe”—“Next”—“Next”—“Close”. 2. ActiveX: Click “Appinstall.exe”—“Next”—“Install”—“Finish”. After this done, the icon “IP Camera Tool” will be displayed on desktop.
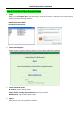
More Security, More Convenience Step 3: Real-time Video Demonstration. 1. Login: Double click “IP Camera Tool” icon on desktop, search the IP address, choose the one of your camera, double click to go to IE login interface. Default username: admin Password: no password. 2. Choose the language. English, Chinese, Spanish, Korean, German, French, Italian, Portuguese optional. 3. Choose the work mode. IE browser: choose ActiveX mode. Safari, Firefox, Google chrome browser: Server push mode.
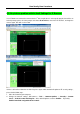
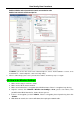
More Security, More Convenience Q1: No pictures problem with ActiveX Settings for IE Browser If use IE browser to connect the camera for the 1st time, maybe there is no image displayed, there will be an ActiveX prompt, please click the prompt and choose Run Add-on, refresh the IE interface, and login the camera again, then will see live video. If there is still no live video after run ActiveX, please try to enable the ActiveX options of IE security settings, please do the follow steps: 1.
More Security, More Convenience Enable: Initialize and script ActiveX controls not marked as safe Enable: Run ActiveX controls and plu-ins In Addition: you can also click “start” menu->“Internet Explorer”, choose “Internet attributes “ to enter, or via “Control Panel” ->“Internet Explorer”, enter to Security setting. 3. If there is still no image, please close your anti-virus software, and then try step 1 & 2 again. Q2: How to do Wireless Settings 1. 2. 3. 4. Make sure the router is a wireless router.
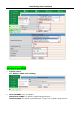
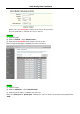
More Security, More Convenience Q3: How to use DDNS 1. Login the camera: Click “Network”>”DDNS Service Settings”. 2. Choose the DDNS, there are 2 options: Manufacturer’s DDNS: This domain is provided by manufacturer. Third Party DDNS: This domain is provided by the 3rd party, such as Dyndns, Oray, 3322 etc.
More Security, More Convenience Third Party DDNS If you use third party DDNS, please choose the server you use, such as “3322.org” or “dyndns.org” as below: You have to register an account firstly, keep the user, password, host, then fill in it.
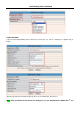
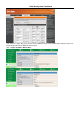
More Security, More Convenience won’t work, if use the 3rd DDNS, the manufacturer’s one won’t work. 3. Change the camera’s port. The default port of camera is “80”, please change “80” to any other one you like, such as “81”, “100”, “8091” etc. Click “OK”, the camera will reboot, wait about 30 seconds. Make sure the “Subnet Mask”, “Gateway”, “DNS Server” is the same as your router. 4. Set Port Forwarding in the router. This is the most important step.
More Security, More Convenience Fill the service port (except 80), IP address of the camera, then click Save The port and IP address should be the same as Camera. BELKIN: (1) Login the router. (2) Choose “Firewall”, select “Virtual Servers” (3) Input the port (except 80) and IP address, then click save. Note: The port and IP address should be the same as Camera. DLINK: (1) Login the router. (2) Choose “Advanced”, select “Virtual Servers” (3) Input the port, IP address, Protocol, then click save.
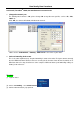
More Security, More Convenience After all these 4 steps done, then you can use the DDNS freely, check the DDNS status from the camera as below, and get the link of DDNS for internet view.
More Security, More Convenience Q4: How to know the WAN IP of the device. 1. From internet. If you want to know the WAN IP of your device, please go to http://www.whatismyip.com. You will find the current WAN IP of your device. 2. From router. You can also get the WAN IP address from your router. Q5: How to register a third party DDNS account For example, you can go to Dyndns website to register a free account. http://www.dyndns.org / http://www.dyndns.com. 1. Click Sign up FREE.
More Security, More Convenience 2. Choose Sign Up under FREE. 3. Do the follow steps: Then choose Add to Cart.
More Security, More Convenience 4. Set the username and password as below: After these settings have been done, it will send an email to your mailbox to active this account. 5. Please login your email box, and open the active link you get by email, then it will go to the activate page to get this account active. You will get all the details of your DDNS, such as hostname, WAN IP address etc.