Instruction Manual DVR-500 DVD Recorder
Important Notice Please read this before use Your Eltax DVR-500 recorder can record on the following types of media: DVD+r DVD+rw Your Eltax DVR-500 can play the following types of media: DVD videos regardsless the region coding DVD-r/-rw recorded in DVD video format and finalized DVD+r/+rw recorded in DVD video format and finalized Audio CD Audio CD-r/-rw Your Eltax DVR-500 cannot record from the following: Videotapes with copyright protection DVD’s with copyright protection Cable TV broadcasts with copyri
Table of Contents Table of Contents..................................1 Using the On-screen Display……..............26 Safety Precautions............................... 2 Setting the Parental Lock………................27 Important Safety Notices...................... 3 Customizing DVD Function Settings…..... 28 Important Information.......................... 5 Recording Options………………….............28 Playable and Recordable Discs.............6 Channel Search……………………........... 29 Disc Protection........
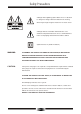
Safety Precautions A triangle with a lightning symbol draws the user's attention to “dangerous voltage” without insulation in the housing which may be high enough to entail a risk of electric shock. A triangle with an exclamation mark draws the user's attention to important instructions for use and maintenance in the accompanying manual which should be studied. Symbol for Class II (double insulation). WARNING: TO MINIMISE THE RISK OF FIRE AND ELECTRIC SHOCK,DO NOT EXPOSE DEVICE TO RAIN OR MOISTURE.
Important Safety Notices WARNING: IT IS IMPORTANT THAT YOU STUDY AND OBSERVE BOTH THE INSTRUCTIONS IN THIS MANUAL AND THE INSTRUCTIONS ON THE DEVICE. KEEP THIS MANUAL FOR FUTURE USE. This device was developed and made with a view to providing maximum safety for the user. Incorrect use of the device may cause electric shock or fire. The protection built into this device will protect the user if the procedure below is observed in connection with installation, use and repair.
Important Safety Notices Lightning Unplug the device for additional protection during thunder or when the device is not used for prolonged periods. This will prevent damage to the device from lightning and surges. Penetration of objects and liquid Never push any objects through the openings into the device, as they may touch dangerous voltage points or short circuit parts and cause fire or electric shock. Do not spill liquid on the DVD player.
Important Information Handling instructions Condensation Condensation may occur in the following cases: The DVD player's top and back panel may become warm after prolonged use. This is not due to a defect. When the DVD player is moved directly from a cold to a warm place. When the DVD player is not used, remove the disc and turn off the device.
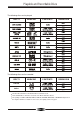
Playable and Recordable Discs The following discs can be played: DISC’S MARKING CONTENTS DIMENSION CONTENTS DIMENSION The following discs can be recorded: DISC’S MARKING DVD+rw DVD+r No other discs than those mentioned above cannot be used. Non-standard discs cannot be used, not even when marked as above. The quality of a CD-R, CD-RW, DVD-R, DVD+R, DVD-RW, DVD+RW, or DVD-RAM depends on the way the CD was recorded. In some cases, the quality can be very poor.
Disc Protection Storing the discs Disc handling Do not store the discs where they may be exposed to direct sunlight or where they are close to sources of heat. Do not store the discs where they may be exposed to moist or dust, for example in a bathroom or close to a humidifier. Store the discs standing in a cassette. If the cassettes are stacked or an object is placed on the cassettes, the discs may become uneven.
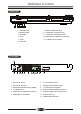
Identification of Controls FRONT PANEL 2 1 DV INPUT 7 L---- AUDIO -----R VIDEO 9 8 10 3 4 5 SOURCE S-VIDEO 11 1. STANDBY/ON 7. DIGITAL VIDICON INPUT 2. OPEN/CLOSE 8. AUDIO INPUT (FRONT LEFT) 3. RECORD 9. AUDIO INPUT (FRONT RIGHT) 4. PLAY 10. COMPOSITE VIDEO INPUT(FRONT) 5. STOP 11. S-VIDEO INPUT(FRONT) 6.
Identification of Controls REMOTE CONTROL THE INSTRUCTIONS BELOW DESCRIBE THE FUNCTIONS OF THE REMOTE CONTROL 23 1 OPEN/CLOSE STANDBY/ON 24 2 3 1. OPEN/CLOSE 2. DV 3. TV 4. NUMBERS 5. SETUP 6. DIRECTION (UP/DOWN/LEFT/RIGHT) 7. SELECT 8. MENU 9. TIMER 10.REC/OTR (RECORD/ONE-TOUCH RECORD) 11.PLAY 12.STOP 13.REVERSE 14.PREVIOUS 15.FWD 16. NEXT 17.AUDIO 18.SUBTITLE 19.REPEAT 20.SLOW 21.PROG 22.RANDOM 23.STANDBY/ON 24.SCAN 25.AV(SOURCE) 26.NAVIGATION 27.ADD/CLEAR 28.TITLE 29.DISCOPER ATION 30.EDIT 31.
The Remote Control Battery Installation 1. Push downward and outward the leaf spring to remove the battery compartment cover. 2. Insert two size AA batteries according to the "+" and "-" markings. 3. Make sure the batteries have been properly installed, then close the battery compartment cover. Notes: Do not mix different types together, or old batteries with new batteries. While the remote controller will not be used for an extended period of time, remove the batteries to prevent possible corrosion.
Connection CONNECTION FOR AUDIO OUTPUT Dolby Pro Logic Surround Sound (GOOD) Enjoy Dolby Pro Logic Surround by connecting an amplifier and speaker system (right and left front speakers, a center speaker, and one or two rear speakers). INPUT IN VIDEO VIDEO OUTPUT Pb/Cb Y DIGITAL OUTPUT S-VIDEO Pr/Cr COAXIAL OPTICAL AUDIO OUTPUT VIDEO L S-VIDEO R L C R SW SL FL OUT TV75 ANTENNA SR FR 5.
Connection CONNECTION FOR VIDEO OUTPUT GOOD BETTER INPUT IN VIDEO OUTPUT AUDIO OUTPUT L VIDEO L C SL FL VIDEO Pb/Cb Y DIGITAL OUTPUT INPUT IN VIDEO VIDEO OUTPUT Pb/Cb Y DIGITAL OUTPUT S-VIDEO Pr/Cr COAXIAL OPTICAL AUDIO OUTPUT VIDEO L S-VIDEO R L C R SW SL FL OUT TV75 ANTENNA OUT R S-VIDEO R SW SR FR 5.1CH MIXED S-VIDEO Pr/Cr COAXIAL OPTICAL TV75 ANTENNA SR 5.
Connection THE RECORDER ALLOWS YOU TO ENJOY OR RECORD PROGRAMS WITH SIGNAL FROM AV SYSTEMS SUCH AS VCR, DVD PLAYER, ETC. CONNECTION FOR AV SIGNAL (A/V REAR INPUT) YOUR RECORDER INPUT IN VIDEO VIDEO OUTPUT Pb/Cb Y DIGITAL OUTPUT S-VIDEO Pr/Cr COAXIAL OPTICAL AUDIO OUTPUT VIDEO L S-VIDEO R L C R SW SL FL OUT TV75 ANTENNA SR FR 5.
Connection CONNECTION FOR AV SIGNAL (A/V FRONT INPUT) INPUT RECORDER REAR IN VIDEO VIDEO OUTPUT Pb/Cb Y DIGITAL OUTPUT S-VIDEO Pr/Cr COAXIAL OPTICAL AUDIO OUTPUT VIDEO L S-VIDEO R L C R SW SL FL OUT TV75 ANTENNA MIXED SR FR 5.1CH Audio out Video out TV set or Audio in Video in RECORDER FRONT DV INPUT L---- AUDIO -----R VIDEO S-VIDEO DV input DIGITAL Connect your recorder with the S-Video cable, if the Signal Source has an S-Video input.
Mp3 & Progressive Scan WHAT IS MP3? MP3 refers to a new format of music files available for playback over the internet. The popularity of MP3 allows people to download music from MP3 websites onto ones home computer. WHAT IS PROGRESSIVE SCAN? Progressive Scan creates a picture with double the scan lines of traditional component video pictures and creates a sharper image.
Playing Back a Disc PLAYING A NORMAL DISC 1. Power on your recorder. OPEN/C LOSE OPEN/CLOSE 2. Insert a DVD disc. DV 3. Press direction Keys or the number buttons to select the title.
Playing Back a Disc PLAYING A DVD+RW OR DVD+R DISC OPEN CLOSE 1. Power on your recorder. OPEN/CLOSE 2. Insert a DVD+RW or DVD+R disc The index pictures will appear on the screen. 3. Press the OPEN/CLOSE button To open or close the disc tray. STANDBY/ON TV DV AV SCAN 3 1 2 4 5 6 7 8 9 ADD/CLEAR NAVIGATION 0 SETUP 4. Use direction keys(UP/DOWN/RIGHT/LEFT) to highlight the item you desired. 5. Press SELECT or PLAY. To select identified part of movie, or enjoy one(From the start).
Playing Back a Disc GENERAL FEATURES 1. Fast forward playback Press >> during normal playback. The speed will cycle with each press as: FF2, FF4,FF16,FF32 or play. Press PLAY to resume normal playback. OPEN/CLOSE DV 2. Fast reverse playback Press << during normal playback. The speed will cycle with each press as: FB2, FB4,FB16,FB32 or play. Press PLAY to resume normal playback. STANDBY/ON TV AV 2 3 4 5 6 8 9 7 ADD/CLEAR NAVIGATION 0 SETUP TITLE SELECT MENU TIMER 3.
Locating a Specific Title, Chaptor or Track DVD VIDEO DISCS ARE NORMALLY DIVIDED INTO TITLES AND SUB-DIVIDED INTO CHAPTERS. SIMILARLY, CD'S(AUDIO,HDCD, and MP3) ARE DIVIDED INTO TRACKS. YOU CAN CONVENIENTLY LOCATE ANY SPECIFIC TITLE, CHAPTER,OR TRACK WITH THIS DVD PLAYER.
Locating a Specific Title, Chaptor or Track LOCATING A TITLE If a DVD video disc contains title numbers, you can locate a specific title by directly selecting a title number. 1. Press GOTO during playback. The control bar will display on the screen. CHAPTER--TITLE:-TIME-: --:-2. To select your desired Chapter, input the number of a vailable chapter, then press SELECT to confirm it. OPEN/CLOSE DV e.g.
Playing Repeatedly THIS RECORDER ALL ALLOWS YOU TO PLAYBACK A SPECIFIC TITLE, CHAPTER, TRACK, OR SEGMENT REPEATEDLY.(TITLE REPEAT, CHAPTER/TRACK REPEAT,A-B REPEAT) HOW TO REPEAT A TITLE, CHAPTER, OR TRACK 1. Press the REPEAT button during playback. The repeat mode changes, each time you press the REPEAT Button. OPEN/CLOSE DV STANDBY/ON TV AV SCAN 3 1 2 4 5 6 7 8 9 ADD/CLEAR NAVIGATION C-RPT 0 Repeats the same chapter. SETUP TITLE SELECT MENU TIMER T-RPT Repeats the same title.
Playing in Random Order THIS RECORDER ALLOWS YOU TO PLAYBACK TITLES, CHAPTERS WITHIN A TITLE, OR TRACKS IN RANDOM ORDER. PLAYING TITLES IN RANDOM ORDER 1. During normal playback press the RANDAM button. The player will start random playback now. OPEN/CLOSE DV Random STANDBY/ON TV AV SCAN 3 1 2 4 5 6 7 8 9 ADD/CLEAR NAVIGATION 0 SETUP Normal TITLE SELECT MENU TIMER DISC OPER REC/OTR EDIT PLAY STOP PAUSE/STEP MUTE REV PREV CH+ VOL+ FWD NEXT CH- VOL- / 2.
Selecting Camera Angles, Languages & Audio settings THIS RECORDER ALLOWS YOU TO SELECT FROM SEVERAL DIFFERENT ANGLES AND LANGUAGES.
Playing in a Favorite Order THIS PLAYER ALLOWS YOU TO PROGRAM UP TO 99 ITEMS INTO MEMORY AND THEN PLAY THEM BACK IN THAT ORDER. (PROGRAM/PLAYBACK) HOW TO SET TITLES, CHAPTERS, OR TRACKS IN A FAVORITE ORDER 1. Press DISPLAY button twice to access the control bar. 2. Highlight MODE Normal by pressing RIGHT/LEFT, press SELECT. OPEN/CLOSE STANDBY/ON TV DV 3. Use UP/DOWN to select PROGRAM and press SELECT, two volumes will appear on the screen. • The left volume displays all titles on the disc.
Selecting Subtitles THIS RECORDER ALLOWS YOU TO DISPLAY THE SUBTITLES FROM THOSE INCLUDED ON THE DISC ON TO YOUR TV SCREEN. Good afternoon Bonsoir Buenas tardes HOW TO DISPLAY SUBTITLES Press the SUBTITLE button during playback to choose one of the subtitles available on the disc, or turn the subtitle off.
Using the On-Screen Display THIS PLAYER ALLOWS YOU TO VIEW STATUS AND DISC INFORMATION ON YOUR TV SCREEN. CHECKING THE OPERATIONAL STATUS With this function, you can view on your TV the following informations: - Play back status - Current title - Current chapter - Current language - Current title Time Press DISPLAY button during DVD playback.
Setting the Parental Lock YOU CAN USE THE PARENTAL LOCK FUNCTION ONLY WITH DVD EQUIPPED WITH THE PARENTAL LOCK FEATURE OPEN/CLOSE STANDBY/ON TV DV SETTING THE PARENTAL LOCK DVD equipped with the parental lock function is rated according to their content. The contents allowed by a parental lock level and the way a DVD can be controlled may vary from disc to disc.
Customizing Function Settings THIS PLAYER ALLOWS YOU TO CUSTOMIZE THE PERFORMANCE TO YOUR PERSONAL PREFERENCES. SETUP MENU GENGERAL PLAYBACK RECORD LANGUAGE CHANNEL SCAN CLOCK DISPLAYING THE SETUP MENU SCREEN The SETUP MENU screen asks you to select a setting category from General, Speaker, Audio and Preferences. The selected category will provide you the setting details using the succeeding screen.
Recording Options CHANNEL SEARCH To record TV programs, you should search TV channels first. SYSTEM SETUP - CHANNEL SCAN 1. Press SCAN to access the TV setup menu. 2. Use the UP/DOWN button to highlight SCAN and press SELECT. It will search channels automatically. During auto-searching, press STOP to cancel searching. Scan channels SCAN Modify channel information EDIT Sort channel order SORT Channel audio language Language A 3% 1 3.
Recording Options ONE-TOUCH RECORD 1. During normal recording, press RECORD, the recorder will automatically stop in 30 minutes. 2. The recording time will extend for another 30 minutes with each press. The length of recording time is determined by disc capacity and record quality. With your setting, if it will exceed the capacity of the disc, OTR will be canceled, and switched to normal record. 3. If you want to stop recording, press STOP.
Recording Options TIMER RECORD 1. First setup the clock of your system as “CLOCK SETUP” on page 30. It is recommended to setup your local date and time. OPEN/CLOSE 2. Press TIMER, the record scheduler will pop up.
Editing EDITING A TITLE OF DVD+RW 1. Insert a recorded DVD+RW on the disc tray. The Index Picture screen pops up. View current title/total title 2. Use the direction keys to highlight the title which you want to edit. View current chapter/total chapter 3. Press EDIT, the edit bar appears on the screen while playing back. Press RIGHT/LEFT to highlight one icon and enter it, press UP/DOWN to select a sub-item.
Editing CHAPTER EDITING From the control bar, select the fourth icon, press SELECT repeatedly, it will cycle as following: Chapter marker Insert marker Delete marker Delete all markers When Insert marker to the current point. is selected by pressing SELECT, a new chapter marker will be added Delete When will be deleted. marker is selected by pressing SELECT, the marker of the current chapter When Delete be deleted.
Editing TITLE ICON AND SPLIT TITLE From the control bar, select the sixth icon, press SELECT . When you want to set the current frame as the icon of the current title which miniature picture will appear in the Index Picture Screen, Press SELECT with In dex pic tu re displayed. From the control bar, select the seventh icon, press SELECT . When is selected by pressing SELECT, a new title marker will be added Split tit le to the current point. EDIT TITLE NAME 1. Insert a recorded DVD+RW on the disc tray.
Editing EDITING A DISC OF A DVD+RW 1. Insert a DVD+RW on the disc tray. DVD+R Display DVD+RW Display 2. Press DISC OPER to access the disc editing menu. 3. With each icon highlighted by pressing UP/DOWN, the corresponding description of each operation will display on the screen, such as Erase disc, Rename disc, Record a new title, Overwrite disc, etc. Play Erase disc Rename disc Make compatible Record a new title Overwrite disc Lock disc Play Rename disc Finalize disc Record a new title 4.
Specifications DVD Player TV System NTSC/PAL Compatible Discs DVD+R, DVD, CD, DVD-R, DVD-RW, MP3, DVD+RW,CD-R, CD-RW Recordable discs format DVD+RW, DVR+R Resolution Ratio Greater Than 500 lines Video S/N Ratio 65dB Frequency Response fs (96KHz/24bit) 4Hz - 44KHz:+/-2dB Audio S/N Ratio 95dB Degree of Distortion <0.01% D/A Converter 192KHz/24bit Video Out 1Vp-p S-Video Out Y: 1Vp-p(75 ) C: 0.3Vp-p(75 ); Audio Out 2.0V 5.
Trouble shooting Guide Check the following guide for a possible correction to a problem before contacting customer service. SYMPTOMS AND CORRECTION Correction Symptom No power Connect the power plug into the wall outlet securely. No picture Verify the connection from the DVD video output to the TV video input. Then Switch TV to appropriate mode(video 1) Connect the video cable into the jacks securely. Refer to your television owners manual. No sound Connect the audio cables into the jacks securely.