
Use and Care Manual


R03.002_27/04/2016
TECHNICAL FILE
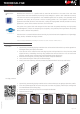
1. Spread a big amount of mortar on the surface to be tiled.
2. Then, place the prole and press it to make the mortar pass through the mechanized holes of the
xing wing. Be sure you also ll out the inside of the prole with mortar to reinforce it.
3. Put a tile on the xing wing and press to an optimal contact with the gripping material.
4, Repeat the operation placing tiles both sides of the prole until the installation is complete.
5. Finally, clean the remaining material, remove the protective lm if necessary and let dry.
* If you plan on polishing the oor, install the prole slightly below the tile.
As ooring
separator
Cleaning and maintenance
The cleaning must be done periodically with a soft cloth. If you use a neutral liquid cleaner, you must
rinse the prole with cold water and dry to remove excess moisture. If dirtiness persists, clean the
prole with a solution with clean water and detergent or neutral soap 5%, brushing with a cloth that
has no particles that could scracht the nish. Ensure the lacquered surface is totally cold (maximum
20ºC) before the cleaning.
Steel wool, abrasive cleaners, souring products as well as strong acids (hydrochloric and
perchloric),strong bases (caustic soda or ammonia) or carbonated solutions are not recommended.
Citric acid is neither recommended because disolves the protective layer of the surface of aluminium.
Waxes, petrolatum, lanolin or similar substances are not appropriate. Solvents containing haloalkanes
(hydrouoroether and chlorinated solvents) and curing accelerators containing chlorides should not be
used (use special accelerators free of chlorides)
Page 3 of 4
Novolistel® 4 Aluminium
1 2
3 4
5
1. Spread a big amount of thin-set mortar on the riser
2. Place the tile on the riser and press to an optimal adherence
3. Then, spread a big amount of thin-set mortar on the tread and align the prole on its vertex (Do
not let overhang, the leverage may remove the step and the tiles). Then press for material to pass
through the mechanized holes of the xing wing. Be also sure that you ll out the inside of the
prole with mortar to reinforce it.
4. Place the tile on the tread, align it to the prole and ensure a perfect adhesion
5. Clean the possible remaining material, remove the protective lm if necessary and let dry.
As stair nosing or
worktop nish
1 2
3
4 5
To see the video, capture this
image with your mobile phone
(QR code reader software is
necessary) or click on it.