7f3 User Guide
Contents Using Your 17f3 Monitor . . . . . . . . . . . . . . . . . . . . . . . . . . . . . . . . . . . . . . . . . . . . . . . . . . . . .1 Setting up the monitor . . . . . . . . . . . . . . . . . . . . . . . . . . . . . . . . . . . . . . . . . . . . . . . . . . Adjusting settings . . . . . . . . . . . . . . . . . . . . . . . . . . . . . . . . . . . . . . . . . . . . . . . . . . . . . . . On-screen display menu options . . . . . . . . . . . . . . . . . . . . . . . . . . . . . . . . . . . . . Video modes . .
Contents ii www.emachines.
Using Your 17f3 Monitor • Setting up the monitor • Adjusting settings • Maintaining • Troubleshooting • Specifications
www.emachines.com Setting up the monitor Read all instructions before using the monitor and save them for later use. Follow all warnings and instructions marked on the product. To set up the monitor: ■ ■ Attach the base Connect the video and power cables To attach the base: 1 Carefully set the monitor on its side. 2 Hold the base with the tab facing the back of the monitor and align the hooks on the base with the corresponding slots on the bottom of the monitor.
www.emachines.com Setting up the monitor Caution The openings in the monitor cabinet are for ventilation. Do not block or cover these openings. Do not insert anything into these openings. If you put the monitor in a bookcase or some other enclosed space, make sure to leave at least six inches (15 cm) around it for ventilation. 4 Connect the power cable that came with the monitor to the AC power connector on the back of the monitor. Only use the power cable that came with the monitor.
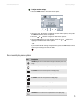
www.emachines.com To turn on the monitor: 1 Press the power button on the front of the monitor. Power button/ power indicator MENU button EXIT button Brightness/ button Contrast/ button 2 Turn on your computer. Adjusting settings Power button. Turns the monitor on and off. Power indicator. Turns blue when the monitor is operating normally, then flashes when the monitor is in energy saving mode. MENU button. Enters the on-screen display (OSD) menu or selects an OSD menu option. Brightness/ button.
www.emachines.com Adjusting settings To adjust monitor settings: 1 Press the MENU button. The OSD menu opens. 2 Press the or buttons to highlight an OSD menu option, then press the MENU button to select the option. 3 Press the or buttons to adjust an OSD menu option. 4 Press the EXIT button to save changes. Press the or buttons to highlight a different OSD menu option. - ORIf you have finished making all adjustments, press the EXIT button twice to save your settings and exit the OSD.
www.emachines.com Icon Description PARALLELOGRAM. Slants the display image to the left or right. PIN BALANCE. Curves the display image to the left or right. MORE ADVANCED SELECT. Opens a submenu that contains menu options to adjust the top and bottom corners of the display and horizontal and vertical moire. COLOR. Adjusts color balance. Select from two preset factory options (9300°K and 6500°K) or USER. USER lets you adjust the red, green, and blue colors separately. OSD R OSD ADJUSTMENT.
www.emachines.com Maintaining Maintaining To keep the monitor in optimal working order: ■ ■ ■ ■ ■ Do not block the ventilation holes. Do not expose the monitor to rain or use near water. Keep the monitor away from radiators or heat vents. Keep the monitor out of direct sunlight. Keep the monitor away from any equipment that generates a magnetic field. Use a screen saver to avoid permanent image burn-in. For more information about screen savers, see the documentation that came with your computer.
www.emachines.com Display colors are wrong ■ ■ ■ ■ Restart your computer with the monitor turned on. Make sure that the video cable is connected securely to the back of your computer. Make sure that the video cable is not damaged. Check the end of the video cable for any pins that might be bent or pushed in. Picture is fuzzy Adjust the contrast and brightness controls to improve the display image.
www.emachines.com Specifications Image cannot be adjusted full screen Some video modes used by the monitor produce images that cannot be adjusted all the way out to the bezel edge (the edge where the screen glass and monitor casing meet). This condition does not indicate that the monitor is defective. Specifications Specifications are subject to change without obligation or notification. CRT Flat 17-inch diagonal (16.0 inches viewable), anti-reflective/anti-glare, 90° deflection, 0.
www.emachines.
Safety, Regulatory, and Legal Information • Important safety information • Environmental information • Regulatory compliance statements • Notices
Important safety information www.emachines.com Important safety information Warning Always follow these instructions to help guard against personal injury and damage to your eMachines product. Your eMachines product is designed and tested to meet the latest standards for safety of information technology equipment. However, to ensure safe use of this product, it is important that the safety instructions marked on the product and in the documentation are followed.
www.emachines.com Environmental information Environmental information The product you have purchased contains extracted natural resources that have been used in the manufacturing process. This product may contain substances known to be hazardous to the environment or to human health.
Regulatory compliance statements www.emachines.com Regulatory compliance statements United States of America Federal Communications Commission (FCC) Unintentional emitter per FCC Part 15 This device has been tested and found to comply with the limits for a Class B digital device, pursuant to Part 15 of the FCC rules. These limits are designed to provide reasonable protection against harmful interference in a residential installation.
www.emachines.com Notices Notices © 2005 Gateway, Inc. All rights reserved. Gateway, Inc. 7565 Irvine Center Drive Irvine, CA 92618 USA All Rights Reserved This publication is protected by copyright and all rights are reserved. No part of it may be reproduced or transmitted by any means or in any form, without prior consent in writing from eMachines. The information in this manual has been carefully checked and is believed to be accurate. However, changes are made periodically.
Notices 16 www.emachines.
MAN MON 17F3 USR GDE R4 11/05