
Product Manual


5
Operating Instructions
3. Make sure forks are fully engaged and tipped
back before lifting or moving compressor.
4. Keep load as low as possible and observe
safe operating practices.
Lifting Safety
1. Carefully inspect all lifting equipment and make
sure it is in good condition. Rated capacity should
exceed compressor weight. Make sure lifting hook
has a functional safety latch or equivalent and is
properly attached to lifting feature.
2. Make sure lifting points are in good condition and
tighten any loose nuts or bolts before lifting.
3. Use provided lifting feature or appropriate sling. A
sling must be used when moving compressor with a
helicopter or other air-borne equipment. Be sure to
follow OSHA standards 29 CFR 1910 Subpart N.
4. Use guide ropes or equivalent to prevent twisting
or swinging of the compressor while it is in the
air and NEVER attempt to lift in high winds. Keep
compressor as low to the ground as possible.
5. Keep persons away and make sure no one is under
the compressor while it is lifted.
6. Only use lifting features provided for entire com-
pressor package. NEVER use bolts or other hooks on
invididual components to move the compressor.
7. Make sure to put compressor on a level surface that
can support the weight of the compressor and load-
ing equipment.
Do not operate unit if damaged
during shipping, handling or use.
Damage may result in bursting and cause injury or
property damage.
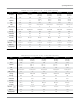
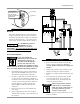
Remove shipping brackets from
each corner of mounting base
before operating compressor. Refer to figure 2.
Installation
Area
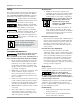
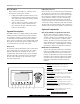
Exhaust air from this unit can be used to supple-
ment environment heat. Install unit in separate room
then create duct system as shown in figure 3.
1. Install compressor in a clean, well ventilated
and well lit area. Make sure air inlet is away from
exhaust fumes or other toxic, noxious or corro-
sive fumes or substances. Installation area must
maintain low relative humidity and a temperature
range between 35˚ - 110˚ F. This unit must be
kept under roof and away from rain, snow, etc.
In environments where fine dust
is common, such as granite or
concrete plants, it is imperative the installation of
this compressor is in a separate area with
dedicated ventilation. Failure to provide dust free
operating area will void the warranty.
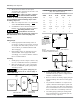
Figure 1: Use Lumber to Protect Compressor
Lumber
Figure 2: Remove Shipping Brackets
Compressor Enclosure
Mounting Base
Shipping Bracket
(Remove 4)
Figure 3: Utilize Exhaust Heat
Rotary Screw
Compressor
Cabinet
Fresh Air
Inlet
(Keep
Open)
Vent To Outside
(Open/Close)
Vent To Shop
(Open/Close)
For Cold Weather Use:
Open shop vent and close outside vent to
use exhaust heat from compressor.
For Warm Weather Operation:
Close shop vent and open outside vent to
divert exhaust heat outdoors.