
Product Manual


EMAX
Electric
Oper
ated,
Pist
on
Compr
essors
10
5.
Keep all body parts and any hand-held
tools or other conductive objects away from
exposed live parts of the electrical system.
When making repairs or adjustments, stand
on a dry, insulated surface and DO NOT con-
tact any other portion of the compressor.
6.
DO NOT leave compressor unattended with
exposed electrical components. Be sure to
tag and disconnect all power if temporary
absence is necessary.
Compressor components can
become hot during operation.
Avoid bodily contact with hot
liquids, hot surfaces and sharp
edges and corners.
Belt Adjustment
Be sure to relieve all system
pressure then lock out power and
tag compressor to prevent
unexpected movement of the unit.
Inspect belt tension after first 30 hours of operation
then every 30 days.
1. Proper belt tension
is determined by
pressing on belt
midway between
motor pulley and
flywheel. There
should be approxi-
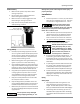
Pull ring on
safety valve
before each use.
Figure 12: Safety Valve
4. Do not splash lubricating oil on belts or pul-
leys when adjusting or replacing belts.
Changing Oil
All units are shipped with break-in oil. Change oil
within first 50 hours or 30 days of operation, which-
ever comes first.
DO NOT use automotive type oil.
Use only Airbase Industries Oil
.
Use of any
other product will cause product damage and void
the warranty.
Change oil every 90 days or if oil becomes milky.
Safety Valve
NEVER attempt to regulate or
tamper with safety valve. Valve is
sealed and certified by ASME code
and is designed to relieve system
pressure when necessary.
Check proper operation of safety valve before each
use. Refer to figure 12. If valve does not open man-
ually,
replace immediately.
Discharge pressure is
generally set at 175 PSI (12.1 bar). DO NOT attempt
mately 1/2 inch of
deflection.
1/2” Deflection
to open valve while machine is under pressure.
Tank
2.
Adjust belt tension as needed by loosening
the four motor frame nuts then adjusting
single bolt head on belt tensioner. See figure
11.
Remember to tighten motor bolts after
adjustment is made.
3.
Always replace all belts with the same brand,
at the same time. Make sure belts are uni-
matched. Do not replace belts independently.
Drain daily.
If unit is equipped with electronic auto drain:
1.
Check daily to ensure proper operation.
2.
Clean filter daily. Refer to figure 13.
Not included on all units
Manual
OPEN/CLOSE
valve
1.
Close manual valve.
2.
Remove filter cap
and filter.
3.
Clean filter.
4.
Reassemble drain.
5.
Open manual valve.
Auto drain
filter
Filter cap
Figure 13: Clean filter in automatic drain
Loosen
motor
bolts
(all
4
mounts)
Belt
tensioner
bolt
Figur
e
11:
Belt
adjustment
Fig.
10:
Proper
belt
tension