
Instruction Manual
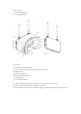


2.2 Power on & off
Press and hold the power switch/menu button for 2 seconds, the display will light up and
it will power on.
After pressing and holding the power switch/menu button for 2 seconds, the display goes
out and it will shutdown.
2.3 Video channel selection
Transporter 2 has frequency band selection button B and channel selection button C. The
two buttons can manually select the correct frequency band and channel. When the
frequency band/channel is cycled, the channel value and frequency will be displayed in
the upper left corner of the screen.
Frequency band selection button B: each short press to switch a frequency band; the
switching sequence is ABEFR; for example, the current frequency band is E, short press
the B button for the first time to switch to the E frequency band, short press the B button
for the second time to switch to the F frequency band, and the third time Short press the
B button to switch to the R band, and continue to cycle.
Channel selection button C: each short press to switch a channel, cyclically reciprocating;
Tip: Make sure the Tinyhawk III is powered on, and when going through the channel cycle,
select the correct channel and frequency band.
Note:
1.
Before adjusting the parameters, you must press and hold the CH button or FR button
for 3 seconds.
2.
Make sure that the power of Tinyhawk III is turned on. When changing channels, it will
be easier to find the correct channel through the video information of Tinyhawk III.
Note: Please make sure that Transporter 2 is on the correct channel where Tinyhawk
III is on. The currently selected Tinyhawk III frequency band and channel are
displayed in the upper left corner of the screen.