
Instruction Manual
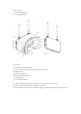


Propeller installation
Align the 3 shafts of the propeller with the 3 shafts of the motor, supporting the back of
the motor, then press the blade in by hand until it is flush with the motor shaft.
Note: If the propeller is installed incorrectly, the Tinyhawk III cannot fly normally and
cannot be controlled. Please carefully check whether the propeller is in the correct
direction; if there is no support on the back of the motor, it may cause the frame to break;
pay attention to safety when installing the propeller.
Use a small tool (such as a 1.5mm hex wrench or a small screwdriver) to press on the
metal at the bottom of the motor and Tinyhawk III. Grasp the blade of the propeller with
your fingers until the propeller pops out of the motor.
Note: It is only necessary to disassemble the propeller when replacing a new propeller;
pay attention to safety when dismantling the propeller and when using tools.