
User manual


AOAA Kit – Software User’s Guide
Page 35
Copyright 2012 © Embedded Artists AB
6 Modifying the Basic Demo
This chapter describes how to modify the AOA Basic demo (see section 3.1 ) applications in order to
add new messages being sent between the Android device and the accessory.
Changes to the demo means modifying both the Demo_AOA_Basic Android application (referred to as
Android App below) and the demo_aoa_basic project (referred to as Accessory below).
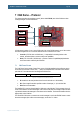
6.1 Add a New Message
Messages such as update RGB LED or update temperature is sent between the Android device and
the accessory. By default the demo shows five peripherals on the AOAA Board and therefore contains
messages for these peripherals. Each message has a unique identifier and can be associated with 2
data bytes (please note that this is something specific to this demo. The actual protocol being used is
application dependent).
6.1.1 Message Identifier in the Android App
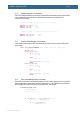
Add a new message identifier in the Android App by opening the AccessoryControl.java file and define
a new constant with a unique ID. The naming used for the default constants indicate the direction of
the message. The temperature and button values are received from the accessory while the RGB LED
values are sent to the accessory.
/*
* Message indexes for messages sent from the Accessory
*/
public static final byte MESSAGE_IN_TRIMPOT = 0;
public static final byte MESSAGE_IN_BTN_1 = 1;
public static final byte MESSAGE_IN_BTN_2 = 2;
/*
* Message indexes for messages sent to the Accessory
*/
public static final byte MESSAGE_OUT_RGB_6_LED = 10;
public static final byte MESSAGE_OUT_RGB_7_LED = 11;
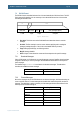
6.1.2 Receive a New Message in the Android App
A separate thread has the responsibility to read messages from the accessory. Locate the Receiver at
the end of AccessoryControl.java file. There is a switch case statement processing the messages. Add
the new message identifier to this switch case statement and process the new message.
As can be seen in the example below a Message object is created and then sent using the Handler
object. The message is being sent to the UI thread which is responsible for updating the user interface.
The only thing being sent in the example below is an integer value being constructed out of 2 data
bytes.
while(pos < numRead) {
int len = numRead - pos;
switch(buffer[pos]) {
case AccessoryControl.MESSAGE_IN_TRIMPOT:
if (len >= 3) {
Message m = Message.obtain(handler,
AccessoryControl.MESSAGE_IN_TRIMPOT);
m.arg1 = toInt(buffer[pos + 1], buffer[pos + 2]);
handler.sendMessage(m);
}
pos += 3;
break;
case AccessoryControl.MESSAGE_IN_BTN_1: