
Installation Guide

13
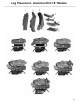
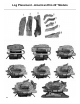
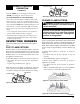
OPERATING LOG SET
FOR YOUR SAFETY
READ BEFORE
OPERATING
WARNING: If you do not follow these
instructions exactly, a fire or explosion may
result causing property damage, personal
injury or loss of life.
A. This appliance is equipped with an ignition device
which automatically lights the pilot. Do Not try to
light the pilot by hand.
B. BEFORE LIGHTING smell all around the appli
-
ance area for gas. Be sure to smell next to the floor
because some gas is heavier than air and will settle
on the floor.
WHAT TO DO IF YOU SMELL GAS
• Do not try to light any appliance.
• Do not touch any electric switch;
do not
use any phone in your building.
• Immediately call your gas supplier from a neigh -
bor’s phone. Follow the gas supplier’s instruc-
tions.
• If you cannot reach your gas supplier, call the
department.
C. Main gas valve in this appliance is not serviceable
and does not have any control knobs or switches to
operate. Do not remove heat shields covering the
valve and electronic devices; do not try to repair or
modify the valve as it may result in a fire or explo-
sion. Call a qualified service technician if you
have
any safety concerns.
D. Do not use this appliance if any part has been un
der
water. Immediately call a
qualified
service
techni
-
cian to inspect the appliance and to replace any part
of the control system and any gas contr
ol which has
been under water.
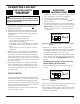
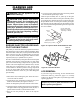
Figure 9a - Burner System Receiver Switch in OFF
Position
8. Wait five (5) minutes to clear out any gas. Then
smell for gas, including near the floor. If you smell
gas, STOP! Follow “B” in the safety information.
If you don’t smell gas, go to the next step.
Note: Before applying any power supply to the Module
board, please verify that the electrical connections
are in accordance to the Wiring Diagram
Figure 24,
page
21.
the appliance will not operate, follow the instructions
“To Turn Off Gas To Appliance” and call your service
technician or gas supplier.
Initializing the System for the First Time
1.
Set the ON/OFF switch to the ON position. (See Fig-
ure 9b)
Figure 9b - Burner System Switch in ON
Position
LEARN
HI/LOW ON/OFF
I
I
0
IPI/CPI SWITCH
The burner system can be operated in either IPI (int-
ermittent Pilot Ignition) or CPI (continues Pilot Ign-
ition) modes. In IPI mode the pilot lights each time
the burner system is operated. In CPI mode the ODS
Pilot stays on and the burner is turned ON and OFF
with the switch or remote handset.
The IPI/CPI switch is on he right side of the burner
system, near the front log.
OPERATING
INSTRUCTIONS
1.
STOP! Read the safety information, starting on page 2.
2. Turn off all electric power to the appliance.
3. Do not attempt to light the pilot by hand.
4.
Turn main shutoff valve counterclockwise to
the ON position.
5. Set Burner System Receiver switch to OFF position.
7. Locate Burner System controls on the right front (see
Figure 15, page 12. Make sure that the ON/OFF
switch for t h e burne r is in the OFF position.
(see Figure 9a)
LEARN
HI/LOW ON/OFF
I
I
0
(IPI/CPI Switch In IPI Position)
The unit will proceed to ignite the pilot, and then the main
burner and will operate in the HIGH setting.
If